Table of contents
Angular JS
References
- Angular Cheatsheet
- Online reference of topic list
- Angular 5 Interview Questions and Answers
- JavaScript Best Practices and node_modules
- How to Add Bootstrap to an Angular CLI project
Introduction
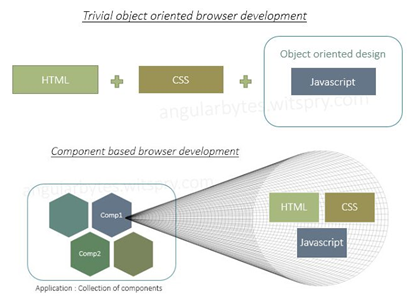
- JS Framework to create reactive SPAs.
- for building client application (primarily browser-based) using Component Based Design Pattern.
- SPA – Single Page Application – On click of link, no page change only the component is changed.
- Transcompiler - for typescript to javascript
- babeljs.io - https://babeljs.io/
- Task Managers – They are just like event managers.
- preferred options: Grunt, gull, webpack (webpack used for angular, this has babel transcompiler)
- webpack
- open-source JavaScript module bundler.
- made primarily for JavaScript, but it can transform front-end assets like HTML, CSS, and images if the corresponding loaders are included.
- webpack takes modules with dependencies and generates static assets representing those modules.
- main purpose is to bundle JavaScript files for usage in a browser.
- example - you define styles and scripts in angular.json, they are included on <head> automatically.
- angular-cli
- Handles dev to deployment, debugging to testing
- needs nodejs
- contains webpack
Angular History
- Angular v1.x (AngularJS) - based on an MVC architecture.
- Angular 2 - based on a component/services architecture.
- What happened to Angular v3? Skipped, to have consistent version numbering due to @angular/router version 4.
Angular Enhancements
- Considerable improvements in bundle size as much as 60%.
- ngc, AOT compiler for angular and typescript are much faster.
- Compatible with latest version of typescript with better type checking and enhanced IDE features.
- IDE detect missing imports, removing unused declarations, unintentionally missing “this” operator etc.
ECMA Script and TypeScript
ECMA Script
- European Computer Manufacturers Association Script
- ECMAScript is object-oriented and conceived as a core language to which can be added the objects of any specific domain or context such as the idea of a “document.” (for example, the World Wide Web Consortium’s Document Object Model).
- ECMAScript together with the Document Object Model corresponds closely to the current implementations of JavaScript and JScript. Although likely to be used mainly as a standard script language for the World Wide Web, ECMAScript could also be used for any scripted application.
TypeScript
- Superset of js
- more features than plain vanilla js, eg. types, classes, interfaces
- used by developers for writing code, but eventually compiled to js for running.
Installation
Steps
- Download node
- Environment variable – pointing to node folder
- Download Visual Studio and got to empty folder
- open console (ctrl+`)
Command Line instructions
- saves time and makes it easy for development process by making scaffolding for components, services, routing etc.
- Scaffold – component, directive, pipe, service, class, guard, interface, enum, module
ng new projectName --skip-install- –skip-install is used to avoid that npm dependencies are installed automatically.
Install angular cli
node –v
npm –v
npm install –g @angular/cli@latest
ng –-version
npm i underscore -g
npm uninstall -g @angular/cli@latest
npm cache clean
create single project workspace
ng new <project> --skip-install
cd <project>
create multi-project workspace
ng new my-workspace --skip-install --createApplication="false"
cd my-workspace
ng generate application my-first-app
adding bootstrap4
// --save ==> updates package.json with dependency
npm install jquery@latest popper.js@latest bootstrap@latest --save
// now, you need to manually add entry to angular.json styles and scripts
npm install bootstrap@latest ngx-bootstrap@latest --save
generate commands
ng g c <component-name>
ng g directive my-new-directive
ng g pipe my-new-pipe
ng g service my-new-service
ng g class my-new-class
ng g guard my-new-guard
ng g interface my-new-interface
ng g enum my-new-enum
ng g module my-module
npm start (calls ng serve automatically)
npm config set https-proxy <proxy>
npm config set http-proxy <proxy>
ng serve
ng generate
ng build – dist file
ng lint – check coding standards
ng test
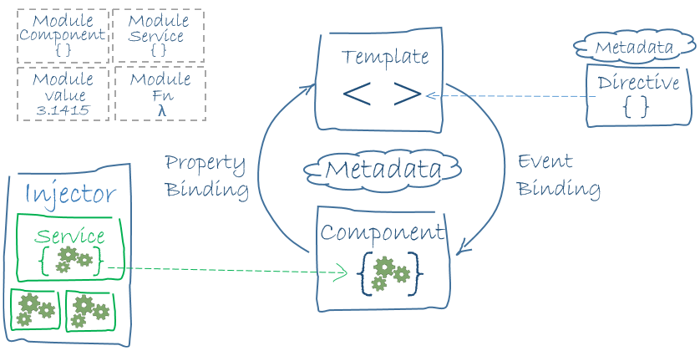
Architecture
- Component Based Design Pattern as it gives reusability of components.
- Hierarchical structure of views is a key factor in the way Angular detects and responds to changes in the DOM and app data.
- 5 Pillars of Angular (Angular Ecosystem) - Component, Services, Directives, Pipes, Routers.
Object Oriented Design v/s Component Based Design
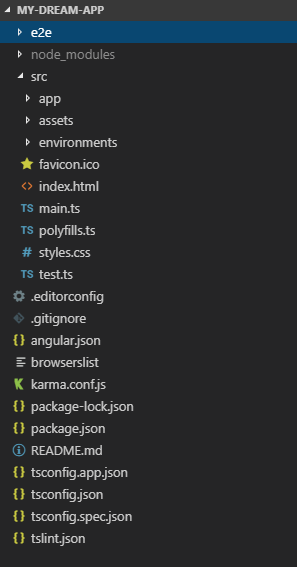
Folder Structure
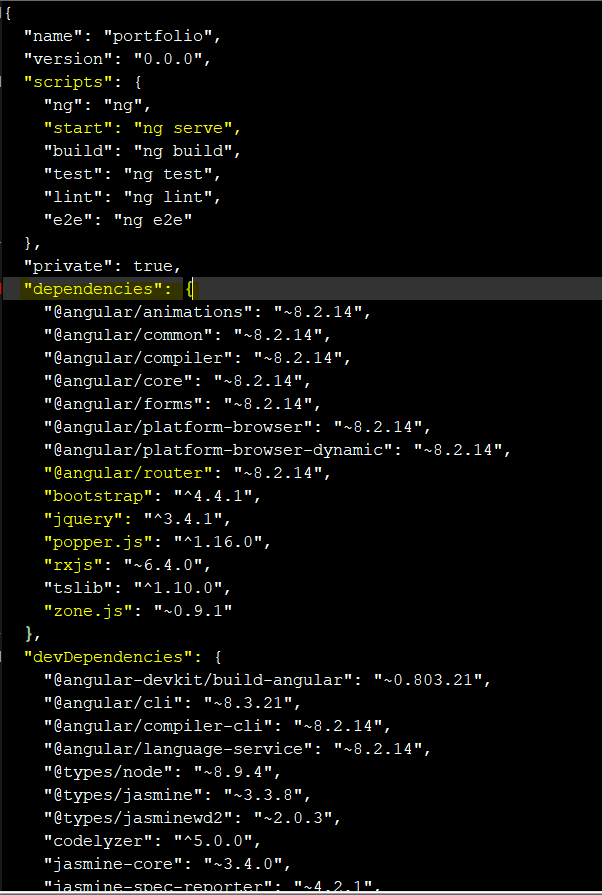
package.json
- scripts
ng serve- Angular deployment live server is angular’s inhouse server and it looks for index.html on startup.
- dependencies (npm install added here)
- devDependencies
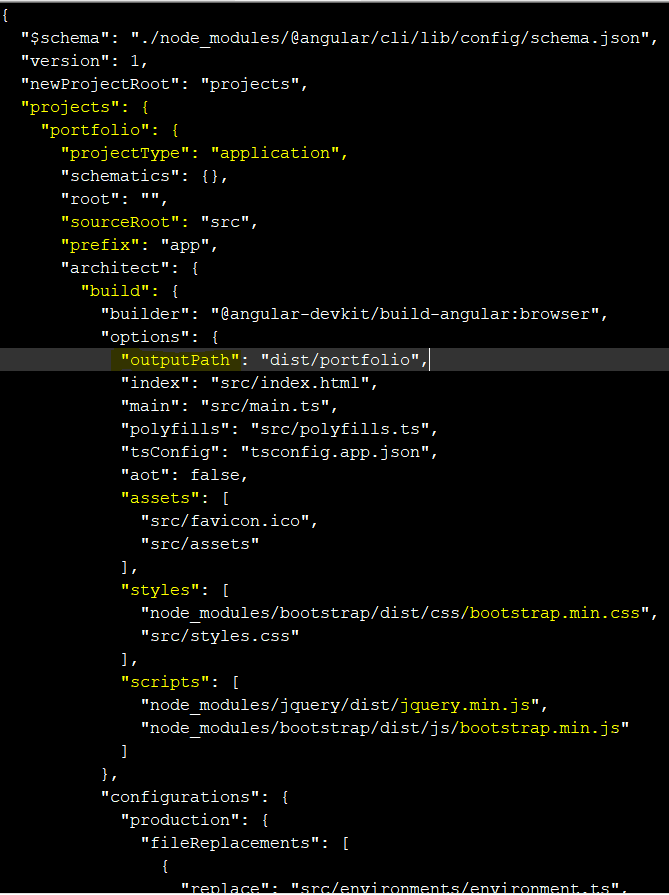
angular.json
- bootstrapping (image on below page)
- build configs of project architect
- bootstrap, jquery and popper
- aot flag
- index.html
- file that hosts your bootstrap component and its hierarchy
- app.module.ts :
- @NgModule
- declarations – AppComponent, available for use to other components of this module without any import
- imports – BrowserModule, AppRoutingModule, other modules
- exports – components exported to other modules.
- bootstrap – AppComponent, 1st component to be launched as it is available for index.html.
- providers – service, pipe, validator
export classs MyComp{ } : export tells the module that it is available and can be imported to use.
- Webpack Configuration files: The webpack.conf.js is at the root of the project. It branches to three more configuration files
- webpack.dev.js
- webpack.prod.js
- webpack.common.js.
- Use the start script to run webpack dev server using dev configuration.
"scripts": {
     "start": "webpack-dev-server --inline --progress --port 8080",
- Webpack creates three bundles, with the application bundled into app.js
entry: {
 'polyfills': './src/polyfills.ts',
 'vendor': './src/vendor.ts',
 'app': './src/main.ts'
},
How Angular App Bootstraps
- main.ts ==>
platformBrowserDynamic().bootstrapModule(AppModule) - AppModule ==>
@NgModule({... bootstrap: [AppComponent]}) - AppComponent ==> Will host all other custom components created
Core Concepts
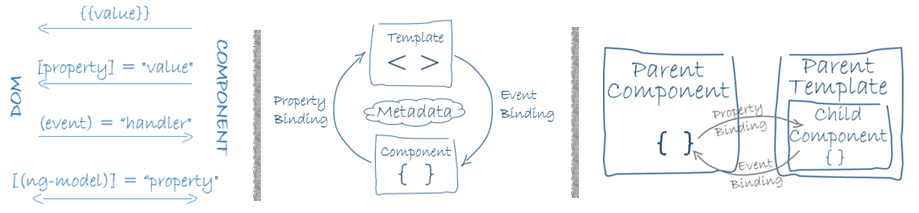
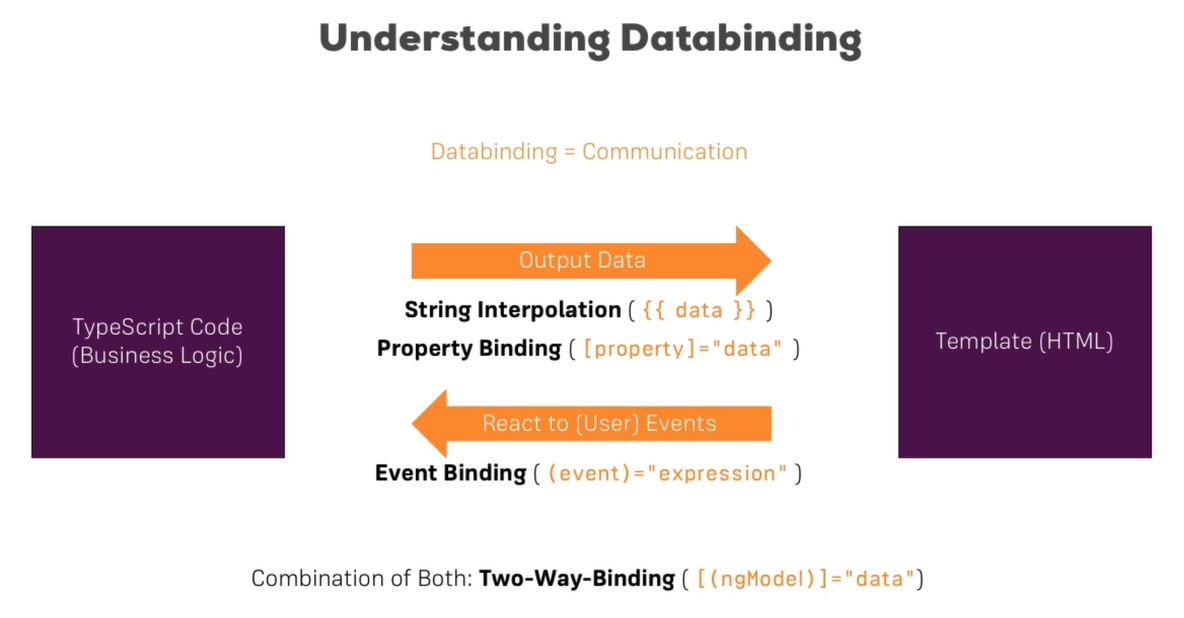
Data Binding
- binding component ts data to its template.
- Interpolation - Angular evaluates all expressions in double curly braces, converts the expression results to strings, and links them with neighboring literal strings. Finally, it assigns this composite interpolated result to an element or directive property.
- Angular processes all data bindings once per JavaScript event cycle, from the root of the application component tree through all child components.
| Data Binding | |
|---|---|
| String Interpolation | <li>{ {hero.name}}</li> |
| property binding | <app-hero-detail [disabled]="!isEnabled()"></app-hero-detail> |
| event binding | <li (click)="selectHero(hero)"></li> |
| 2-way binding | <input [(ngModel)]="hero.name">, requires FormsModule for ngModel directive. |
| Class Binding | [class.active = “isActive”] |
| Style Binding | [style.*] |
<input type="text" class="form-control" (input)="onUpdateServerName($event)">
<p>{ {serverName}}</p>

onUpdateServerName(event:Event){
  this.serverName = (<HTMLInputElement>event.target).value;
}
Custom Binding
- Custom Attribute Binding -
@Input()to pass attribute from parent to child - Custom Event Binding -
@Output()to pass attribute from child to parent
Decorators
- Allows us to decorate classes and functions, similar to annotations in java
- Functions that attaches metadata to TypeScript classes, so compiler knows what those classes mean and how they should work.
Decorator Types
- Class decorators, e.g.
@Componentand@NgModule - Property decorators for properties inside classes, e.g.
@Inputand@Output - Method decorators for methods inside classes, e.g.
@HostListener - Parameter decorators for parameters inside class constructors, e.g.
@Inject
| List of Decorators | |||
|---|---|---|---|
| @NgModule | @Component | @Directive | |
| @Injectable | @Pipe | ||
| @Input | @Output | @HostBinding | @HostListener |
| @ContentChild | @ContentChildren | @ViewChild | @ViewChildren |
@NgModule
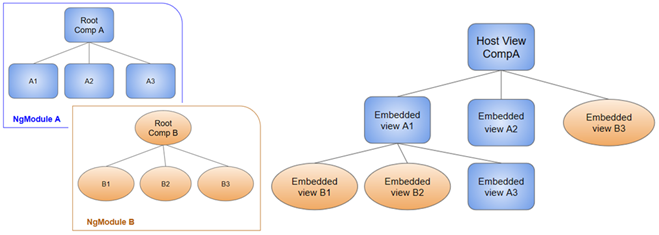
- Angular app is a set of NgModules.
- declares a compilation context for closely related set of capabilities.
- By default AppModule (app.module.ts) is the root module from where bootstrapping happens.
- Distinct functional modules helps with reusability and lazy-loading (minimize amount of code to be loaded at startup)
import { BrowserModule } from '@angular/platform-browser';
import { NgModule } from '@angular/core';
import { FormsModule } from '@angular/forms';
import { HttpClientModule } from '@angular/common/http';
import { AppComponent } from './app.component';
@NgModule({
  declarations: [AppComponent],
  imports: [BrowserModule,  FormsModule, HttpClientModule ],
  exports:[],
  entryComponents: [SomeComponent, OtherComponent],
  providers: [Service, Pipes],
  bootstrap: [AppComponent]
})
export class AppModule { }
providers
- global collection of services accessible in all parts of app.
- You can also specify providers at the component level, which is often preferred.
bootstrap
- root component, which hosts all other app views. Only the root NgModule should set this property.
declarations
- components, directives and pipes
- declared classes are visible within the module but invisible to components in a different module unless they are exported from this module and the other module imports this one.
| NgModule | Import from | Why use it |
|---|---|---|
| BrowserModule | @angular/platform-browser | When you want to run your app in a browser |
| CommonModule | @angular/common | When you want to use NgIf, NgFor |
| FormsModule | @angular/forms | When you want to build template driven forms (includes NgModel) |
| ReactiveFormsModule | @angular/forms | When you want to build reactive forms |
| RouterModule | @angular/router | When you want to use RouterLink, .forRoot(), and .forChild() |
| HttpClientModule | @angular/common/http | When you want to talk to a server |
@Component
Component = template + class (typescript)
root component connects a component hierarchy with the page DOM.
Template
- combines HTML with Angular markup that can modify the HTML elements before they are displayed.
- Together, a component and template define an Angular view.
import { Component } from '@angular/core';
@Component({
  selector: 'app-root', // as selector
  // selector: '[app-root]', // as attribute <div app-root/>
  // selector: '.app-root', // as class <div class="app-root"/>
  templateUrl: './app.component.html',
  styleUrls: ['./app.component.css']
})
export class AppComponent {
  title = 'app';
}
@Component Attributes
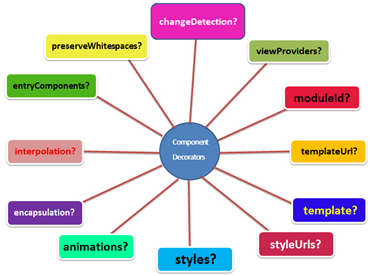
@Component({
  changeDetection?: ChangeDetectionStrategy
  viewProviders?: Provider[]
  moduleId?: string
  templateUrl?: string
  template?: string
  styleUrls?: string[]
  styles?: string[]
  animations?: any[]
  encapsulation?: ViewEncapsulation // Emulated (default), None, Native
  interpolation?: [string, string]
  entryComponents?: Array<Type<any> | any[]>
  preserveWhitespaces?: boolean
  // inherited from core/Directive
  selector?: string
  inputs?: string[]
  outputs?: string[]
  providers?: Provider[]
  exportAs?: string
  queries?: {...}
  host?: {...}
  jit?: boolean
})
| properties | |
|---|---|
| changeDetection | change the detection strategy used by this component. |
| viewProviders | list of providers available for this component and the view of their children. |
| inputs | it is property within one component (child component) to receive a value from another component (parent component). |
| outputs | it is property of a component to send data from one component (child component) to calling component (parent component). |
| providers | Providers are usually singleton objects (an instance), to which other objects have access through dependency injection (DI). |
| jit | if true, the AOT compiler will ignore this directive/component and will therefore always be compiled using JIT. |
View Encapsulation
- component.css styles are applied to elements of that component only, known as Style encapsulation.
- All elements of a component are assigned a specific attribute, ex. _ngcontent-ejo-2.
- this is how angular emulates shadow DOM, as shadow DOM is not supported by all browsers.
- encapsulation
- ViewEncapsulation.Emulated - default
- ViewEncapsulation.None - css applied globally
- ViewEncapsulation.Native - view encapsulation only for browsers supporting shadow DOM technology.
@Directive
- Directives are instructions in the DOM to render templates.
- Directives can optionally have a template of themselves.
- @Component is also a directive, which extends the @Directive with template-oriented features.
<p appTurnGreen>Receives a green background!</p>
@Directive({
  selector:'[appTurnGreen]'
})
export class TurnGreenDirective{
  ...
}

Structural Directives
Alter layout structure by adding, removing, and replacing elements in DOM.
<p *ngIf="heroSelected; else heroNotSelected">You have selected a hero - { {hero}}</p>
<ng-template #heroNotSelected>
  <p>No hero selected.</p>
</ng-template>
if (foo === 1) {
  ...
} else if (bar === 99) {
  ...
} else if (foo === 2) {
  ...
} else {
  ...
}
<ng-container *ngIf="foo === 1; else elseif1">foo === 1</ng-container>
<ng-template #elseif1>
    <ng-container *ngIf="bar === 99; else elseif2">bar === 99</ng-container>
</ng-template>
<ng-template #elseif2>
    <ng-container *ngIf="foo === 2; else else1">foo === 2</ng-container>
</ng-template>
<ng-template #else1>else</ng-template>
<li *ngFor="let hero of heroes; let i = index">
  <a href=hero.url>i - </a>
</li>
<div [ngSwitch]="conditionExpression">
 	<ng-template [ngSwitchCase]="case1Exp">...</ng-template>
 	<ng-template ngSwitchCase="case2LiteralString">...</ng-template>
 	<ng-template ngSwitchDefault>...</ng-template>
</div>
Attribute Directives
- Alter the appearance or behavior of an existing element.
<input [(ngModel)]="hero.name">	// 2 way binding

<!-- Binds presence of css classes to the truthiness of associated map values.
right-hand expression should return {class-name: true/false} map.-->
<div [ngClass]="{'activeClass': (isActive === 'true'), 'disabledClass': isDisabled}">

<!-- Allows you to assign styles to an HTML element using CSS. -->
<div [ngStyle]="{'backgroung-color': 'green'}">
<div [ngStyle]="{backgroundColor: getColor()}">
<div [ngStyle]="dynamicStyles()">
@Injectable
- Both components and services are simply classes, with decorators that mark their type and provide metadata that tells Angular how to use them.
@Injectabledecorator provides the metadata that allows your service to be injected into client components as a dependency.- For data or logic that is not associated with a specific view, and that you want to share across components.
- Dependency injection (or DI) lets you keep your component classes lean and efficient. components don’t fetch data from the server, validate user input, or log directly to the console; they delegate such tasks to services.
- Template, component and services are loosely coupled and have separation of concerns.
- Services can depend on other services.
import { Injectable } from '@angular/core';
@Injectable({
  providedIn: 'root',
})
export class HeroService {
private heroes: Hero[] = [];
constructor( private backend: BackendService, private logger: Logger) {}
getHeroes() {
  this.backend.getAll(Hero)
  .then((heroes: Hero[])=>{this.logger.log(`Fetched ${heroes.length} heroes.`);
  this.heroes.push(...heroes); // fill cache });
  return this.heroes; }
}
Dependency Injection
@Injectabledecorator provide the metadata that allows Angular to inject it into a component as a dependency.- Similarly, use the @Injectable decorator to indicate that a component or other class (such as another service, a pipe, or an NgModule) has a dependency. A dependency doesn’t have to be a service—it could be a function, for example, or a value.
- Dependency injection (often called DI) is wired into the Angular framework and used everywhere to provide new components with the services or other things they need.
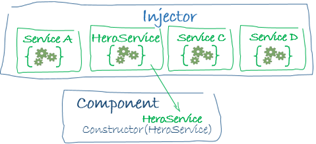
- The injector is the main mechanism. Angular creates an application-wide injector for you during the bootstrap process.
- The injector maintains a container of dependency instances that it has already created, and reuses them if possible.
- A provider is a recipe for creating a dependency.
- For any dependency you need in your app, you must register a provider with the app’s injector, so that the injector can use it to create new instances.
- When Angular creates a new instance of a component class, it determines which services or other dependencies that component needs by looking at the types of its constructor parameters.
constructor(private service: HeroService) { }
- When Angular discovers that a component depends on a service, it first checks if the injector already has any existing instances of that service. If a requested service instance does not yet exist, the injector makes one using the registered provider, and adds it to the injector before returning the service to Angular.
- When all requested services have been resolved and returned, Angular can call the component’s constructor with those services as arguments. The process of HeroService injection looks something like this:
Providing services
- You must register at least one provider of any service you are going to use. You can register providers in modules or in components.
- When you add providers to the root module, the same instance of a service is available to all components in your app.
- When you register a provider at the component level, you get a new instance of the service with each new instance of that component.
providers: [ BackendService, HeroService, Logger ],
@Component({
 	selector: 'app-hero-list',
	templateUrl: './hero-list.component.html',
	providers: [ HeroService ]
})
Change Scope of Service
How to change Scope of Service? or make it singleton?
// Option 1
providers: [ { provide: MyService, singleton: true  } ],
or
providers: [ { provide: MyService, scope: 'singleton'  } ],
// Option 2
@Injectable({ singleton: true })
export class MyserviceService {
  constructor() { }
}
// Option 3
@Injectable({ scope: 'singleton' })
export class MyserviceService {
  constructor() { }
}
@Pipe
- templates use pipes to improve the user experience by transforming values for display.
- Use pipes to display, for example, dates and currency values in a way appropriate to the user’s locale.
@Pipedecorator defines a function that transforms input values to output values for display in a view.- Angular defines various predefined pipes, such as the date pipe and currency pipe. You can also define new pipes.
- You can chain pipes, sending the output of one pipe function to be transformed by another pipe function.
- A pipe can also take arguments that control how it performs its transformation. For example, you can pass the desired format to the date pipe:
// Pipe definition
import { Pipe, PipeTransform } from '@angular/core';
@Pipe({
name: ‘Multiplier’,
pure: false/true     // (default is `true`)
})
export class MultiplierPipe implements PipeTransform {
   transform(value: number, multiply: string): number {
      let mul = parseFloat(multiply);
      return mul * value
   }
}
// Add to NgModule declarations
@NgModule ({…
   declarations: [AppComponent, MultiplierPipe],
<!-- Default format: output 'Jun 15, 2015'-->
<p>Today is { {today | date} }</p>
<!-- fullDate format: output 'Monday, June 15, 2015'-->
<p>The date is { {today | date:'fullDate'} }</p>
<!-- shortTime format: output '9:43 AM'-->
<p>The time is { {today | date:'shortTime'} }</p>
<!-- Using Custom Pipe -->
<p>Multiplier: { {2 | Multiplier: 10} }</p> // : for more params
Stateful Pipes - pure vs impure
| Pure Functions | Impure Functions |
|---|---|
| Doesn’t have a state. | Have an internal state. |
| same input parameters produce same output. | |
| can be safely shared with many instances. | |
| pure pipe is only called when Angular detects a change in the value or the parameters passed to a pipe. | impure pipe is called for every change detection cycle no matter whether the value or parameters changes. |
/** Pure Functions **/
const addPure = (v1, v2) => { return v1 + v2; };
addPure(1, 1); // 2
addPure(1, 1); // 2
addPure(1, 1); // 2
/** Impure Functions **/
const addImpure = (() => {
    let state = 0;
    return (v) => { return state += v; }
})();

addImpure(1); // 1
addImpure(1); // 2
addImpure(1); // 3
Content Projection
import { Input, ... } from '@angular/core';
Custom Binding - Property and Event
- app-root - contains servers array, app-server-edit, list of app-server-element
- app-server-element - takes property as input
- app-server-creator - output event on addition of server to app-root
Here, app-server-creator emits event to app-root and then app-root pushes it down to app-server-element, this creates a chain of output and input.
For lengthy chains, use of service to share data is recommended.
@Input()
- Read more about @Input
- Parent to Child communication.
- Makes property bind-able from outside the component.
- Declares an input property that you can update via property binding.
- (example: <my-cmp [myProperty]=”someExpression”>).
- Custom Attribute Binding
/* app-root */
<app-server-element *ngFor="let server of servers" [element]="server"></app-server-element>
<app-server-element *ngFor="let server of servers" [srvElement]="server"></app-server-element> // with alias srvElement
/* app-server-element @Component */
@Input() element: {type: string, name:string, content:string};
@Input('srvElement') element: {type: string, name:string, content:string}; // with alias srvElement
@Output()
@Output() myEvent = new EventEmitter();
- @Output()
- Event Emitter
- Declares an output property that fires events that you can subscribe to with an event binding.
- (example: <my-cmp (myEvent)=”doSomething()”>).
- Custom Event Binding.
/* app-root */
<app-server-creator (onServerCreated)="onServerAdded($event)"></app-server-creator>
<app-server-creator (onServerCreatedAlias)="onServerAdded($event)"></app-server-creator> // with alias
/* app-root @Component*/
onServerAdded(serverData: {name:string, content:string}){
  this.serverElement.push({
    type: 'server',
    name: serverData.name,
    content: serverData.content
  });
}
/* app-server-creator */
@Output() onServerCreated = new EventEmitter<{name:string, content:string}>();
@Output('onServerCreatedAlias') onServerCreated = new EventEmitter<{name:string, content:string}>(); // with alias
newServerName = '';
newServerContent = '';
onCreateServer(){
  this.onServerCreated.emit({
    name: this.newServerName,
    content: this.newServerContent
  });
}
Using Local References in Templates
- Can be used only in template, not in typescript.
- Type is
HTMLInputElement
<!-- Normal definition -->
<input type="text" class="form-control" [(ngModel)]="newServerContent">
<!-- Local References -->
<input type="text" class="form-control" #serverNameInput>
<button class="btn btn-primary" (click)="onAddServer(serverNameInput)">Add Server</button>
<!-- app-root.ts -->
onAddServer(serverNameInput: HTMLInputElement){
  console.log(serverNameInput.value);
}
@ViewChild()
- Can get access to any local reference or any other element directly from the ts code.
- Earlier we passed local reference to method, but sometimes you may need to get the element before method call.
- Type is
ElementRef@ViewChild(myPredicate) myChildComponent; - @ViewChild
- Binds the first result of the component view query (myPredicate) to a property (myChildComponent) of the class. Not available for directives.
- The same change (add { static: true } as a second argument) needs to be applied to ALL usages of @ViewChild() (and also @ContentChild(), IF you plan on accessing the selected element inside of ngOnInit().
- If you DON’T access the selected element in ngOnInit (but anywhere else in your component), set static: false instead!
- Can be accessed only after View Init.
- Here, you access something from a child component in your view.
<!-- Normal definition -->
<input type="text" class="form-control" [(ngModel)]="newServerContent">
<!-- Element to be accessed as view child -->
<input type="text" class="form-control" #serverNameInput>
<!-- app-root.ts -->
<!-- by selector -->
@ViewChild('serverNameInput', {static: true}) serverNameInput: ElementRef;
<!-- by component name -->
<!-- Gets First Element of that component type -->
@ViewChild(ServerCreatorComponent, {static: true}) serverNameInput: ElementRef;
var text = this.serverNameInput.nativeElement.value;
<!-- can be used to modify DOM and output data like below, but not recommended. -->
<!-- Instead use String interpolation or property binding to output the data. -->
this.serverNameInput.nativeElement.value = "new value";
@ViewChildren()
@ViewChildren(myPredicate) myChildComponents;
- @ViewChildren
- Binds the results of the component view query (myPredicate) to a property (myChildComponents) of the class. Not available for directives.
@ContentChild()
@ContentChild(myPredicate) myChildComponent;
- @ContentChild
- Binds the first result of the component content query (myPredicate) to a property (myChildComponent) of the class.
- Here, you are the child and want to access content passed from parent to you inside ng-content.
@ContentChildren()
@ContentChildren(myPredicate) myChildComponents;
- @ContentChildren
- Binds the results of the component content query (myPredicate) to a property (myChildComponents) of the class.
@HostBinding()
@HostBinding(‘class.valid’) isValid;
- @HostBinding
- Binds a host element property (here, the CSS class valid) to a directive/component property (isValid).
@HostListener()
@HostListener(‘click’, [‘$event’]) onClick(e) {…}
- @HostListener
- Subscribes to a host element event (click) with a directive/component method (onClick), optionally passing an argument ($event).
@ng-content()
- contents passed within the ng component selectors are projected in the component view.
- Can be used to make reusable widgets like tab widget.
<!-- anything passed within the element is ignored, and no error msg is shown -->
<app-server-element></app-server-element>

<app-server-element>
  <p *ngIf="serverAdded.type === ''server">serverAdded.name</p>
</app-server-element>
<!-- app-server-element.html -->
<div>
  <ng-content></ng-content>
</div>
Change Detection
- Change Detection means updating the DOM every time the data is changed.
- A model in Angular can change as a result of one of the following scenarios:
- DOM events (click, hover over, etc.)
- AJAX requests
- Timers (setTimer(), setInterval())
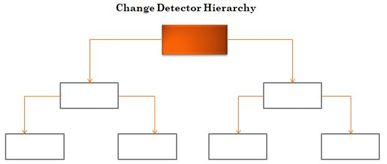
- All angular applications consist of a hierarchical tree of components. At runtime, Angular creates a change detector class separately for each tree component, which then eventually forms a hierarchy of change detectors similar to the hierarchy tree components.
- When change tracking is activated, Angular goes through this tree of change detectors to determine if any of them have changed.
- The change detection cycle is always performed once for each detected change and starts from the root change detector and is sequentially reduced.
import { Component, OnInit, Input , ChangeDetectionStrategy } from '@angular/core';
@Component({
  selector: 'app-message',
  changeDetection: ChangeDetectionStrategy.OnPush,
  templateUrl: ‘’
})
export class MessageComponent implements OnInit {
  @Input() company;
  constructor() { }
  ngOnInit() {  }
}
Change Detection Strategies
Default Strategy
- Every time you put or edit any data, Angular will run the change detector to update the DOM.
- By default, Angular makes no assumptions about what the component depends on. Therefore, it must be prudent and will check every time something has changed, this is called dirty checking.
- In a more concrete way, it will perform checks for every browser event, timer, XHR and promises.
- It is problematic when you start having a big application with many components, especially if you have focused on performance.
onPush
- Angular only performs the change detector when a new reference to the data of @Input () is passed.
- Each component is provided its own change detector, which is responsible for tracking changes and updating the DOM.
- Based only on the modification of the input references, some events activated by themselves (the component) or one of his children.
- Developer, can explicitly ask Angular to do it with the componentRef.markForCheck () method.
- With onPush, the component depends only on its inputs and covers immutability, the change detection strategy will be activated when:
- The input reference changes;
- An event originating from the member or one of his children;
- Execute change detection explicitly (componentRef.markForCheck ());
- Use the async pipe in the view.
To be remember
- If the Angular ChangeDetector is configured by default, for any change in any model properties, Angular will track changes through the component structure to update the DOM.
- If the Angular ChangeDetetor is set to onPush, Angular only runs the change detector when a new reference to the component is passed.
- If you pass observable to the onPush change detector’s enabled component, Angular ChangeDetctor must be called manually to update the DOM.
LifeCycle Hooks
- Component lifecycle managed by Angular.
- Angular creates it, renders it, creates and renders its children, checks it when its data-bound properties change, and destroys it before removing it from the DOM.
- Angular offers lifecycle hooks that provide visibility into these key life moments and the ability to act when they occur.
- A directive has the same set of lifecycle hooks.
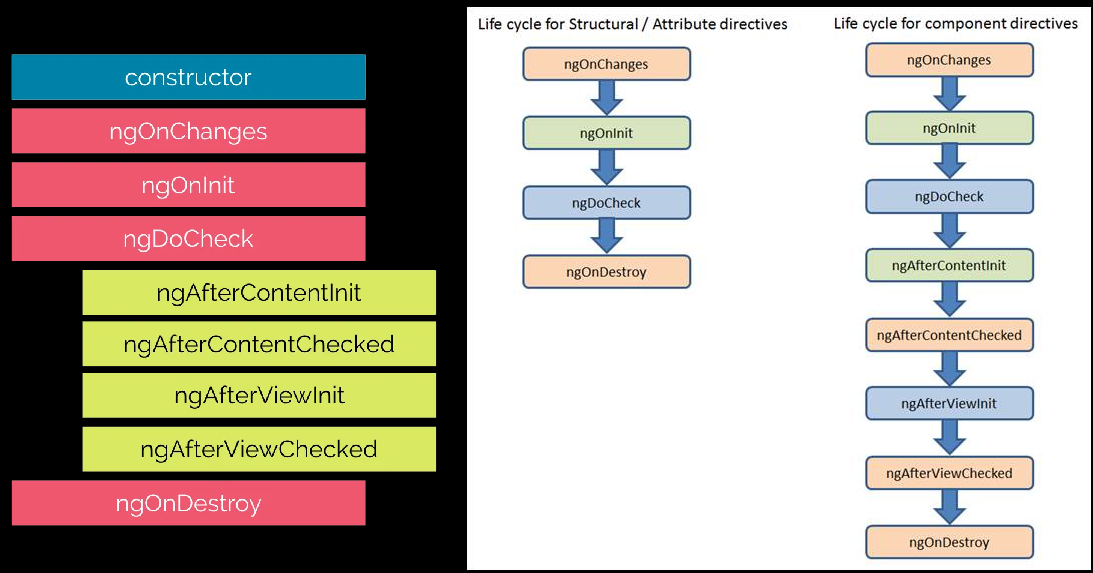
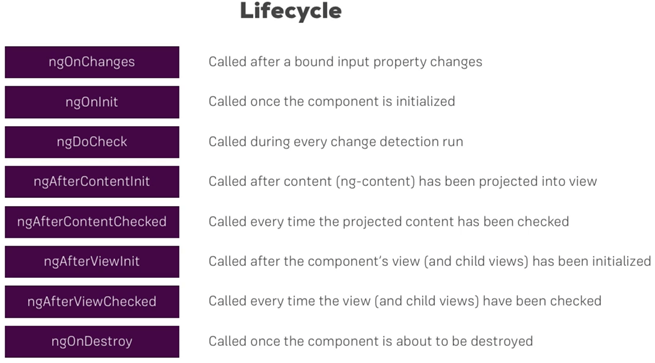
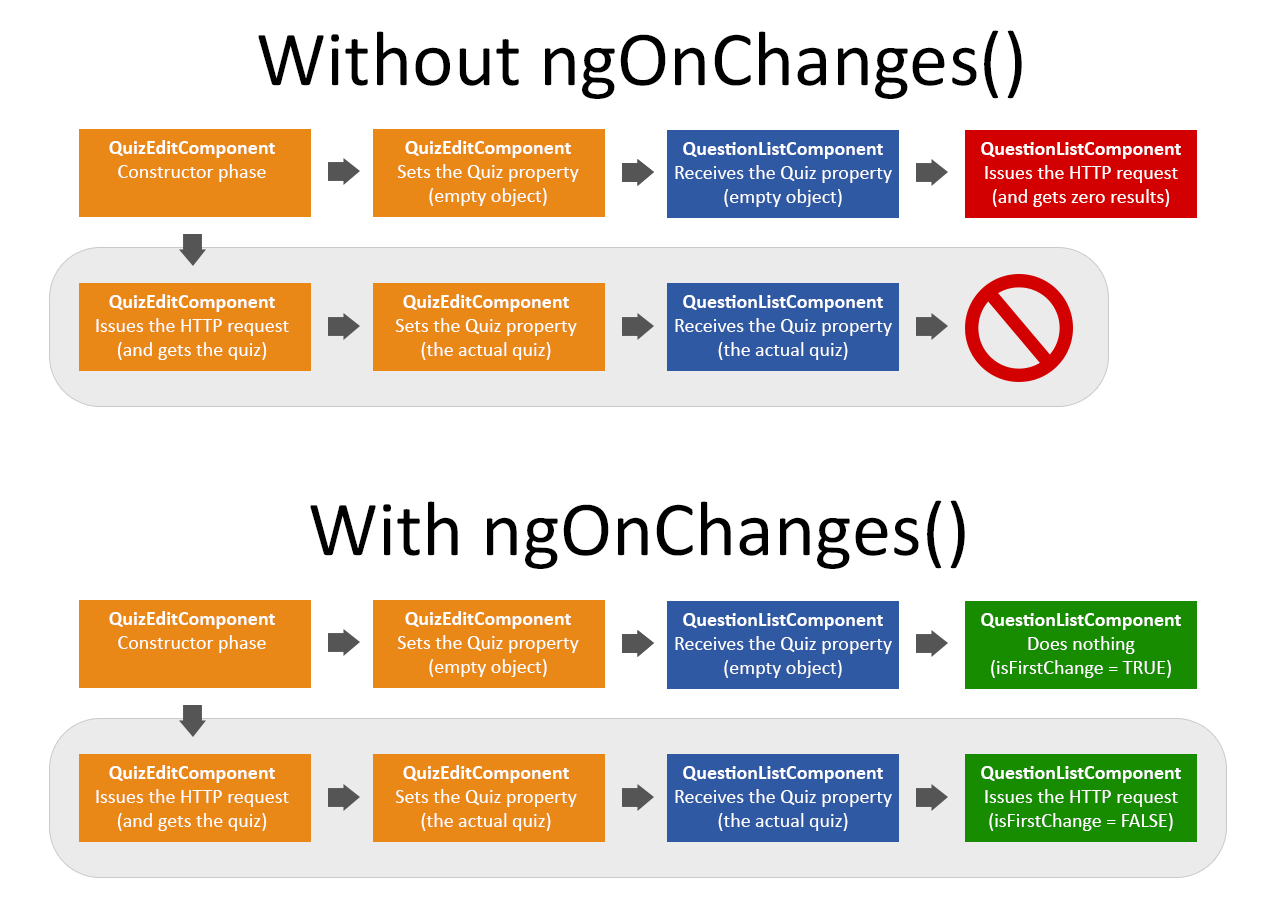
ngOnChanges()
- Respond when Angular (re)sets data-bound input properties. (@Input)
- The method receives a SimpleChanges object of current and previous property values.
- Called before ngOnInit() and whenever one or more data-bound input properties change.
export class ServerElementComponent implements onInit, onChnages{
  @Input('serverElement') element: {name: string, content:string};
  ngOnChanges(changes: SimpleChanges){
    console.log('ngOnChanges called!');
    console.log(changes);
    // SimpleChange contains @Input element
  }
}
ngOnInit()
- Initialize the directive/component after Angular first displays the data-bound properties and sets the directive/component’s input properties.
- When it is Initialized but not displayed in the DOM.
- Called once, after the first ngOnChanges().
- Runs after the constructor.
ngDoCheck()
- Detect and act upon changes that Angular can’t or won’t detect on its own.
- Called during every change detection run, immediately after ngOnChanges() and ngOnInit().
- Runs on every check run by angular, irrespective of any changes made.
- Very powerful tool, can be used in cases where you have to do something manually as angular didn’t pick up the changes.
ngAfterContentInit()
- Respond after Angular projects external content into the component’s view / the view that a directive is in.
- Called only once ie. after the first ngDoCheck().
- Called after content (in ng-content) has been projected into the view.
ngAfterContentChecked()
- Respond after Angular checks the content projected into the directive/component.
- Called after the ngAfterContentInit() and every subsequent ngDoCheck().
ngAfterViewInit()
- Respond after Angular initializes the component’s views and child views / the view that a directive is in.
- Called once after the first ngAfterContentChecked().
ngAfterViewChecked()
- Respond after Angular checks the component’s views and child views / the view that a directive is in.
- Called after the ngAfterViewInit() and every subsequent ngAfterContentChecked().
ngOnDestroy()
- Cleanup just before Angular destroys the directive/component.
- Unsubscribe Observables and detach event handlers to avoid memory leaks.
- Called just before Angular destroys the directive/component.
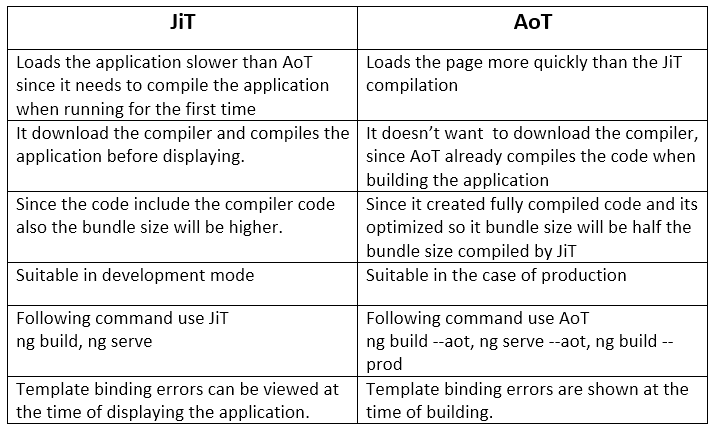
JIT vs AOT
The main differences between JIT and AOT in Angular are:
- The time when the compilation takes place.
- JIT generates JavaScript however, AoT usually generates TypeScript.
ng buildcommand creates a dist folder with deployables.
ng build --prod --jit
ng build --prod --aot
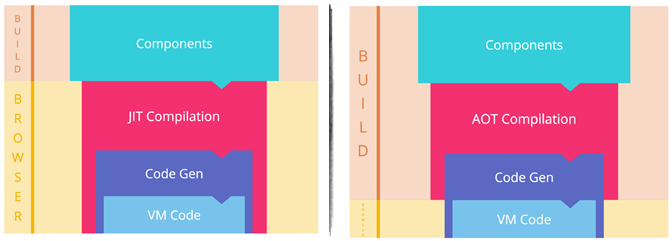
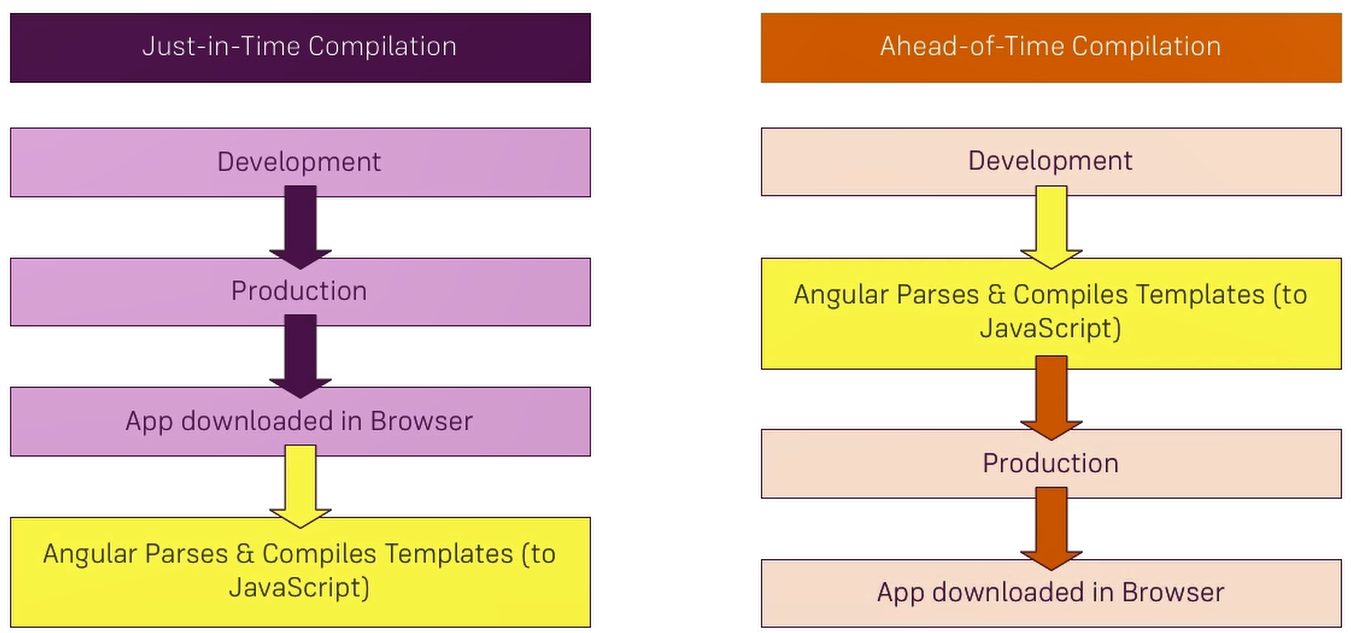
Flow of events with Just-in-Time Compilation
- Development of Angular application with TypeScript.
- Compilation of the application with tsc.
- Bundling.
- Minification.
- Deployment.
Once we’ve deployed the app and the user opens her browser, she will go through the following steps (without strict CSP):
- Download all the JavaScript assets.
- Angular bootstraps.
- Angular goes through the JiT compilation process, i.e. generation of JavaScript for each component in our application. The application gets rendered.
Flow of events with Ahead-of-Time Compilation
In contrast, with AoT we get through the following steps:
- Development of Angular application with TypeScript.
- Compilation of the application with ngc.
- Performs compilation of the templates with the Angular compiler and generates (usually) TypeScript.
- Compilation of the TypeScript code to JavaScript.
- Bundling.
- Minification.
- Deployment.
Although the above process seems lightly more complicated the user goes only through the steps:
- Download all the assets.
- Angular bootstraps.
- The application gets rendered.
Forms
Template-driven forms
Further Reads - NgModule, BrowserModule, FormsModule, FormControl
- Bind data properties to each form control using the ngModel two-way data-binding syntax.
- Add a name attribute to each form-input control.
- Handle form submission with
ngSubmit. - Template reference variables are used.
import { NgModule } from '@angular/core';
import { BrowserModule } from '@angular/platform-browser';
import { FormsModule } from '@angular/forms';
@NgModule({
imports: [ BrowserModule, FormsModule ],
export class AppModule { }
<div class="container">
  <div [hidden]="submitted">
    <h1>Hero Form</h1>
    <form (ngSubmit)="onSubmit()" #heroForm="ngForm">
      <div class="form-group">
        <label for="name">Name</label>
        <input type="text" class="form-control" id="name" required [(ngModel)]="model.name" name="name" #name="ngModel">
        <div [hidden]="name.valid || name.pristine" class="alert alert-danger">Name is required</div>
      </div>
       <div class="form-group">
        <label for="alterEgo">Alter Ego</label>
        <input type="text" class="form-control" id="alterEgo" [(ngModel)]="model.alterEgo" name="alterEgo">
      </div>

      <div class="form-group">
        <label for="power">Hero Power</label>
        <select class="form-control" id="power" required [(ngModel)]="model.power" name="power" #power="ngModel">
          <option *ngFor="let pow of powers" [value]="pow"></option>
        </select>
        <div [hidden]="power.valid || power.pristine" class="alert alert-danger">Power is required</div>
      </div>

      <button type="submit" class="btn btn-success" [disabled]="!heroForm.form.valid">Submit</button>
      <button type="button" class="btn btn-default" (click)="newHero(); heroForm.reset()">New Hero</button>
    </form>
  </div>

  <div [hidden]="!submitted">
    <h2>You submitted the following:</h2>
    <div class="row">
      <div class="col-xs-3">Name</div>
      <div class="col-xs-9"></div>
    </div>
    <div class="row">
      <div class="col-xs-3">Alter Ego</div>
      <div class="col-xs-9"></div>
    </div>
    <div class="row">
      <div class="col-xs-3">Power</div>
      <div class="col-xs-9"></div>
    </div>
    <br>
    <button class="btn btn-primary" (click)="submitted=false">Edit</button>
  </div>
</div>
Validator functions
- Sync validators: functions that take a control instance and immediately return either a set of validation errors or null. You can pass these in as the second argument when you instantiate a FormControl.
- Async validators: functions that take a control instance and return a Promise or Observable that later emits a set of validation errors or null. You can pass these in as the third argument when you instantiate a FormControl.
- styles.css ==> @import url(‘https://unpkg.com/bootstrap@3.3.7/dist/css/bootstrap.min.css’);
- Why check dirty and touched? Don’t want want to display errors before user edit the form.
| Properties | |
|---|---|
| valid | This property returns true if the element’s contents are valid and false otherwise. |
| invalid | This property returns true if the element’s contents are invalid and false otherwise. |
| pristine | This property returns true if the element’s contents have not been changed. |
| dirty | This property returns true if the element’s contents have been changed. |
| untouched | This property returns true if the user has not visited the element. |
| touched | This property returns true if the user has visited the element. |
Validation Template Driven
<input id="name" name="name" class="form-control" required
	minlength="4" appForbiddenName="bob" [(ngModel)]="hero.name" #name="ngModel" >
  <div *ngIf="name.invalid && (name.dirty || name.touched)" class="alert alert-danger">
  <div *ngIf="name.errors.required">Name is required.</div>
  <div *ngIf="name.errors.minlength">Name must be at least 4 characters long.</div>
  <div *ngIf="name.errors.forbiddenName">Name cannot be Bob.</div>
</div>
Data Driven Form/ Reactive Form
<form [formGroup]="profileForm" (ngSubmit)="onSubmit()>
   <label>First Name:<input type="text" formControlName="firstName"></label>
   <label>Last Name:<input type="text" formControlName="lastName"></label>
   <div formGroupName="address">
      <h3>Address</h3>
      <label>Street:<input type="text" formControlName="street"></label>
      <label>City:<input type="text" formControlName="city"></label>
      <label>State:<input type="text" formControlName="state"></label>
      <label>Zip Code:<input type="text" formControlName="zip"></label>
   </div>
   <button type="submit" [disabled]="!profileForm.valid">Submit</button>
</form>
export class ProfileEditorComponent {
  profileForm = new FormGroup({
    firstName: new FormControl(''),
    lastName: new FormControl(''),
    address: new FormGroup({
      street: new FormControl(''),
      city: new FormControl(''),
      state: new FormControl(''),
      zip: new FormControl('')
    })
  });
}
<input id="name" class="form-control"
      formControlName="name" required >
<div *ngIf="name.invalid && (name.dirty || name.touched)"
    class="alert alert-danger">
  <div *ngIf="name.errors.required">
    Name is required.
  </div>
  <div *ngIf="name.errors.minlength">
    Name must be at least 4 characters long.
  </div>
  <div *ngIf="name.errors.forbiddenName">
    Name cannot be Bob.
  </div>
</div>
ngOnInit(): void {
  this.heroForm = new FormGroup({
    'name': new FormControl(this.hero.name, [
      Validators.required,
      Validators.minLength(4),
      forbiddenNameValidator(/bob/i)
    ]),
    'alterEgo': new FormControl(this.hero.alterEgo),
    'power': new FormControl(this.hero.power, Validators.required)
  });
}
get name() { return this.heroForm.get('name'); }
get power() { return this.heroForm.get('power'); }
/** A hero's name can't match the given regular expression */
export function forbiddenNameValidator(nameRe: RegExp): ValidatorFn {
  return (control: AbstractControl): {[key: string]: any} | null => {
    const forbidden = nameRe.test(control.value);
    return forbidden ? {'forbiddenName': {value: control.value}} : null;
  };
}
Routers
- Routers and router outlet
- Route – multiple path vars or query params
- define navigation paths among views ie. sophisticated in-browser navigational capabilities.
- maps URL-like paths to views instead of pages.
- When a user performs an action, such as clicking a link, that would load a new page in the browser, the router intercepts the browser’s behavior, and shows or hides view hierarchies.
- Router logs activity in the browser’s history journal, so the back and forward buttons work as well.
routercan lazy-load the module on demand.
Routing Strategy
Read full article on Routing Strategies
Parameterized Routes
Read full article on Parameterized Routes
Nested Routes
Read full article on Nested Routes
Router Guards
Read full article on Router Guards here.
- To check permissions and return a 403 error page if the user didn’t have permissions, or perhaps redirect them to a login/register page if they were not signed up. with Router Guards we can use this functionality.
- 403 is a HTTP error code - Permission Denied
- For a given route we can implement zero or any number of Guards.
Use Cases
- Maybe the user must login (authenticate) first.
- Perhaps the user has logged in but is not authorized to navigate to the target component.
- We might ask the user if it’s OK to discard pending changes rather than save them.
Types of Router Guards
- CanActivate - Checks if a user can visit a route.
- CanActivateChild - Checks if a user can visit a route’s children.
- CanDeactivate - used to warn people if they are navigating away from a page where they have some unsaved changes.
- Resolve - Performs route data retrieval before route activation.
- CanLoad - Checks if a user can route to a module that lazy loaded.
import {CanActivate} from "@angular/router";

@Injectable
class AlwaysAuthGuard implements CanActivate {
  canActivate() {
    console.log("AlwaysAuthGuard");
    return true;
  }
}

@Injectable()
class OnlyLoggedInUsersGuard implements CanActivate {
  constructor(private userService: UserService) {};
  canActivate() {
    console.log("OnlyLoggedInUsers");
    if (this.userService.isLoggedIn()) {   return true;  }
    else {
      window.alert("You don't have permission to view this page");
      return false;
    }
  }
}
@NgModule({
  ...
  providers: [    AlwaysAuthGuard  ]
})
const routes: Routes = [
  {path: '', redirectTo: 'home', pathMatch: 'full'},
  {path: 'find', redirectTo: 'search'},
  {path: 'home', component: HomeComponent},
  {path: 'search', component: SearchComponent},
  {
    path: 'artist/:artistId',
    component: ArtistComponent,
    canActivate: [OnlyLoggedInUsersGuard, AlwaysAuthGuard],
    children: [
      {path: '', redirectTo: 'tracks'},
      {path: 'tracks', component: ArtistTrackListComponent},
      {path: 'albums', component: ArtistAlbumListComponent},
    ]
  },
  {path: '**', component: HomeComponent}
];
Guard Function Parameters
To help determining whether or not a guard should accept or deny access the guard function can be passed certain arguments:
- component: Component this is the component itself.
- route: ActivatedRouteSnapshot — this is the future route that will be activated if the guard passes, we can use it’s params property to extract the route params.
- state: RouterStateSnapshot — this is the future RouterState if the guard passes, we can find the URL we are trying to navigate to from the url property.
class UnsearchedTermGuard implements CanDeactivate<SearchComponent> {
  canDeactivate(component: SearchComponent, route: ActivatedRouteSnapshot, state: RouterStateSnapshot): boolean {
    console.log(route.params);
    console.log(state.url);
    return component.canDeactivate() || window.confirm("Are you sure?");
  }
}
- CanDeactivate interface is a generic interface.
- Guard functions can return either a boolean or an Observable
or Promise which resolves to a boolean at some point in the future.
Firstly lets create a function called canDeactivate on our SearchComponent, it should be the component that decides whether or not it has unsaved changes.
canDeactivate() {
  return this.itunes.results.length > 0;
}
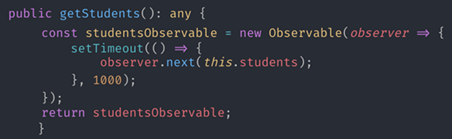
RxJS
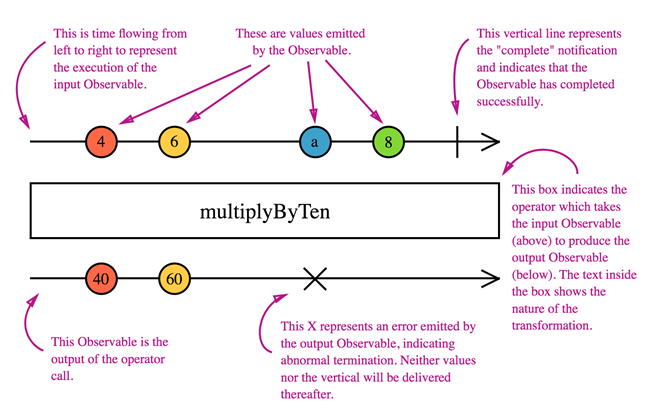
Promise vs Observable
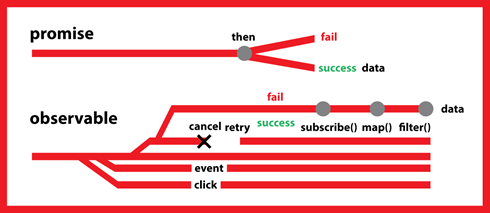
| Promise | Observable |
|---|---|
| handles a single event when an async operation completes or fails. | stream of zero or more events where the callback is called for each event. |
| Has only one pipeline | Streams data in multiple pipelines |
| Only .then() | Provides chaining and subscription |
| Not Lazy | Lazy - emits values when time progresses |
| Not cancellable | Cancellable – heavy operations that are not needed anymore by .unsubscribe() |
| possible decisions– Reject, Resolve | |
| Cannot be retried | retry(), or replay() or retryWhen |
| operators like map, forEach, reduce, filter | |
| Push errors to child promises | Subscribe method for centralized and predictable error handling. |
Http Calls using RxJs

import { HttpClientModule } from '@angular/common/http';
@NgModule(
{ imports: [// import HttpClientModule after BrowserModule.
   HttpClientModule,
],
//Component
showConfig() {
  this.configService.getConfig()
    .subscribe(
      (data: Config) => this.config = {
        heroesUrl: data['heroesUrl'],
        textfile:  data['textfile']
       }, // success path
      (error) => this.error = error // error path
     );
}
//Json
{ "heroesUrl": "api/heroes", "textfile": "assets/textfile.txt" }
//Service
import { Injectable } from '@angular/core';
import { HttpClient } from '@angular/common/http';
@Injectable()
export class ConfigService {
  constructor(private http: HttpClient) { }
  configUrl = 'assets/config.json';
  getConfig() {   return this.http.get(this.configUrl); }
  //return this.http.get<Config>(this.configUrl);  //Observable
}
//Config structure
export interface Config {
  heroesUrl: string;
  textfile: string;
}
Get Request
- The HttpClient.get() method parsed the JSON server response into the anonymous Object type. It doesn’t know what the shape of that object is.
- You can tell HttpClient the type of the response to make consuming the output easier and more obvious. get
Reading the full response
The response body doesn’t return all the data you may need. Sometimes servers return special headers or status codes to indicate certain conditions that are important to the application workflow.
getConfigResponse(): Observable<HttpResponse<Config>> {
  return this.http.get<Config>(
    this.configUrl, { observe: 'response' });
}
- observe option: Tell HttpClient that you want the full response
- Now HttpClient.get() returns an Observable of typed HttpResponse rather than just the JSON data.
showConfigResponse() {
  this.configService.getConfigResponse()
    // resp is of type `HttpResponse<Config>`
    .subscribe(resp => {
      // display its headers
      const keys = resp.headers.keys();
      this.headers = keys.map(key =>
        `${key}: ${resp.headers.get(key)}`);
      // access the body directly, which is typed as `Config`.
      this.config = { ... resp.body };
    });
}
- HttpClient captures both kinds of errors in its HttpErrorResponse and you can inspect that response to figure out what really happened.
- Error inspection, interpretation, and resolution is something you want to do in the service, not in the component.
private handleError(error: HttpErrorResponse) {
  if (error.error instanceof ErrorEvent) {
    // A client-side or network error occurred. Handle it accordingly.
    console.error('An error occurred:', error.error.message);
  } else {
    // The backend returned an unsuccessful response code.
    // The response body may contain clues as to what went wrong,
    console.error(
      `Backend returned code ${error.status}, ` +
      `body was: ${error.error}`);
  }
  // return an observable with a user-facing error message
  return throwError(
    'Something bad happened; please try again later.');
};
getConfig() {
  return this.http.get<Config>(this.configUrl)
    .pipe(
      catchError(this.handleError)
    );
}

getConfig() {
  return this.http.get<Config>(this.configUrl)
    .pipe(
      retry(3), // retry a failed request up to 3 times
      catchError(this.handleError) // then handle the error
    );
}
POST request
/** POST: add a new hero to the database */
addHero (hero: Hero): Observable<Hero> {
  return this.http.post<Hero>(this.heroesUrl, hero, httpOptions)
    .pipe(
      catchError(this.handleError('addHero', hero))
    );
}
import { HttpHeaders } from '@angular/common/http';
const httpOptions = {
  headers: new HttpHeaders({
    'Content-Type':  'application/json',
    'Authorization': 'my-auth-token'
  })
};
this.heroesService.addHero(newHero).subscribe(hero => this.heroes.push(hero));
PUT Request
/** PUT: update the hero on the server. Returns the updated hero upon success. */
updateHero (hero: Hero): Observable<Hero> {
  return this.http.put<Hero>(this.heroesUrl, hero, httpOptions)
    .pipe(
      catchError(this.handleError('updateHero', hero))
    );
}
Update headers
httpOptions.headers = httpOptions.headers.set('Authorization', 'my-new-auth-token');
URL Parameters
api/heroes/?name=foo.
/* GET heroes whose name contains search term */
searchHeroes(term: string): Observable<Hero[]> {
  term = term.trim();
  // Add safe, URL encoded search parameter if there is a search term
  const options = term ?
   { params: new HttpParams().set('name', term) } : {};
  return this.http.get<Hero[]>(this.heroesUrl, options)
    .pipe(
      catchError(this.handleError<Hero[]>('searchHeroes', []))
    );
}
DELETE Request
/** DELETE: delete the hero from the server */
deleteHero (id: number): Observable<{}> {
  const url = `${this.heroesUrl}/${id}`; // DELETE api/heroes/42
  return this.http.delete(url, httpOptions)
    .pipe(
      catchError(this.handleError('deleteHero'))
    );
}
this.heroesService.deleteHero(hero.id).subscribe();
- An HttpClient method does not begin its HTTP request until you call subscribe() on the observable returned by that method. This is true for all HttpClient methods.
Debouncing Request
Sending a request for every keystroke could be expensive. It’s better to wait until the user stops typing and then send a request. That’s easy to implement with RxJS operators.
- debounceTime(500) - wait for the user to stop typing (1/2 second in this case).
- distinctUntilChanged() - wait until the search text changes.
- switchMap() - send the search request to the service.
withRefresh = false;
packages$: Observable<NpmPackageInfo[]>;
private searchText$ = new Subject<string>();

search(packageName: string) {
  this.searchText$.next(packageName);
}

ngOnInit() {
  this.packages$ = this.searchText$.pipe(
    debounceTime(500),
    distinctUntilChanged(),
    switchMap(packageName =>
      this.searchService.search(packageName, this.withRefresh))
  );
}

constructor(private searchService: PackageSearchService) { }
Security - XSRF Protection
- Cross-Site Request Forgery (XSRF) is an attack technique by which the attacker can trick an authenticated user into unknowingly executing actions on your website. HttpClient supports a common mechanism used to prevent XSRF attacks. When performing HTTP requests, an interceptor reads a token from a cookie, by default XSRF-TOKEN, and sets it as an HTTP header, X-XSRF-TOKEN. Since only code that runs on your domain could read the cookie, the backend can be certain that the HTTP request came from your client application and not an attacker.
- By default, an interceptor sends this header on all mutating requests (POST, etc.) to relative URLs but not on GET/HEAD requests or on requests with an absolute URL.
- To take advantage of this, your server needs to set a token in a JavaScript readable session cookie called XSRF-TOKEN on either the page load or the first GET request. On subsequent requests the server can verify that the cookie matches the X-XSRF-TOKEN HTTP header, and therefore be sure that only code running on your domain could have sent the request. The token must be unique for each user and must be verifiable by the server; this prevents the client from making up its own tokens. Set the token to a digest of your site’s authentication cookie with a salt for added security.
- In order to prevent collisions in environments where multiple Angular apps share the same domain or subdomain, give each application a unique cookie name.
Testing HTTP requests
// Http testing module and mocking controller
import { HttpClientTestingModule, HttpTestingController } from '@angular/common/http/testing';

// Other imports
import { TestBed } from '@angular/core/testing';
import { HttpClient, HttpErrorResponse } from '@angular/common/http';

describe('HttpClient testing', () => {
  let httpClient: HttpClient;
  let httpTestingController: HttpTestingController;

  beforeEach(() => {
    TestBed.configureTestingModule({
      imports: [ HttpClientTestingModule ]
    });

    // Inject the http service and test controller for each test
    httpClient = TestBed.get(HttpClient);
    httpTestingController = TestBed.get(HttpTestingController);
  });
  /// Tests begin ///
});
TestBed.get() to inject the HttpClient service and the mocking controller so they can be referenced during the tests.
it('can test HttpClient.get', () => {
  const testData: Data = {name: 'Test Data'};

  // Make an HTTP GET request
  httpClient.get<Data>(testUrl)
    .subscribe(data =>
      // When observable resolves, result should match test data
      expect(data).toEqual(testData)
    );

  // The following `expectOne()` will match the request's URL.
  // If no requests or multiple requests matched that URL
  // `expectOne()` would throw.
  const req = httpTestingController.expectOne('/data');

  // Assert that the request is a GET.
  expect(req.request.method).toEqual('GET');

  // Respond with mock data, causing Observable to resolve.
  // Subscribe callback asserts that correct data was returned.
  req.flush(testData);

  // Finally, assert that there are no outstanding requests.
  httpTestingController.verify();
});
The last step, verifying that no requests remain outstanding, is common enough for you to move it into an afterEach() step:
afterEach(() => {
  // After every test, assert that there are no more pending requests.
  httpTestingController.verify();
});
// Expect one request with an authorization header
const req = httpTestingController.expectOne(
  req => req.headers.has('Authorization')
);  //match() for more than 1
Testing for errors
it('can test for 404 error', () => {
  const emsg = 'deliberate 404 error';
  httpClient.get<Data[]>(testUrl).subscribe(
    data => fail('should have failed with the 404 error'),
    (error: HttpErrorResponse) => {
      expect(error.status).toEqual(404, 'status');
      expect(error.error).toEqual(emsg, 'message');
    }
  );
  const req = httpTestingController.expectOne(testUrl);
  // Respond with mock error
  req.flush(emsg, { status: 404, statusText: 'Not Found' });
});
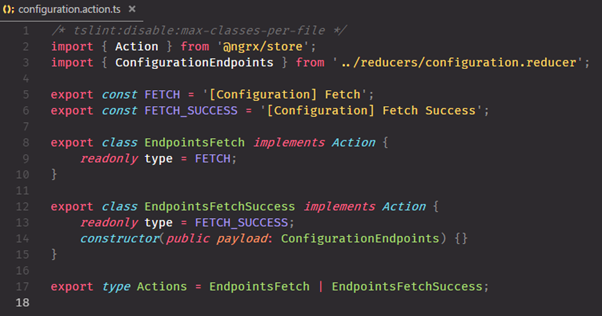
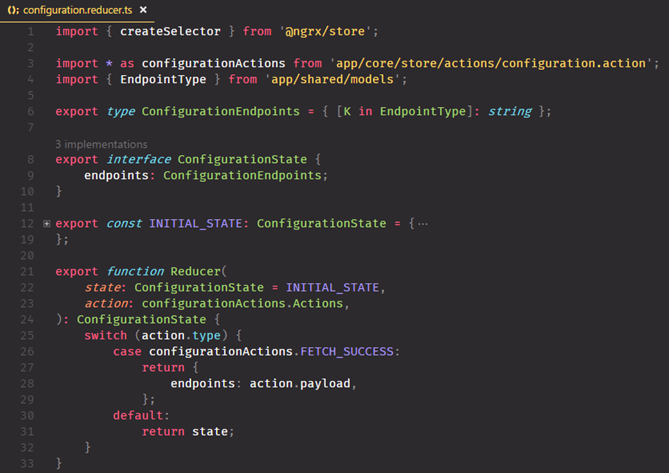
ngrx
Read more about ngrx
- NGRX, Reactive State for Angular.
- NGRX is a group of libraries.
- NGRX <– Redux pattern <– Flux pattern.
- The main purpose of this pattern is to provide a predictable state container, based on three main principles.
- Single source of truth - state of your whole application is stored in an object tree within a single store.
- State is read-only – you are never going to change the state directly instead you are going to dispatch actions. These actions describe what’s happening (can be things like getting, adding, removing, updating the state).
- Changes are made with pure functions - reducers (remember that they are just pure functions) receive an action and the state, depending on the action dispatched (usually with a switch statement) they execute an operation and return a new state object.
- State in a redux app is immutable. So, when a reducer changes something in the state, it returns a new state object.
- pure functions – for same arguments you are going to get the same result.
The main benefit, in my opinion, is that by binding all our components inputs to state properties we can change the change detection strategy to on push, and this is going to be a boost on performance for the application.

Checklist Topics
- Directives
- Custom Attribute Directive
- Custom Structural Directive
- Services and DI
- Services Overview
- Creating a Service
- Injecting a Service
- Example: Calculator Service
- Dependency Injection
- Why Dependency Injection?
- Injection API
- Component Multi Providers
- Injection Multi Providers
- Injector in angular works
- Scoping the beans – singleton and prototype
- Lifecycle hooks – ngOnChange, ngOnInit, ngDoCheck, ngAfterContentInit, ngAfterContentCheck, ngAfterViewInit, ngAfterViewCheck, ngOnDestroy
- Routing
- Introduction and Use
- Creating and configuring Routes
- Imperative Routing
- Routing Parameters
- Child Routes
- Routing Lifecycle Hooks
- Setting up Firebase
- HTTP POST Request
- HTTP GET Request
- Routers
- Router Guards - https://codecraft.tv/courses/angular/routing/router-guards/
- Observables
- Promises - still available, still useful
- Calling an API via HTTP
- Introduction to Observables
- Observable Bindings
- Observables Operators
- Forms
- Controls
- Control groups
- FormBuilder
- Template Driven Approach
- Data Driven Approach
- Pipes
- Pure impure functions
- Pure impure pipes
- Custom Pipes and declarations
- Using Pipes
- Creating Pipes
- Built-in Pipes
- Chaining Pipes
- Custom Pipes
- Stateful Pipes
- http
- calls to service
- authentication
- ngRX store - component, action, reducer, store
- JWT on angular side
- Stateful angular
- Session Store
- optimizations and ngmodules
- @NgModule
- deployment
- –prod jit vs –prod –aot
- animations and testing
- Unit Testing
- End to End Testing
Node JS Training Outline
- Introduction to the Node.js framework
- Installing Node.js
- Using Node.js to execute scripts
- The Node Package Manager
- The package.json configuration file
- Global vs. local package installation
- Automating tasks with Gulp.
- The HTTP protocol
- Building an HTTP server
- Rendering a response
- Using Representational State Transfer
- Express Framework
- Connecting to Mongo databases
- Performing CRUD operations
Future Bookmarks
- Parent to Child – Content Projection
- content projection – ng-content
- multiblock content projection - selector
- multiblock content projection - selector
- Preparing for TypeScript
- Brief Intro to TypeScript
- The TypeScript Module System
- Getting Setup
- Project Setup
- String Templates
- Const
- Let
- Debugging
- Rest & Spread Operators
- Arrow Functions
- For…of
- Maps
- Sets
- Class
- Interface
- Generics
- New Object Features
- Destructuring
- Angular 4 with TypeScript and Modules
- TypeScript decorators