- Introduction
- Multi Tenancy
- OAuth
- Authorization Grant Types
- CSRF (Cross Site Request Forgery)
- JWT (JSON Web Tokens)
- OpenID Connect (OIDC)
- To Do
Introduction
- Auth0 is a flexible, drop-in solution to add authentication and authorization services to your applications.
- Can be used with any application(written in any language/stack)
Why use auth0 (Use Cases)
- You built an app and want to add authentication and authorization.
- Secure your app with OAuth2
- More than one app, implement SSO
- Mobile App and JS Frontend needs to securely access your api
- Implement One time password login
- You don’t want to implement your own user management solution.
- Want to enforce MFA(Multi Factor Authentication)
- Want to use analytics to track users on your site/app.
Industry Standards Used in Auth0
- Open Authorization 2 (OAuth2)
- authorization standard that allows a user to grant limited access to their resources on one site, to another site, without having to expose their credentials.
- Example - login using Google account
- OpenID Connect (OIDC)
- identity layer that sits on top of OAuth 2 and allows for easy verification of the user’s identity.
- ability to get basic profile information from the identity provider.
- JSON Web Tokens (JWT)
- open standard that defines a compact and self-contained way for securely transmitting information between parties as a JSON object.
Terminology
Tenant
- Tenant is a term borrowed from software multitenancy. It refers to an architecture where a single software instance serves multiple tenants. In Auth0, a tenant is logically isolated. No tenant can access the data of another tenant, even though multiple tenants might be running on the same machine.
- Characteristics
- The tenant name has to be unique. It will be used to create your personal domain.
- The tenant name must be all lowercase.
- The tenant name cannot be changed after creation.
- You can create more than one tenant; in fact, you are encouraged to do so for each environment you have (such as Development, Staging, or Production).
Domains
- Auth0 domains, base URL you will use to access our API and the URL where your users are redirected in order to authenticate.
- Pattern :
.auth0.com
Application
- Refers to third-party applications that need access to restricted resources owned by resource owner without sharing credentials with the third party.
- you must register each application.
- On creation, Each App have a generated client ID (Sharable) and client Secret (confidential).
- Types of Applications:
- Regular Web App - Traditional web apps that perform most of their application logic on the server (such as Express.js or ASP.NET).
- Single-page app(SPA) - JavaScript apps that perform most of their user interface logic in a web browser, communicating with a web server primarily using APIs (such as AngularJS + Node.js or React).
- Native App - Mobile or Desktop apps that run natively in a device (such as iOS or Android).
- Machine-to-Machine - Non-interactive apps, such as command-line tools, daemons, IoT devices, or services running on your back-end. Typically, you use this option if you have a service that requires access to an API.
- Auth0 provides many different authentication and authorization grant types or flows and allows you to indicate which grant types are appropriate based on the
grant_typesproperty of your Auth0-registered app.
Can the app securely hold credentials?
- Confidential apps can hold credentials securely, require a trusted backend server to store the secret(s).
- while public apps cannot.
Who owns the app?
- First-party apps -controlled by the same organization or person that owns the Auth0 domain.
- Third-party apps - external parties or partners to securely access protected resources behind your API.
Connection
- Auth0 sits between your app and the identity provider that authenticates your users (such as Google or Facebook). Through this level of abstraction, Auth0 keeps your app isolated from any changes of the provider’s implementation.
- This relationship between Auth0 and the identity provider is referred to as a Connection.
- Connections are sources of users and they can be of the following types:
- Database connections: Users log in with username and passwords, stored either in the Auth0 cloud or your own database
- Social logins: Google, Facebook, Twitter, and more
- Enterprise directories: LDAP, G Suite, Office 365, ADFS, AD, SAML-P, WS-Federation, and more
- Passwordless systems: Users log in with one-time codes, sent via SMS or email
- Each connection can be shared among multiple applications. You can configure any number of connections, and then choose which of them to enable for each application.
Rules
Read more about Rules
- Configure custom JavaScript snippets that are executed in Auth0 as part of the transaction every time a user authenticates to your application.
- You can call external APIs, filter which users can login to your application, use a whitelist, geolocated access or anything.
Hooks
Read more about Hooks
- Configure Node.js code that is executed against extensibility points (which are comparable to webhooks that come with a server).
- This way you can customize the behaviour of Auth0 when you use Database Connections
Types of Applications
- Regular Web App -
- Traditional web apps that perform most of their application logic on the server (such as Express.js or ASP.NET).
- Single-page app(SPA) -
- JavaScript apps that perform most of their user interface logic in a web browser, communicating with a web server primarily using APIs (such as AngularJS + Node.js or React).
- Native App -
- Mobile or Desktop apps that run natively in a device (such as iOS or Android).
- Machine-to-Machine -
- Non-interactive apps, such as command-line tools, daemons, IoT devices, or services running on your back-end.
- Typically, you use this option if you have a service that requires access to an API.
- Regular Web app/ Native App/ SPA - Settings, Quick Start, Add-ons, Connections
- M2M -
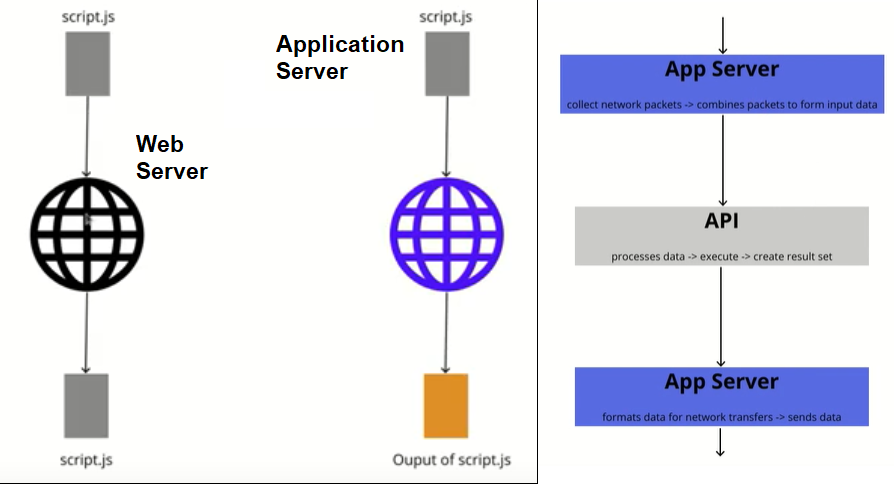
Web Server vs Application Server vs API
- Web Server
- serves static resource (has web container)
- Works with HTTP (HttpRequest and HttpResponse)
- Application Server - Computing power
- API - Contract between source and target systems for what data will be in and the format of it.
- API is the contract and Server is the lower level mechanism to transmitting and collecting the data b/w two systems.
Classification of Applications
- Confidential Apps - Can securely hold credentials
- Public Apps
Confidential Applications
can hold credentials securely, they require a trusted backend server to store the secret(s).
Grant types
- Because confidential Applications use a trusted backend server, these Apps can use grant types that require them to authenticate by specifying their client ID and secret when calling the token endpoint.
- Auth0 provides many different authentication and authorization grant types or flows and allows you to indicate which grant types are appropriate based on the grant_types property of your Auth0-registered app.
- The following are considered to be confidential applications:
- A web application with a secure backend that uses the Authorization Code Flow, Password grant, or Password grant with Realm support
- A machine-to-machine (M2M) application that uses the Client Credentials Flow
ID Tokens Because confidential applications are capable of holding secrets, you can have ID Tokens issued to them that have been signed in one of two ways:
- Symmetrically, using their client secret (HS256)
- Asymmetrically, using a private key (RS256)
Public Applications
Public applications cannot hold credentials securely.
Grant types
- Public applications can only use grant types that do not require the use of their client secret.
- The following are public applications:
- A native desktop or mobile application that uses the Authorization Code Flow with PKCE
- A JavaScript-based client-side web application (such as a single-page app) that uses the Implicit Flow grant
ID Tokens
- Because public applications are unable to hold secrets, ID Tokens issued to them must be:
- Signed asymmetrically using a private key (RS256)
- Verified using the public key corresponding to the private key used to sign the token
Multi Tenancy
- Blog - https://auth0.com/blog/how-to-use-auth0-to-manage-your-multi-tenancy-application/
- Select connection - https://auth0.com/docs/libraries/lock/v11/selecting-the-connection-for-multiple-logins
- Auth0 for Multi Tenant - https://auth0.com/docs/design/using-auth0-with-multi-tenant-apps
-
UseCase Product0 - https://auth0.com/blog/using-auth0-for-b2b-multi-and-single-tenant-saas-solutions/
- Multi-tenant - One instance, multiple customers.
- Single-tenant - One instance, one customer.
Tenant
- a group of users who share access to that application instance.
- could be a company with multiple employees, all who have access to your SaaS service.
In a multi-tenant architecture, a single instance of your application would be shared across multiple companies (tenants), and across multiple employees within those companies.
Every tenant would however have a dedicated share of that instance, and multi-tenant application can then be customized for each specific tenant’s need, in particular:
- Branding - Each instance would likely need to be “skinned” to fit with the branding of the organization. This is akin to how Lock can be customized for each user’s login page.
- Functionality - Each tenant may require certain workflow changes that fit better with their business.
- Access Control - Each tenant will want to set the permissions, rights, and roles of their users independently.
Benefits of Multi-Tenancy (mainly SaaS company)
- Scalability
- In single tenancy architecture, there is overhead associated with spooling up each application instance.
- Example - Total 10 tenants and each tenant needed 1.1 servers for their requirement then you need total 20 servers as each tenant demands dedicated server.
- Data Hiding
- Easier to handle and utilize data when it is aggregated in a single location, so running queries across multiple tenants and analysing trends is simpler.
- Release Management
- Single codebase for all tenants, hence fix is released to all tenants in one go.
Why Multi-Tenancy Is Difficult
- it requires significant planning and forethought to go into the initial coding.
- As there is no physical separation between different tenants like there would be with single-tenant architectures, all the separation has to be resolved in code.
- Developers have to :
- determine the tenant a request was intended for
- protect against data leakage
- isolate configurations
- run individual logging and background tasks per tenant
- Additionally, as each tenant’s data is stored together, significant security testing is required to make sure each tenant has access to only their data.
OAuth
An open standard for access delegation, commonly used as a way for Internet users to grant websites or applications access to their information on other websites but without giving them the passwords.
Authentication
Authentication refers to the process of confirming identity. While often used interchangeably with authorization, authentication represents a fundamentally different function.
In authentication, a user or application proves they are who they say they are by providing valid credentials for verification. Authentication is often proved through a username and password, sometimes combined with other elements called factors, which fall into three categories: what you know, what you have, or what you are.
- Single-Factor Authentication relies on a password. Example: a school website that only requires validating a password against a username.
- Two-Factor Authentication relies on a piece of confidential information in addition to a username and password. Example: a banking website that validates a password against a username and then requires the user to enter a PIN known to only the user.
- Multi-Factor Authentication (MFA) uses two or more security factors from independent categories. Example: a hospital system that requires a username and password, a security code received on the user’s smartphone, and fingerprint.
For a comparison of authentication and authorization, see Authentication vs. Authorization](https://auth0.com/docs/authorization/concepts/authz-and-authn).
OAuth 2.0 Protocol
- OAuth 2.0 is the industry-standard protocol for authorization.
- OAuth protocol (also called framework) allows third-party applications to grant limited access to an HTTP service, either on behalf of a resource owner or by allowing the third-party application to obtain access on its own behalf. Access is requested by a client; it can be a website or a mobile application for example.
- OAuth 2.0 is a protocol that allows a user to grant limited access to their resources on one site, to another site, without having to expose their credentials.
To get access to the protected resources OAuth 2.0 uses Access Tokens. An Access Token is a string representing the granted permissions. By default, Auth0 generates Access Tokens, for API Authorization scenarios, in JSON Web Token (JWT) format. JWTs contain three parts: a header, a payload, and a signature:
- The header contains metadata about the type of token and the cryptographic algorithms used to secure its contents.
- The payload contains a set of claims, which are statements about the permissions that should be allowed, and other information like the intended audience and the expiration time.
- The signature is used to validate that the token is trustworthy and has not been tampered with.
The permissions represented by the Access Token, in OAuth 2.0 terms are known as scopes. When an application authenticates with Auth0, it specifies the scopes it wants. If those scopes are authorized by the user, then the Access Token will represent these authorized scopes.
| OAuth roles | |
|---|---|
| Resource Owner | the entity that can grant access to a protected resource. Typically this is the end-user. |
| Resource Server | the server hosting the protected resources. This is the API you want to access. |
| Client | the app requesting access to a protected resource on behalf of the Resource Owner. |
| Authorization Server | the server that authenticates the Resource Owner, and issues Access Tokens after getting proper authorization. In this case, Auth0. |
| User Agent | the agent used by the Resource Owner to interact with the Application, for example a browser or a native application. |
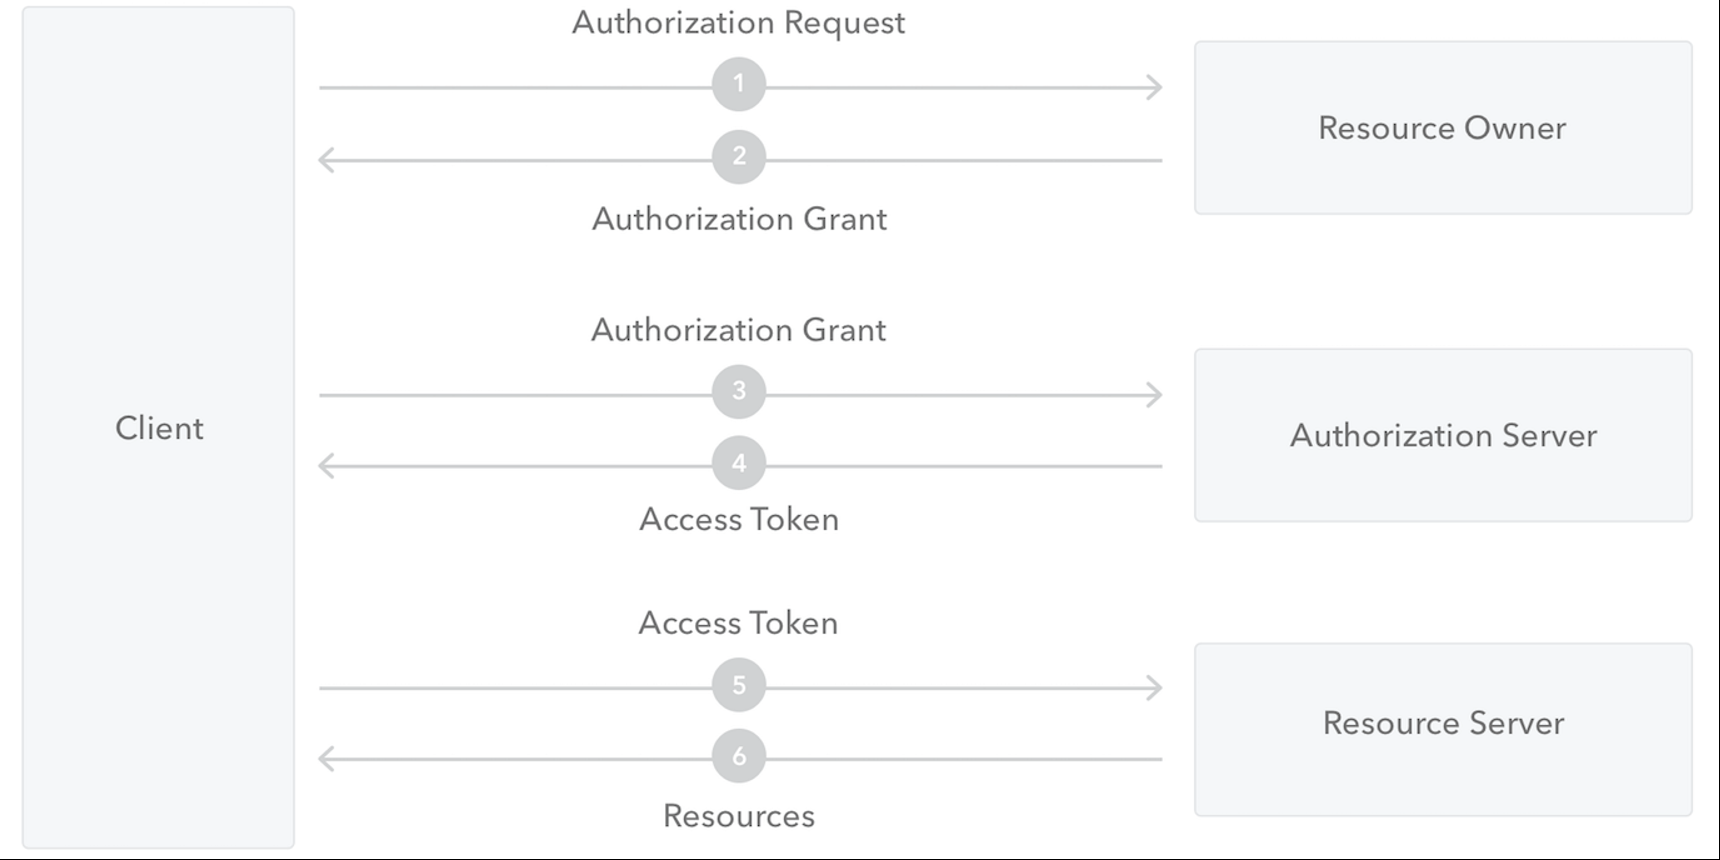
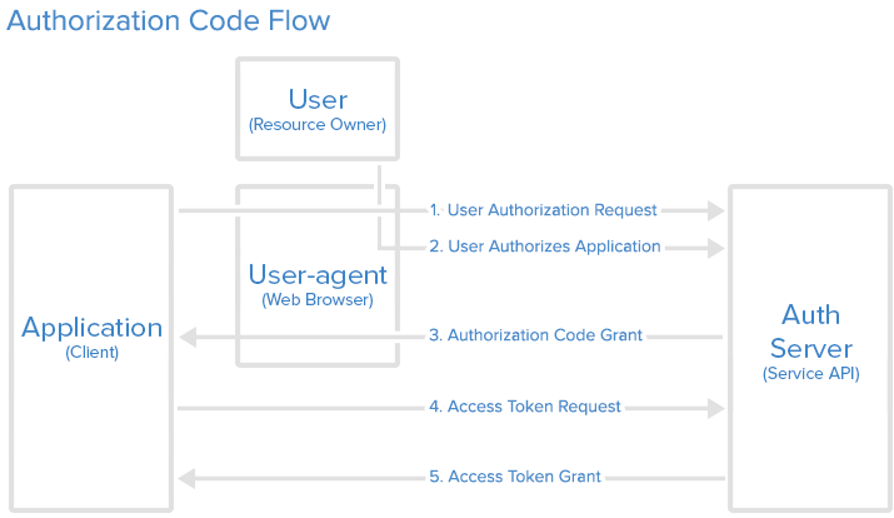
- The Application (Client) asks for authorization from the Resource Owner in order to access the resources.
- Provided that the Resource Owner authorizes this access, the Application receives an Authorization Grant. This is a credential representing the Resource Owner’s authorization.
- The Application requests an Access Token by authenticating with the Authorization Server and giving the Authorization Grant.
- Provided that the Application is successfully authenticated and the Authorization Grant is valid, the Authorization Server issues an Access Token and sends it to the Application.
- The Application requests access to the protected resource by the Resource Server, and authenticates by presenting the Access Token.
- Provided that the Access Token is valid, the Resource Server serves the Application’s request.
OAuth Endpoints
OAuth 2.0 utilizes two endpoints: the Authorization endpoint and the Token endpoint.
- For authorization: https://login.salesforce.com/services/oauth2/authorize
- For token requests: https://login.salesforce.com/services/oauth2/token
- For revoking OAuth tokens: https://login.salesforce.com/services/oauth2/revoke
Authorization endpoint
The Authorization endpoint is used to interact with the resource owner and get the authorization to access the protected resource.
The request parameters of the Authorization endpoint are:
- response_type: Tells the authorization server which grant to execute. Refer to the How Response Type Works paragraph for details.
- client_id: The id of the application that asks for authorization.
- redirect_uri: Holds a URL. A successful response from this endpoint results in a redirect to this URL.
- scope: A space-delimited list of permissions that the application requires.
- state: An opaque value, used for security purposes. If this request parameter is set in the request, then it is returned to the application as part of the redirect_uri.
How response type works
- This endpoint is used by the Authorization Code and the Implicit grant types. The authorization server needs to know which grant type the application wants to use, since it affects the kind of credential it will issue: for Authorization Code grant it will issue an authorization code (which later can be exchanged with an Access Token), while for Implicit grant it will issue an Access Token.
Authorization Code vs Access Token An authorization code is an opaque string, meant to be exchanged with an Access Token at the token endpoint. An Access Token is an opaque string (or a JWT in Auth0 implementation) that denotes who has authorized which permissions (scopes) to which application. In order to inform the authorization server which grant type to use, the response_type request parameter is used:
- For Authorization Code grant set response_type=code. This way the response will include an authorization code.
- For Implicit grant set response_type=token. This way the response will include an Access Token. An alternative is to set response_type=id_token token. In this case the response will include both an Access Token and an ID Token.
ID Token The ID Token is a JWT that contains information about the logged in user. It was introduced by OpenID Connect (OIDC). For more info, see OpenID Connect and ID Token.
Token endpoint
- The Token endpoint is used by the application in order to get an Access Token or a Refresh Token. It is used by all flows, except for the Implicit Flow (since an Access Token is issued directly).
- In the Authorization Code Flow, the application exchanges the authorization code it got from the Authorization endpoint for an Access Token.
- In the Client Credentials Flow and Resource Owner Password Credentials Grant, the application authenticates using a set of credentials and then gets an Access Token.
How response mode works
The OAuth 2.0 Multiple Response Type Encoding Practices specification, added a new parameter that specifies how the result of the authorization request is formatted. This parameter is called response_mode, it’s optional, and it can take the following values:
- query: This is the default for Authorization Code grant. A successful response is 302 Found, which triggers a redirect to the redirect_uri. The response parameters are embedded in the query component (the part after ?) of the redirect_uri in the Location header.
- fragment: This is the default for Implicit grant. A successful response is 302 Found, which triggers a redirect to the redirect_uri (which is a request parameter). The response parameters are embedded in the fragment component (the part after #) of the redirect_uri in the Location header.
- form_post: This response mode is defined by the OAuth 2.0 Form Post Response Mode specification. A successful response is 200 OK and the response parameters are embedded in an HTML form as hidden params. The action of the form is the redirect_uri and the onload attribute is configured to submit the form. Hence, after the HTML is loaded by the browser, a redirection to the redirect_uri is done.
- web_message: This response mode is defined by the OAuth 2.0 Web Message Response Mode specification. It uses HTML5 Web Messaging instead of the redirect for the Authorization Response from the Authorization Endpoint. This is particularly useful when using Silent Authentication. To use this response mode you have to register your app’s URL at the Allowed Web Origins field of your Application’s settings.
HTTP/1.1 200 OK
<html>
 <head><title>Submit</title></head>
 <body onload="javascript:document.forms[0].submit()">
  <form method="post" action="https://my-redirect-uri.com/callback">
    <input type="hidden" name="state" value="klsdfY78FVN3sl6DWSjsdhfsd8r67832nb"/>
    <input type="hidden" name="access_token" value="eyJ...plD"/>
  </form>
 </body>
</html>
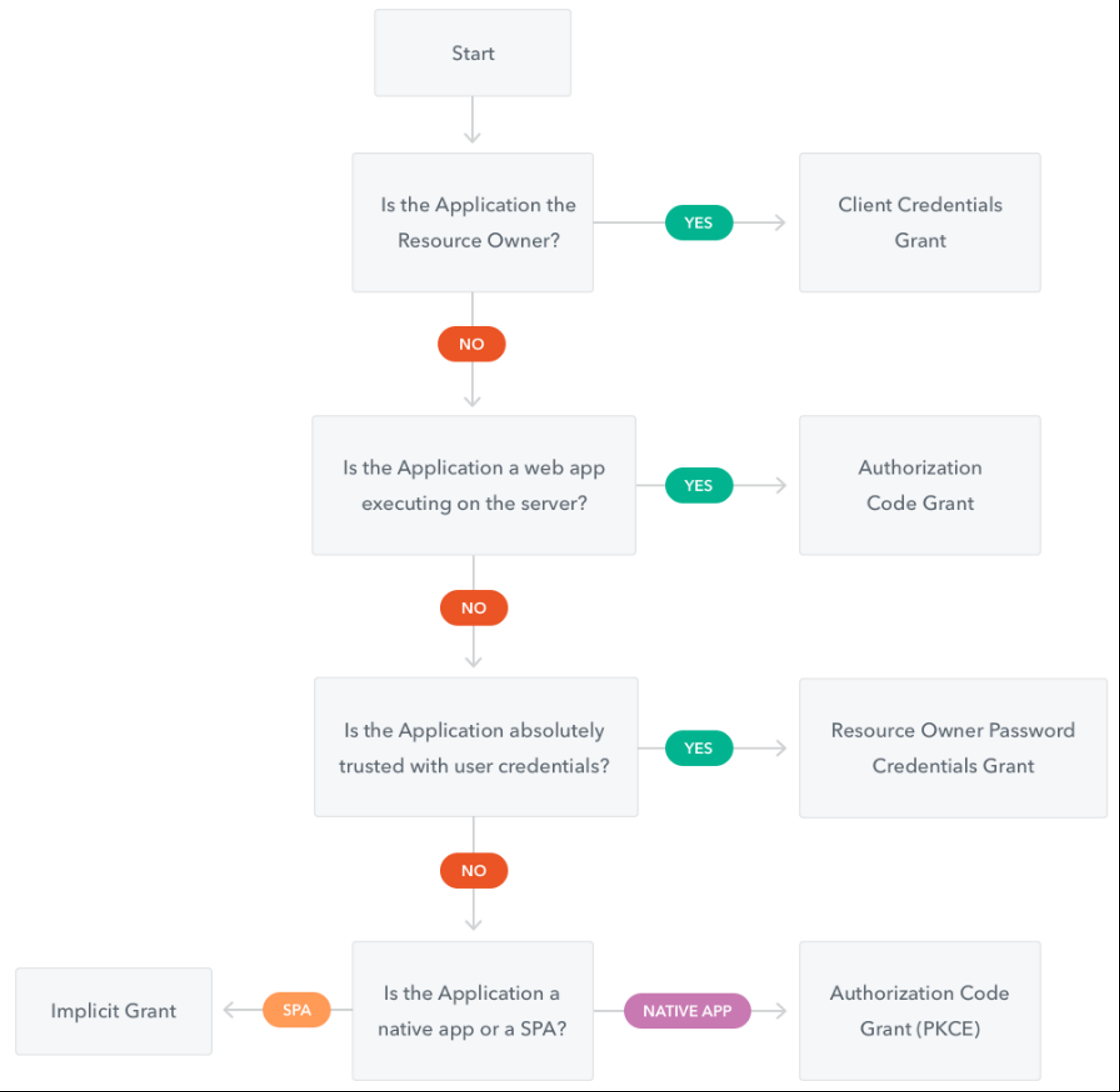
Authorization Grant Types
The OAuth 2.0 Authorization Framework specification defines four flows to get an Access Token. These flows are called grant types. Deciding which one is suited for your case depends mostly on the type of your application.
- Authorization Code: used by Web Apps executing on a server. This is also used by mobile apps, using the Proof Key for Code Exchange (PKCE) technique.
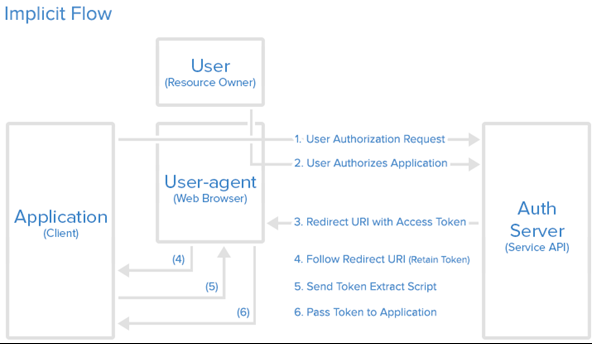
- Implicit: used by JavaScript-centric apps (Single-Page Applications) executing on the user’s browser.
- Resource Owner Password Credentials: used by trusted apps.
- Client Credentials: used for machine-to-machine communication.
The specification also provides an extensibility mechanism for defining additional types.
Authorization Code
Implicit
Password

With the resource owner password credentials grant type, the user provides their service credentials (username and password) directly to the application, which uses the credentials to obtain an access token from the service. This grant type should only be enabled on the authorization server if other flows are not viable. Also, it should only be used if the application is trusted by the user (e.g. it is owned by the service, or the user’s desktop OS).
Client Credentials
The client credentials grant type provides an application a way to access its own service account. Examples of when this might be useful include if an application wants to update its registered description or redirect URI, or access other data stored in its service account via the API.
CSRF (Cross Site Request Forgery)
State Parameter
Authorization protocols provide a state parameter that allows you to restore the previous state of your application. The state parameter preserves some state object set by the client in the Authorization request and makes it available to the client in the response.
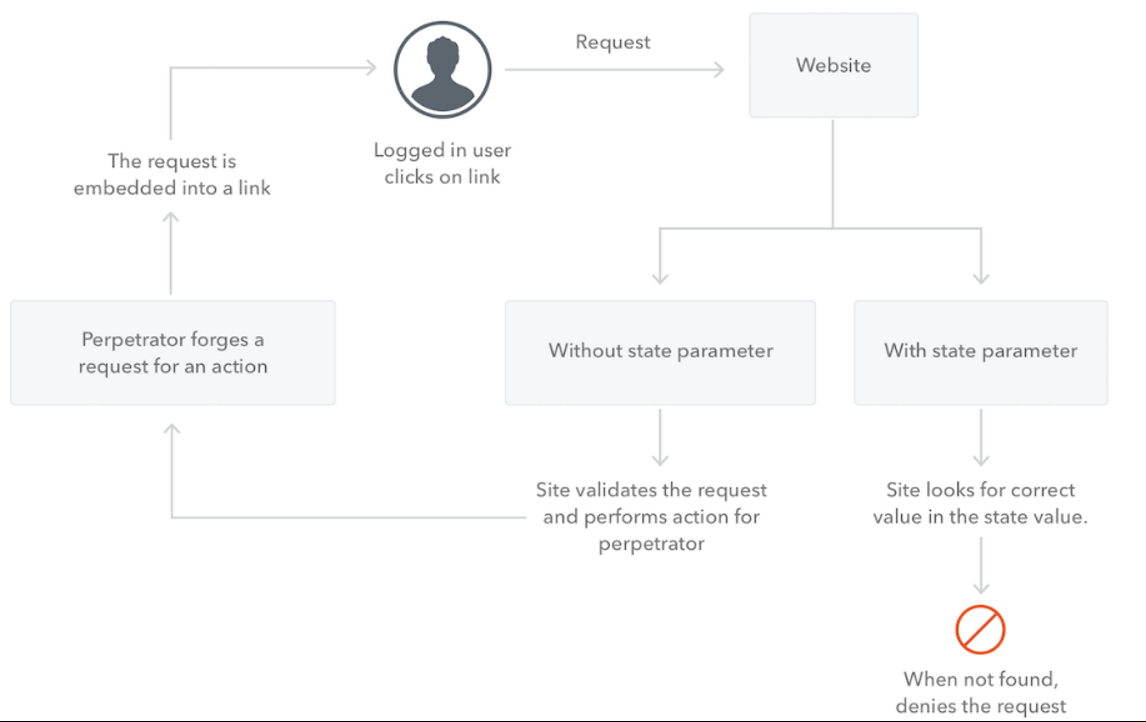
CSRF attacks
The primary reason for using the state parameter is to mitigate CSRF attacks. When you use state for CSRF mitigation on the redirection endpoint, that means that within the state value there is a unique and non-guessable value associated with each authentication request about to be initiated. It’s that unique and non-guessable value that allows you to prevent the attack by confirming if the value coming from the response matches the one you expect (the one you generated when initiating the request). The state parameter is a string so you can encode any other information in it.
Redirect users
You can also use the state parameter to encode an application state that will round-trip to the client application after the transaction completes. In this way, the application can put the user where they were before the authentication process happened.
Limitations
- From a security perspective, neither the request nor the response is integrity-protected so a user can manipulate them. That is true for adding a parameter to the redirect_uri as well.
- The allowed length for state is not unlimited. If you get the error 414 Request-URI Too Large try a smaller value.
JWT (JSON Web Tokens)
JWT is a self-contained authentication token that can contain information such as a user identifier, roles and permissions of a user, and anything else you might want to store in it. It can be easily read and parsed by anyone and can be verified as authentic with a secret key.
Advantages of JWT with Microservices
- We can set it up so that it already contains any authorities that the user has. This means that each service does not need to reach out to our authorization service in order to authorize the user.
- They are serializable and small enough to fit inside a request header.
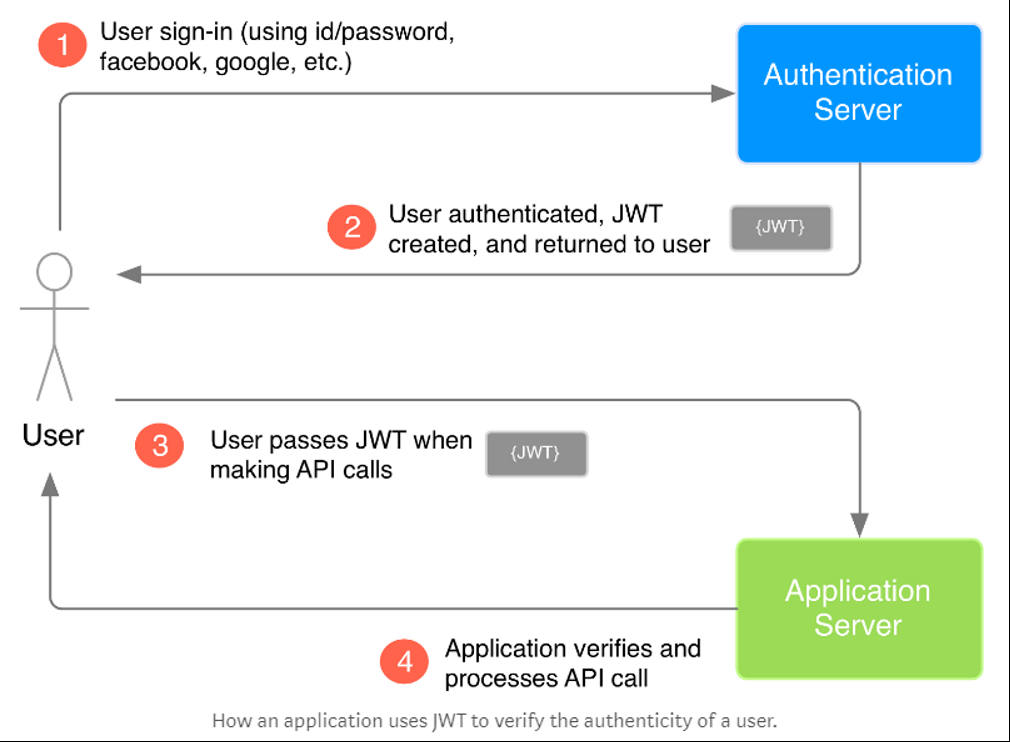
How It Works
- Firstly, request is a POST to an unprotected authentication endpoint with a username and password.
- On successful authentication, the response contains a JWT.
- All further requests come with an HTTP header that contains this JWT token in the form of Authorization: xxxxx.yyyyy.zzzzz.
- Any service-to-service requests will pass this header along so that any of the services can apply authorization along the way.
// signature algorithm
data = base64urlEncode( header ) + “.” + base64urlEncode( payload )
hashedData = hash( data, secret )
signature = base64urlEncode( hashedData )
The data string is hashed with the secret key using the hashing algorithm specified in the JWT header. The resulting hashed data is assigned to hashedData. This hashed data is then base64url encoded to produce the JWT signature.
header.payload.signature
How does JWT protect our data?
It is important to understand that the purpose of using JWT is NOT to hide or obscure data in any way. The reason why JWT are used is to prove that the sent data was actually created by an authentic source.
As demonstrated in the previous steps, the data inside a JWT is encoded and signed, not encrypted. The purpose of encoding data is to transform the data’s structure. Signing data allows the data receiver to verify the authenticity of the source of the data. So encoding and signing data does NOT secure the data. On the other hand, the main purpose of encryption is to secure the data and to prevent unauthorized access.
Since JWT are signed and encoded only, and since JWT are not encrypted, JWT do not guarantee any security for sensitive data.
The application server receives the secret key from the authentication server when the application sets up its authentication process. Since the application knows the secret key, when the user makes a JWT-attached API call to the application, the application can perform the same signature algorithm as in Step 3 on the JWT. The application can then verify that the signature obtained from it’s own hashing operation matches the signature on the JWT itself (i.e. it matches the JWT signature created by the authentication server). If the signatures match, then that means the JWT is valid which indicates that the API call is coming from an authentic source. Otherwise, if the signatures don’t match, then it means that the received JWT is invalid, which may be an indicator of a potential attack on the application. So by verifying the JWT, the application adds a layer of trust between itself and the user.
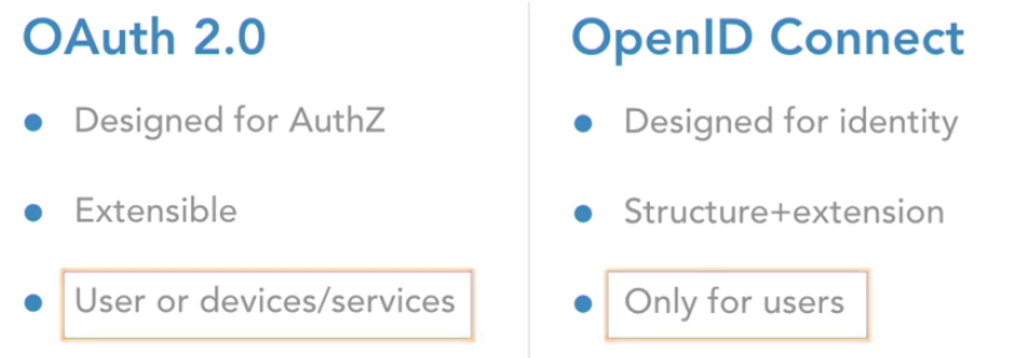
OpenID Connect (OIDC)
OpenID Connect (OIDC) is an authentication protocol, based on the OAuth 2.0 family of specifications. It uses simple JSON Web Tokens (JWT), which you can obtain using flows conforming to the OAuth 2.0 specifications.
While OAuth 2.0 is about resource access and sharing, OIDC is all about user authentication. Its purpose is to give you one login for multiple sites. Each time you need to log in to a website using OIDC, you are redirected to your OpenID site where you login, and then taken back to the website.
For example, if you chose to sign in to Auth0 using your Google account then you used OIDC. Once you successfully authenticate with Google and authorize Auth0 to access your information, Google will send back to Auth0 information about the user and the authentication performed. This information is returned in a JWT. You’ll receive an Access Token and, if requested, an ID Token.
How the Protocol Works
Let’s use the example we mentioned earlier, signing into Auth0 using your Google account, for a high level overview on how the flow works:
- When you choose to sign in to Auth0 using your Google account, Auth0 sends an Authorization Request to Google.
- Google authenticates your credentials or asks you to login if you are not already signed in, and asks for your authorization (lists all the permissions that Auth0 wants, for example read your email address, and asks you if you are ok with that).
- Once you authenticate and authorize the sign in, Google sends an Access Token, and (if requested) an ID Token, back to Auth0.
- Auth0 can retrieve user information from the ID Token or use the Access Token to invoke a Google API.
Access Tokens
Access Tokens are credentials that can be used by an application to access an API. Access Tokens can be an opaque string, JWT, or non-JWT token. Its purpose is to inform the API that the bearer of this token has been granted delegated access to the API and request specific actions (as specified by the scopes that have been granted).
ID Tokens
The ID Token is a JSON Web Token (JWT) that contains identity data. It is consumed by the application and used to get user information like the user’s name, email, and so forth, typically used for UI display. ID Tokens conforms to an industry standard (IETF RFC 7519) and contain three parts: a header, a body and a signature.
Claims
- JWT Tokens contain claims, which are statements (such as name or email address) about an entity (typically, the user) and additional metadata.
- The OpenID Connect specification defines a set of standard claims. The set of standard claims include name, email, gender, birth date, and so on. However, if you want to capture information about a user and there currently isn’t a standard claim that best reflects this piece of information, you can create custom claims and add them to your tokens.
To Do
Auth0 - References
- OAuth 2.0 and OpenID Connect (in plain English)
- Auth0 Videos (official)
- QuickStart Apps
- Auth0 Config Steps
- Auth0 Libraries
- https://auth0.com/docs/dev-centers/java (More Libraries)
Universal Login Page
- Login Page Customization
- Lock UI Customization
- Force email verification
- Lock Error Message
- Custom Fields
- Custom Sign Up