References
Introduction
Linux container
- A Linux container is an operating system-level virtualization technology that, unlike a virtual machine (VM), shares the host operating system kernel and makes use of the guest operating system libraries for providing required OS capabilities.
- Since there is no dedicated operating system, containers are more lightweight and start much faster than VMs.
Docker
- Docker was developed as an open platform for packaging, deploying, and running distributed applications.
- Docker uses its own Linux container library called libcontainer.
- It became the most popular and widely used container management system.
- Later, this library was donated to OCI (Open Container Initiative) with the name of runc.
Why Do We Need Containers for Microservices?
- To manage a microservice-based application, containers are the easiest alternative.
- It helps the user to individually deploy and develop.
- You can also use Docker to encapsulate microservices in the image of a container.
- Without any additional dependencies or effort, microservices can use these elements.
What is the use of Docker?
- Docker offers a container environment which can be used to host any application.
- This software application and the dependencies that support it which are tightly-packaged together.
What is Docker? How to deploy Spring Boot Microservices to Docker?
- What is Docker
- Deploying Spring Based WAR Application to Docker
- Deploying Spring Based JAR Application to Docker
What is Docker? How to deploy Spring Boot Microservices to Docker?
- What is Docker
- Deploying Spring Based WAR Application to Docker
- Deploying Spring Based JAR Application to Docker
How to deploy multiple microservices to docker?
Containerizing a Spring Boot Demo Applicaton
Create Container Image
The easiest way to create a Docker image is to write a Dockerfile. It contains a series of commands that customize an image based on a previous one. For our application, we will start from the existing OpenJDK 10 image, add our JAR file, and define the default command that will execute when the container starts.
The Dockerfile below is also available to be copied here. This file should be in the same folder of the project.
# Our base image that contains OpenJDK
FROM openjdk
# Add the fatjar in the image
COPY target/demo-0.0.1-SNAPSHOT.jar /
# Default command
CMD java -jar /demo-0.0.1-SNAPSHOT.jar
Before adding the JAR file to the image, we needed to create it using the command mvn package. Now that we have a Dockerfile, we can execute the build of the JAR and the Docker image using the following commands:
$ mvn package
. . .
$ sudo docker build -t demo .
Sending build context to Docker daemon  17.87MB
Step 1/3 : FROM openjdk
Step 2/3 : COPY target/demo-0.0.1-SNAPSHOT.jar /
Step 3/3 : CMD java -jar /demo-0.0.1-SNAPSHOT.jar
. . .
Successfully built 4df92f5aa7f6
Successfully tagged demo:latest
The flag -t on the docker build command specifies the name/tag of the image. Using a tag called demoallows you to refer to this image by its name when you need to create a container instance. The last parameter for docker build is the path of Dockerfile. Since the Dockerfile is in the same folder of your project, the . will instruct the Docker daemon to use the file in the same folder that you execute the command.
Running the Application Inside the Container
The previously created image called demo is available locally. You can check the existing images available locally through the command docker images.
The demo image can now be used to create a new container instance with the following command:
$ sudo docker run -d --name demo-app -p 8080:8080 demo
582b891f7ffa307ad08f6669cfb473ac822dc49d29b80dc18477d4a120d2a023
The flag -d instructs the Docker daemon to detach from the container after the execution of the command. The flag –name gives the name demo-app to this container. If you don’t specify a name, Docker will create a random name for you.
By default, you can’t access any ports in the container unless you specify the mapping between the Docker daemon port and the container port. This feature is useful to allow the same application that is running on port 8080 to bind to different ports if you decide to run multiple containers. In our case, we are mapping port 8080 from the Docker daemon to port 8080 of the container through the flag -p 8080:8080.
Finally, we specify the name of the image that we want to use to create the container. In this case, we used the demo image created previously. After the execution of the command, it will show a hash number that identifies your container. You can verify the containers that are running with the following command:
$ sudo docker ps
CONTAINER ID        IMAGE               COMMAND                  CREATED             .         STATUS              PORTS                    NAMES
ebc74b33f1e5        demo                "/bin/sh -c 'java -j…"   5 minutes ago       Up 5 minutes        0.0.0.0:8080->8080/tcp   demo-app
Now that your container is being executed, you can open your browser again in the URL http://localhost:8080/api/hello. You will see the same result that you had previously, but this time, your application is running inside the container.
Extra Operations on the Container
Although your container is running detached, you can perform some operations on it like checking the logs of your application with the command docker logs plus the name of the container.
$ sudo docker logs demo-app
  .   ____          _            __ _ _
 /\\ / ___'_ __ _ _(_)_ __  __ _ \ \ \ \
( ( )\___ | '_ | '_| | '_ \/ _` | \ \ \ \
 \\/  ___)| |_)| | | | | || (_| |  ) ) ) )
  '  |____| .__|_| |_|_| |_\__, | / / / /
 =========|_|==============|___/=/_/_/_/
 :: Spring Boot ::        (v2.0.4.RELEASE)
...
If you want to open a terminal session inside the container, you can use the command docker execfollowed by the name of the container and the name of a process that you want to execute. In this case, we want to execute bash in an interactive terminal. Use the following command:
$ sudo docker exec -it demo-app bash
root@ebc74b33f1e5:/# ls
bin          dev           home   lib64   mnt   root  srv  usr
boot             docker-java-home  lib    libx32  opt   run   sys  var
demo-0.0.1-SNAPSHOT.jar  etc           lib32  media   proc  sbin  tmp
Once you are inside the container, you can run any Linux command like ls or ps. Note that if you run ls, you should see the file demo-0.0.1-SNAPSHOT.jar that was added during the creation of the image. You can exit from the container terminal and return to your local terminal by typing exit.
Publishing Your Image on Docker Hub
To publish your image on Docker Hub, you need to sign up for a free account.
Now that you have a Docker Hub account, you can log in by running docker login:
$ sudo docker login
Login with your Docker ID to push and pull images from Docker Hub. If you don't have a Docker ID, head over to https://hub.docker.com to create one.
Username:
Password:
Login Succeeded
Note that the images published on Docker Hub need to have your username as a prefix. When we created our demo image, we didn’t add the username prefix, but we can do it now using the command docker tag.
$ docker tag demo <your username>/refcard-demo
Now, the same image has two tags (demo and rafabene/refcard-demo). You can use any tag that you want. The only requirement to push to Docker Hub is to have your username as a prefix.
To push the new tag to Docker Hub, just execute the command docker push <your username>/image-name. Example:
$ sudo docker push <your username>/refcard-demo
The push refers to repository [docker.io/<your username>/refcard-demo]
4c7628270fc7: Pushed
. . .
25edbec0eaea: Mounted from library/openjdk
latest: digest: sha256:92cddb652d55db14c3f697d25f4c93a145f9b287522ae43afe623fe130437d35 size: 2212
Now, your image /refcard-demo is available to be used by any Docker daemon worldwide.
Scaling Your Application in the Cloud
Every time you execute the docker run command, it creates a single container running in a single machine. Now, imagine that you need to execute a fleet of containers on multiple servers. You will face the following challenges:
- How to scale?
- How to avoid port conflicts?
- How to manage them in multiple hosts?
- What happens if a host has a trouble?
- How to keep them running?
- How to update them?
- Where are my containers?
The answer to address all these challenges is using a container orchestration solution like Kubernetes. The easiest way to try Kubernetes and also have other features like image build automation, deploy automation, self-service catalog, and CI/CD pipelines is through the usage of OpenShift.
Red Hat® OpenShift® is the industry’s most secure and comprehensive enterprise-grade container platform based on industry standards, Docker, and Kubernetes. It is designed to provide ease of use, making Dev and Ops lives easier. Let’s deploy our application on OpenShift so you can understand some of its functionalities.
Go to https://www.openshift.com/ and create a free trial account. This account allows you to experiment OpenShift online with a limit of 1GB of RAM and 1GB of persistent storage. Once you have activated your free OpenShift Online Starter subscription, your account will be provisioned in seconds. Refresh the page and open the web console for OpenShift.
On the top right-hand side of the console, click Create Project. The name is the only required field. You can call it project.
To deploy our previously created image, click Deploy image. This will open a wizard that allows you to provide the name of the image pushed to Docker Hub. After you type the name of the image including in the format /refcard-demo, click the magnifier icon so OpenShift can read the metadata of the image. Now, click the blue Deploy button.
The image will be downloaded, and a new container instance will be executed based on your image.
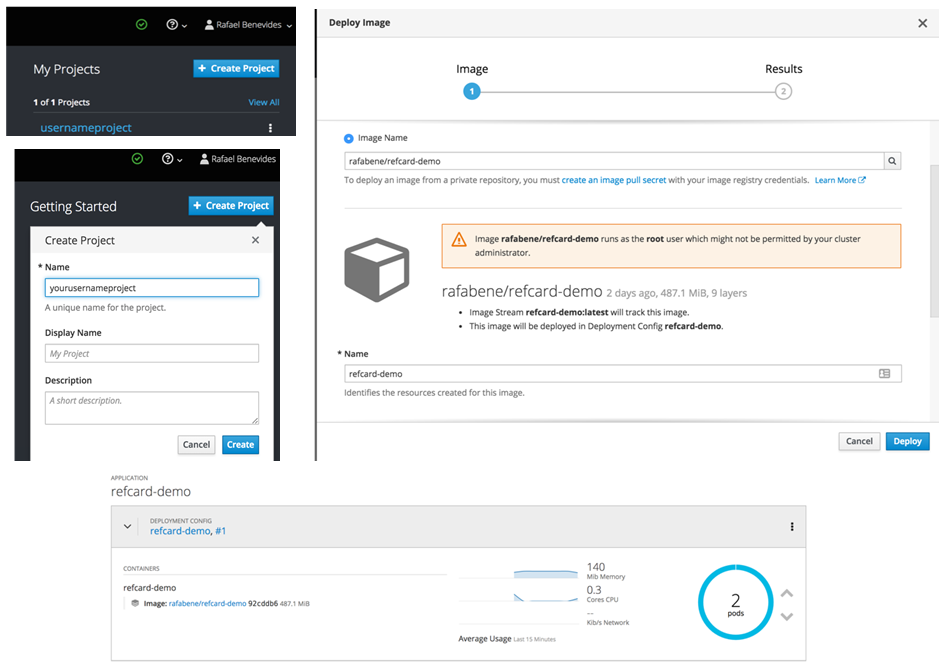
The up and down arrows control the number of replicas. Because we are running with a free subscription, scaling to more than two replicas will exceed the usage memory quota of 1GB and no replicas will be created. However, this feature can give you an idea of how easy is to create multiple container replicas and scale your application.
Making Your Cloud Application Accessible Externally
At this moment, your application is being executed inside the cluster, but it’s not accessible externally.
Because we can have more than one container executing, we need to create a load balancer to receive requests to this application. This load balancer is known as a “service” in the Kubernetes world. Kubernetes services can be created through a command line tool or using YAML or JSON format.
To avoid the installation of any command line tool, you can import the following YAML file by clicking Add to project on the top right-hand side of the screen and selecting Import YAML/JSON.
This file can also be copied from here.
kind: Service
apiVersion: v1
metadata:
 name: myservice
spec:
 type: LoadBalancer
 ports:
   - port: 8080
 selector:
  app: refcard-demo
This file requests the OpenShift/Kubernetes cluster creates a load balancer for the application called refcard-demo on port 8080. After defining this Kubernetes service, you will notice that a new section called Networking is available in your application. Although the Kubernetes service acts as a load balancer for internal traffic, we need an extra step to make our application available externally. To allow external access, we need to create a route. Click Create Route.

In the Create Route screen, accept the default values and click the blue Create button. Now, on the Overview screen, there’s a route to your application. You can click on the route link to open the application address in another tab. Don’t forget to add /api/hello in the address to allow it to access the endpoint that we have previously created (http:///api/hello).
Improving the Developer Workflow
As developer, to place your application in the cloud, you had to follow these steps:
- Create your application.
- Create a Dockerfile.
- Create a Docker image.
- Deploy the image on OpenShift.
- Create a service to act as a load balancer.
- Create a router.
What if I told you that OpenShift has a feature called S2I (source-to-image) that allows your application to be containerized and deploy from the sources? Your application’s source code just needs to be accessible in a Git repository on the internet.
If you don’t want to create a repository from the scratch for this application, just fork my repository.
Before exploring the S2I features, we need first to get rid of all objects that have been created up until now (deployment, route, service, etc.). The easiest way to do this is by deleting the entire project.
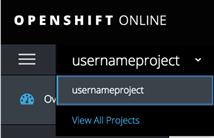
To delete the entire project, select View all projects in the top left corner. In the My projects screen, select your application menu and click Delete Project. You will be asked to confirm the deletion of the project.
Create your project again. If you receive a message saying that your project already exists, wait a few seconds and try again. The project may still be being removed from the cluster.
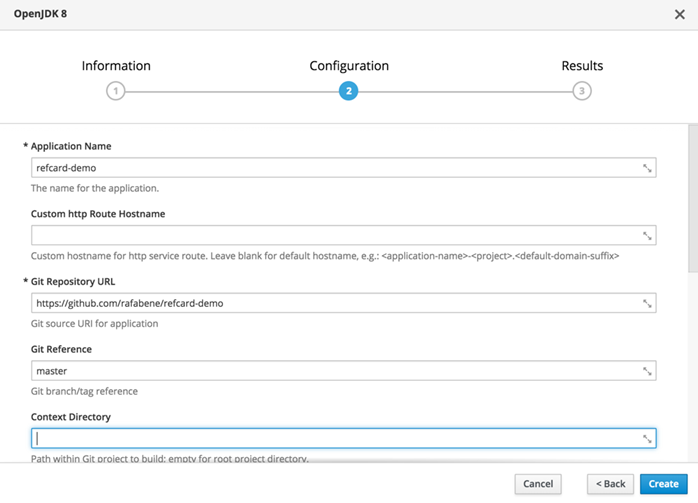
In Get started with your project, instead of deploying an image as we did previously, click Browse Catalog. The OpenShift catalog has support for several languages, databases, and middleware runtimes. You can just go to the Java tab and select OpenJDK 8.
In the wizard, make sure to fill the following fields:
- Application name: refcard-demo
- Custom HTTP route hostname:
- Git repository URL: Use your forked repository from here.
- Git reference (git branch): Master
- Context directory: (Delete the existing value) Click Create.
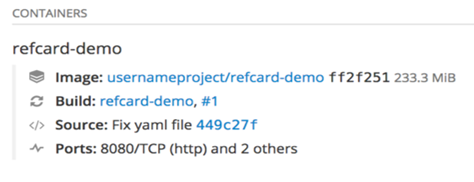
The build process will start automatically. You can check the build log running in the Overview page and note that OpenShift will clone your Git repository and run a Maven package on your project. When the build process completes, the new container will be deployed automatically.
You can notice also that the route and service objects were automatically created.
Continuously Delivering Your Java Application
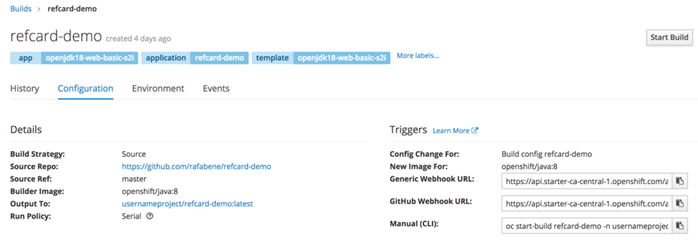
Since you created your application from the source code, OpenShift also shows the commit version that was used to create your application.
You can enable the continuous delivery of your code by configuring GitHub to send notifications of new commits to OpenShift. When OpenShift receives that notification, it will start the build automatically.
Click the Build link, as you can see in the image above. That will take you to Build Configuration. In the Configuration tab, you can copy the GitHub webhook URL (located on the right-hand side of the screen under the Triggers section).
Copy the GitHub webhook URL. Open your GitHub project settings. Click Add webhook and fill the web form the following values:
- Payload URL:
- Content type:
- Secret:
- SSL verification:
- Which events would you like to trigger this webhook?: Just the push event.
- Active:
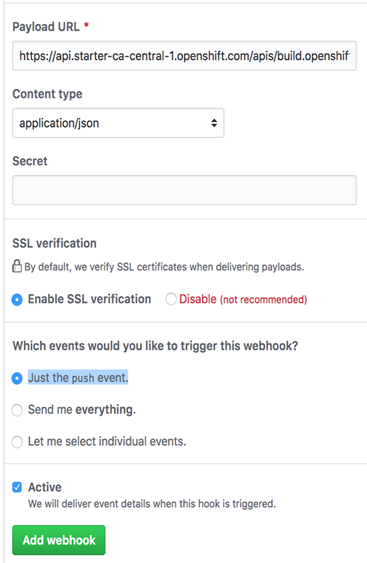
Click the green Add webhook button. To test the continuous delivery, you can modify the file HelloController.java. Change, for example, the RESPONSE_STRING_FORMAT variable from Hello from ‘%s’: %dto Version 2 - Hello from ‘%s’: %d.
When you push the committed change to your GitHub repository, GitHub will notify OpenShift and Build #2 will start automatically.
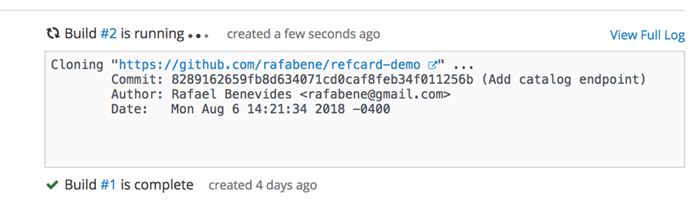
At the end of the build, OpenShift will replace all the running replicas with the one containing your changes. At the end of the deployment, you can open your browser at http:///api/hello and you should see the prefix Version 2.
Connecting Your Containerized Application to a Containerized Database
The application that you forked from https://github.com/rafabene/refcard-demo contains an endpoint that replies with a catalog of items, their names, and their prices in JSON format. These values are stored in an H2 “in-memory” database.
You can check this endpoint by opening the http:///api/catalog/ endpoint in the browser.
However, an in-memory database is not suitable for Enterprise applications. To replace our H2 database, we need to deploy a MySQL database. Because of the quota limit, before creating the database, make sure that you have only one replica of your refcard-demo application running.
In Search Catalog, select MySQL. On the wizard screen, change the value of MySQL Database Name to catalog. The other values like “username” and “password” can be generated automatically so you can see how your application can consume those generated values later.
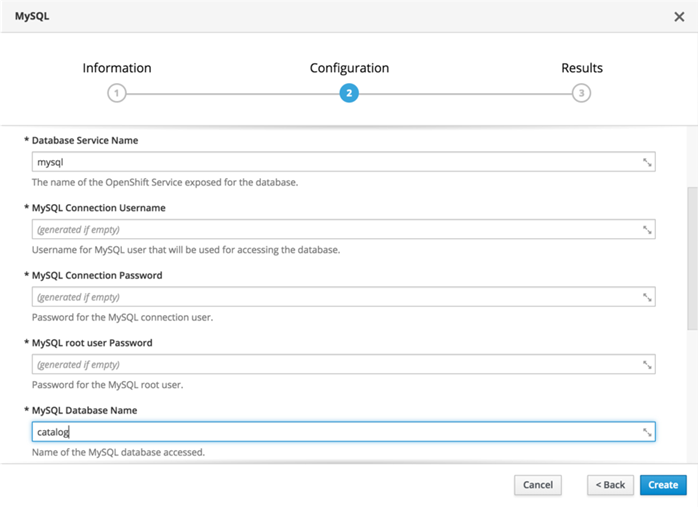
Click Create.
MySQL will be deployed, and all the sensitive information is stored in a “secret” object. This object can be consumed by the refcard-demo application as an environment variable or as a volume.
To configure our refcard-demo application to point to this MySQL instance, click Deployment Config for refcard-demo. Under the Environment tab, add the following values:
- SPRING_DATASOURCE_URL: jdbc:mysql://mysql/catalog?useSSL=false
- SPRING_DATASOURCE_DRIVER_CLASS_NAME: com.mysql.jdbc.Driver
Now, click Add ValueFrom Config Map or Secret and add:
- SPRING_DATASOURCE_USERNAME: mysql (secret) / database-user
- SPRING_DATASOURCE_PASSWORD: mysql (secret) / database-password
Click Save. Because these environment variables were introduced, OpenShift will replace the existing replica with a new one containing these values. After the deployment, you can check your application at http:///api/catalog/ to verify that it’s working.
According to Spring Boot configuration, these environment variables have a higher preference to configure the application over the existing application.properties file that already exists in the application.
We don’t know the value of the generated username and password for MySQL. However, we could configure the application to read the sensitive values from the “secret” object called mysql that was created when we deployed the database.
Accessing the In-Browser Terminal for the Running Containers
You can open a command prompt on any running container on OpenShift. Let’s open a terminal on MySQL so we can check if the database has been created and the values has been imported.
To open a terminal, click the pod number for your MySQL application that you see in the Overview page. This will open a page containing the details of your pod, which is how Kubernetes/OpenShift refers to the group of containers that run together. Once you click the Terminal tab, you will see a web terminal open in the running container mysql.
The credentials (username and password) in the MySQL container are stored in environment variables. You can connect to MySQL Server executing mysql -uecho $MYSQL_USER–password=echo $MYSQL_PASSWORD-h 127.0.0.1 catalog, as you can see below:
sh-4.2$ mysql -u `echo $MYSQL_USER` --password=`echo $MYSQL_PASSWORD` -h 127.0.0.1 catalog
mysql: [Warning] Using a password on the command line interface can be insecure.
Welcome to the MySQL monitor.  Commands end with ; or \g.
Your MySQL connection id is 1307
Server version: 5.7.21 MySQL Community Server (GPL)
Copyright (c) 2000, 2018, Oracle and/or its affiliates. All rights reserved.
Oracle is a registered trademark of Oracle Corporation and/or its
affiliates. Other names may be trademarks of their respective
owners.
Type 'help;' or '\h' for help. Type '\c' to clear the current input statement.
mysql>
Once you are connected, you can check the values in the database.
mysql> show tables;
+-------------------+
| Tables_in_catalog |
+-------------------+
| PRODUCT           |
+-------------------+
1 row in set (0.00 sec)
mysql> select * from PRODUCT;
. . .
8 rows in set (0.00 sec)
mysql> exit
Bye
sh-4.2$
Monitoring Running Containers - CPU, Memory, I/O Utilization
On each pod, the user can monitor the CPU, memory, and I/O of the running containers. This can be done by clicking on the Metrics tab. A pre-defined date range can be selected to view CPU, memory, and I/O historically.
