- Introduction
- MVC Flow
- Writing a controller
- Rendering web views
- Multipart Requests
- Handling exceptions
- Spring MVC - FAQ
- Creating JSP views
Introduction
- Developing web-based applications have challenges - state management, workflow, and validation.
- HTTP protocol’s stateless nature.
- Spring’s web framework is designed to help you address these concerns.
- Spring MVC pattern
- build web-applications that are flexible and as loosely coupled.
- well known design pattern for designing UI based applications.
- decouples business logic from UI, so they can change independently without affecting each other.
- Model-View-Controller
- Models - responsible for encapsulating application data for views to present.
- Views
- present data, without including any business logic.
- JSP templates written with Java Standard Tag Library (JSTL)
- Controller
- receive requests from users and invoke back-end service (business logic).
- collect response data and prepare models for views to present.
- Controller part is played by dispatcher servlet.
- 3-tier architecture
- data-service-presentation.
- MVC is actually part of presentation layer.
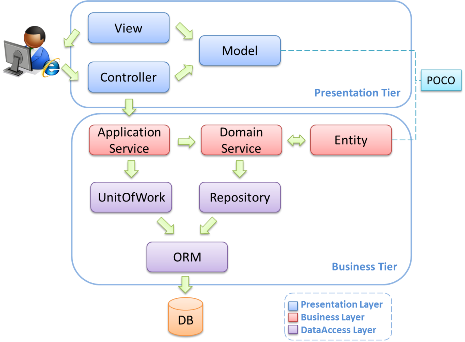
- The real controller in Spring MVC is DispatchServlet that will use the specific @Controller class to handle the URL request.
- @Controller - serves as C in MVC.
- @Service, @Repository and your entity classes will be M from MVC.
- @Service - serve as service layer. Here you should put your business logic.
- @Repository - serve for your data access layer. Here you should put CRUD logic: insert, update, delete, select.
- JSP and other view technologies will conform V from MVC.
- @Controller –> @Service (through interfaces).
- @Service –> other @Service and @Repository (through interfaces).
MVC Flow
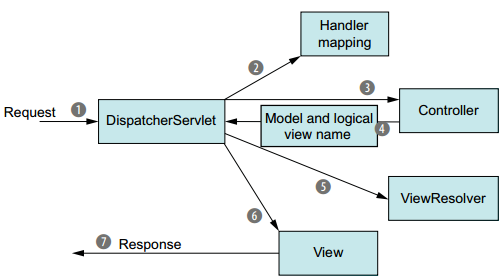
- Dispatcher Servlet (Spring Conrtoller) implements front controller design pattern
- every web request must go through it so that it can manage the entire request life cycle.
- configure in a Java web deployment descriptor - web.xml file.
- DispatcherServlet consults handler mappings to find out which controller to be called.
- HandlerMapping
- an interface that defines a mapping between requests and handler objects based on request URL.
- Controller handler mappings based on @RequestMapping.
- Model - After handler method processing, results need to be carried back.
- View - response given to a view, JavaServer Page (JSP) to be shown in user-friendly format.
- Controller packages ModelAndView (logical view name) to render the output.
- It then sends the request, along with the model and view name back to the DispatcherServlet.
- logical view - without any file extension.
- logical views mapped based on applicationContext file
- so that you can easily change your view layer code without even touching request handler class code.
- DispatcherServlet consults a view resolver to map the logical view name to a specific view implementation, which may or may not be a JSP.
- Now, DispatcherServlet’s final stop is at the view implementation, typically a JSP, where it delivers the model data.
- The view will use the model data to render output.
HandlerInterceptorAdapter
- HandlerMapping, maps controller method to an URL.
- DispatcherServlet uses HandlerAdapter to invoke the method.
- HandlerInterceptor
- perform actions before handling, after handling or after completion (when the view is rendered) of a request.
- can be used for cross-cutting concerns and to avoid repetitive handler code.
- like: logging, changing globally used parameters in Spring model etc.
References
- Read more about HandlerInterceptor
- Read more about HandlerInterceptorAdapter
DispatcherServlet
- DispatcherServlet
- implementation of FrontController.
- Java Servlet component.
- receives all incoming HTTP request.
- is a HttpServlet.
- configured in web application deployment descriptor(web.xml)
- can configure initialization parameters to alter the behavior of DispatcherServlet.
- Servlet container
- classpath classes which implement ServletContainerInitializer interface.
- implementation by spring, ServletContainerInitializer –> SpringServletContainerInitializer.
- It seeks out implementation of WebApplicationInitializer and delegates to them for configuration.
- implementation by spring, WebApplicationInitializer -> AbstractAnnotationConfigDispatcherServletInitializer.
- Any class that extends AbstractAnnotationConfigDispatcherServletInitializer will automatically be used to configure DispatcherServlet and the Spring application context in the application’s servlet context.
public class SpittrWebAppInitializer extends AbstractAnnotationConfigDispatcherServletInitializer {

 @Override
 protected String[] getServletMappings() {
   return new String[] { "/" };
   // paths that DispatcherServlet will be mapped to.
   // "/" means application’s default servlet ie. handle all requests
 }

 @Override
 protected Class<?>[] getRootConfigClasses() {
   return new Class<?>[] { RootConfig.class };
   // application context
 }

 @Override
 protected Class<?>[] getServletConfigClasses() {
   return new Class<?>[] { WebConfig.class };
   // servlet context
 }
}
- Configuring DispatcherServlet via
AbstractAnnotationConfigDispatcherServletInitializeris an alternative to the traditional web.xml file. - AbstractAnnotationConfigDispatcherServletInitializer creates both a DispatcherServlet and a ContextLoaderListener.
- ContextLoaderListener
- Spring application context.
- @Configuration class returned getRootConfigClasses() will be used to configure the application context created by ContextLoaderListener.
- Here, RootConfig configuration class.
- load beans for middle-tier and data-tier components.
- DispatcherServlet
- load beans containing web components such as controllers, view resolvers, and handler mappings.
- The @Configuration classes returned from getServletConfigClasses() will define beans for DispatcherServlet’s application context.
- Here, WebConfig configuration class.
<listener>
 	<listener-class>org.springframework.web.context.ContextLoaderListener</listener-class>
</listener>
<context-param>
  	<param-name>contextConfigLocation</param-name>
   	<param-value>/WEB-INF/root-context.xml</param-value>
</context-param>
<servlet>
 	<servlet-name>dispatcher</servlet-name>
 	<servlet-class>org.springframework.web.servlet.DispatcherServlet</servlet-class>
 	<init-param>
   		<param-name>contextConfigLocation</param-name>
   		<param-value>classpath:/context/dispatcher-servlet.xml</param-value>
 	</init-param>
 	<load-on-startup>1</load-on-startup>
</servlet>
<servlet-mapping>
  	<servlet-name>dispatcher</servlet-name>
  	<url-pattern>/</url-pattern>
</servlet-mapping>
Enabling Spring MVC
RootConfig is annotated with @ComponentScan.
@Configuration
@ComponentScan(
    basePackages={"spitter"},
    excludeFilters={ @Filter(type=FilterType.ANNOTATION, value=EnableWebMvc.class) }
    )
public class RootConfig {}
@Configuration
@EnableWebMvc
@ComponentScan("com.my.package")
public class WebConfig extends WebMvcConfigurerAdapter {

    @Bean
    public ViewResolver viewResolver() {
        InternalResourceViewResolver resolver = new InternalResourceViewResolver();
        resolver.setPrefix("/WEB-INF/views/");
        resolver.setSuffix(".jsp");
        resolver.setExposeContextBeansAsAttributes(true);
        return resolver;
    }

    @Override
    public void configureDefaultServletHandling(DefaultServletHandlerConfigurer configurer) {
        configurer.enable();
    }
}
<mvc:annotation-driven>to enable annotation-driven Spring MVC.- WebConfig annotated with @ComponentScan so that the com.my.package will be scanned for components.
- @Controller - candidates for component-scanning.
- ViewResolver bean
- InternalResourceViewResolver, configured to look for JSP files by adding prefix and suffix to view names.
- view name
homewill be resolved as/WEB-INF/views/home.jsp.
- WebConfig class extends WebMvcConfigurerAdapter
- override
configureDefaultServletHandling()method. - By calling enable() on the given DefaultServletHandlerConfigurer, you’re asking DispatcherServlet to forward requests for static resources to the servlet container’s default servlet and not to try to handle them itself.
- override
Application Context vs DispatcherServletContext
- Spring lets you define multiple contexts in a parent-child hierarchy.
- applicationContext.xml
- defines beans for “root webapp context”, i.e. the context associated with the webapp.
- used to contain beans that are shared between all servlets in a webapp.
- spring-servlet.xml defines beans for one servlet’s app context.
- There can be many servlets in a webapp.
- spring1-servlet.xml , spring2-servlet.xml.
- Beans in spring-servlet.xml can reference beans in applicationContext.xml, but not vice versa.
- All Spring MVC controllers must go in the spring-servlet.xml context.
Alternate Spring MVC configuration
- setting up Spring MVC by extending
AbstractAnnotationConfigDispatcherServletInitializer.- assumes that we want a basic
DispatcherServletandContextLoaderListenersetup. - assumes configuration will be in Java instead of XML.
- assumes that we want a basic
- you may need to configure DispatcherServlet in a traditional web.xml file.
Customizing DispatcherServlet configuration
customizeRegistration()- called after AbstractAnnotationConfigDispatcherServletInitializer registers DispatcherServlet with the servlet container.
- param
ServletRegistration.Dynamic
- param
- By overriding customizeRegistration(), you can apply additional configuration to DispatcherServlet.
- setLoadOnStartup() - set the load-on-startup priority
- setInitParameter() - set an initialization parameter
- setMultipartConfig() - configure Servlet 3.0 multipart support
- example - multipart support to temporarily store uploaded files at /tmp/spittr/uploads.
- called after AbstractAnnotationConfigDispatcherServletInitializer registers DispatcherServlet with the servlet container.
@Override
protected void customizeRegistration(Dynamic registration) {
   registration.setMultipartConfig(new MultipartConfigElement("/tmp/spittr/uploads"));
}
Adding additional servlets and filters
Given the way that AbstractAnnotationConfigDispatcherServletInitializer is defined, it will create a DispatcherServlet and a ContextLoaderListener. But what if you want to register additional servlets, filters, or listeners?
One of the nice things about working with a Java-based initializer is that (unlike with web.xml) you can define as many initializer classes as you want. Therefore, if you need to register any additional components into the web container, you need only create a new initializer class. The easiest way to do this is by implementing Spring’s WebApplicationInitializer interface.
public class MyServletInitializer implements WebApplicationInitializer {
    @Override
    public void onStartup(ServletContext servletContext) throws ServletException {
        Dynamic myServlet = servletContext.addServlet("myServlet", MyServlet.class);
        myServlet.addMapping("/custom/**");
    }
}

@Override
public void onStartup(ServletContext servletContext)
throws ServletException {
    javax.servlet.FilterRegistration.Dynamic filter = servletContext.addFilter("myFilter", MyFilter.class);
    filter.addMappingForUrlPatterns(null, false, "/custom/*");
}
To register one or more filters and map them to DispatcherServlet, all you need to do is override the getServletFilters() method of AbstractAnnotationConfigDispatcherServletInitializer.
@Override
protected Filter[] getServletFilters(){ return new Filter[] { new MyFilter() }; }
This method returns an array of javax.servlet.Filter. Here it only returns a single filter, but it could return as many filters as you need. There’s no need to declare the mapping for the filters; any filter returned from getServletFilters() will automatically be mapped to DispatcherServlet.
Declaring DispatcherServlet in web.xml
<?xml version="1.0" encoding="UTF-8"?>
<web-app xmlns="http://java.sun.com/xml/ns/javaee"
        xmlns:xsi="http://www.w3.org/2001/XMLSchema-instance" version="2.5"
        xsi:schemaLocation="http://java.sun.com/xml/ns/javaee http://java.sun.com/xml/ns/javaee/web-app_2_5.xsd">
   <context-param>
      <param-name>contextConfigLocation</param-name>
      <param-value>/WEB-INF/spring/root-context.xml</param-value>
   </context-param>
   <listener>
      <listener-class>org.springframework.web.context.ContextLoaderListener</listener-class>
   </listener>
   <servlet>
      <servlet-name>appServlet</servlet-name>
      <servlet-class>org.springframework.web.servlet.DispatcherServlet</servlet-class>
      <load-on-startup>1</load-on-startup>
   </servlet>
   <servlet-mapping>
      <servlet-name>appServlet</servlet-name>
      <url-pattern>/</url-pattern>
   </servlet-mapping>
</web-app>
ContextLoaderListener and DispatcherServlet each load a Spring application context. The contextConfigLocation context parameter specifies the location of the XML file that defines the root application context loaded by ContextLoaderListener. As defined in listing 7.3, the root context is loaded with bean definitions in /WEB-INF/spring/root-context.xml. DispatcherServlet loads its application context with beans defined in a file whose name is based on the servlet name. In listing 7.3, the servlet is named appServlet. Therefore, DispatcherServlet loads its application context from an XML file at /WEB-INF/appServlet-context.xml.
If you’d rather specify the location of the DispatcherServlet configuration file, you can set a contextConfigLocation initialization parameter on the servlet. For example, the following DispatcherServlet configuration has DispatcherServlet loading its beans from /WEB-INF/spring /appServlet/servlet-context.xml:
<?xml version="1.0" encoding="UTF-8"?>
<servlet>
   <servlet-name>appServlet</servlet-name>
   <servlet-class>org.springframework.web.servlet.DispatcherServlet</servlet-class>
   <init-param>
      <param-name>contextConfigLocation</param-name>
      <param-value>/WEB-INF/spring/appServlet/servlet-context.xml</param-value>
   </init-param>
   <load-on-startup>1</load-on-startup>
</servlet>
- To use Java-based configuration in Spring MVC
- you need to tell DispatcherServlet and ContextLoaderListener to use AnnotationConfigWebApplicationContext, an implementation of WebApplicationContext that loads Java configuration classes instead of XML.
- You can do that by setting
- context parameter -
contextClass - initialization parameter for DispatcherServlet.
- context parameter -
<?xml version="1.0" encoding="UTF-8"?>
<web-app xmlns="http://java.sun.com/xml/ns/javaee"
        xmlns:xsi="http://www.w3.org/2001/XMLSchema-instance" version="2.5"
        xsi:schemaLocation="http://java.sun.com/xml/ns/javaee http://java.sun.com/xml/ns/javaee/web-app_2_5.xsd">
   <context-param>
      <param-name>contextClass</param-name>
      <param-value>org.springframework.web.context.support.AnnotationConfigWebApplicationContext</param-value>
   </context-param>
   <context-param>
      <param-name>contextConfigLocation</param-name>
      <param-value>com.habuma.spitter.config.RootConfig</param-value>
   </context-param>
   <listener>
      <listener-class>org.springframework.web.context.ContextLoaderListener</listener-class>
   </listener>
   <servlet>
      <servlet-name>appServlet</servlet-name>
      <servlet-class>org.springframework.web.servlet.DispatcherServlet</servlet-class>
      <init-param>
         <param-name>contextClass</param-name>
         <param-value>org.springframework.web.context.support.AnnotationConfigWebApplicationContext</param-value>
      </init-param>
      <init-param>
         <param-name>contextConfigLocation</param-name>
         <param-value>com.habuma.spitter.config.WebConfig</param-value>
      </init-param>
      <load-on-startup>1</load-on-startup>
   </servlet>
   <servlet-mapping>
      <servlet-name>appServlet</servlet-name>
      <url-pattern>/</url-pattern>
   </servlet-mapping>
</web-app>
Writing a controller
- @Controller - stereotype annotation, to enable for component-scanning and declared as a bean.
- could have annotated with @Component.
- @RequestMapping value attribute accepts an array of String.
@RequestMapping({"/", "/homepage"})
@Controller
@RequestMapping(method=GET, value="/spittles")
public class SpittleController {

  @Autowired
  private SpittleRepository spittleRepository;

  @RequestMapping(method=RequestMethod.GET)
  public String spittles(Model model) {
    model.addAttribute("spittleList",spittleRepository.findSpittles(Long.MAX_VALUE, 20));
    // model.addAttribute(spittleRepository.findSpittles(Long.MAX_VALUE, 20));
    return "home";
  }
}
@RequestMapping(method=RequestMethod.GET)
public List<Spittle> spittles() {return spittleRepository.findSpittles(Long.MAX_VALUE, 20));}
- Model is a map that will be handed to the view to be rendered.
- When addAttribute() is called without specifying a key, the key is inferred from the type of object.
- In this case, because it’s a
List<Spittle>, the key will be inferred as spittleList.
- In this case, because it’s a
- When handler method returns an object or a collection
- value returned is put into the model
- model key is inferred from its type.
- logical view name inferred from the request path
- GET /spittles, view name is spittles (chopping off the leading slash).
- When addAttribute() is called without specifying a key, the key is inferred from the type of object.
<c:forEach items="${spittleList}" var="spittle" >
  <li id="spittle_<c:out value='spittle.id'/>">
    <div class="spittleMessage"><c:out value="${spittle.message}"/></div>
  </li>
</c:forEach>
Accepting request input - @PathVariable, @RequestParam
- Query parameters
- Path variables
- Form parameters
@PathVariable and @RequestParam
/spittles/54321?count=30&max=100
private static final String MAX_LONG_AS_STRING = Long.toString(Long.MAX_VALUE);

@RequestMapping(value="/{spittleId}", method=RequestMethod.GET)
public List < Spittle > spittles(
    @PathVariable("spittleId") long spittleId,
    @RequestParam(value = "max", defaultValue = MAX_LONG_AS_STRING) long max,
    @RequestParam(value = "count", defaultValue = "20") int count) {
    return spittleRepository.findSpittles(max, count);
}
- As a general rule
- query parameters should not be used to identify a resource.
GET /spittles/12345is better than/spittles/show?spittle_id=12345.GET /spittles/12345identifies a resource to be retrieved./spittles/show?spittle_id=12345describes an operation with a parameter - essentially RPC over HTTP.
Processing forms
@Controller
@RequestMapping("/spitter")
public class SpitterController {

    @Autowired
    private SpitterRepository spitterRepository;

    @RequestMapping(value = "/register", method = GET)
    public String showRegistrationForm() {
        return "registerForm";
    }

    @RequestMapping(value = "/register", method = POST)
    public String processRegistration(Spitter spitter) {
        spitterRepository.save(spitter);
        return "redirect:/spitter/" + spitter.getUsername();
    }
}
- InternalResourceViewResolver identifies
redirect:prefix and interpret it as a redirect specification instead of as a view name.- It will redirect to the path for a user’s profile page.
- InternalResourceViewResolver recognizes prefix -
redirect:andforward:.
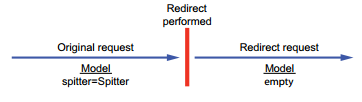
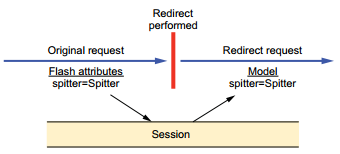
Carrying data across redirect requests
- redirect:
- good practice to redirect after POST request.
- this prevents client from reissuing a dangerous POST request by clicking the Refresh or back-arrow button in their browser.
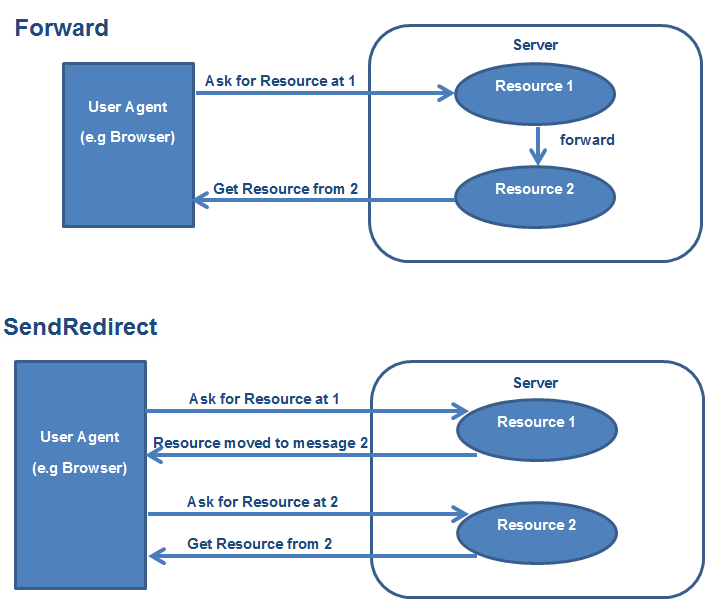
- controller returns String with
redirect:prefix, it is used as a path to redirect the browser to.- the original request ends and a new HTTP GET request begins.
- New request does not have any model data as model data carried in the original request dies with the request.
- Passing data as path variables and/or query parameters using URL templates
- Sending data in flash attributes
- good practice to redirect after POST request.
Redirecting with URL templates
@RequestMapping(value="/register", method=POST)
public String processRegistration(
Spitter spitter, Model model) {
  spitterRepository.save(spitter);
  model.addAttribute("username", spitter.getUsername());
  model.addAttribute("spitterId", spitter.getId());
  return "redirect:/spitter/{username}";
}
- By using placeholder in URL template, any unsafe characters in username property are escaped.
- If username is habuma and spitterId is 42, resulting redirect path will be
/spitter/habuma?spitterId=42. - Sending data across a redirect via path variables and query parameters is easy and straightforward.
- Limitation - for sending simple values, such as String and numeric values.
Working with flash attributes
- Put Spitter into the session.
- A session is long-lasting, spanning multiple requests.
- put in the session before redirect and retrieve from session after redirect.
- You’re responsible for cleaning it up from the session after the redirect.
- Spring offers capability of sending the data as flash attributes.
- Flash attributes, carry data until next request; then they go away.
RedirectAttributes, sub-interface of Model with additional methods for setting flash attributes.
@RequestMapping(value = "/register", method = POST)
public String processRegistration(Spitter spitter, RedirectAttributes model) {
    spitterRepository.save(spitter);
    model.addAttribute("username", spitter.getUsername());
    model.addFlashAttribute("spitter", spitter);
    return "redirect:/spitter/{username}";
}
@RequestMapping(value = "/{username}", method = GET)
public String showSpitterProfile(@PathVariable String username, Model model) {
    if (!model.containsAttribute("spitter"))
        model.addAttribute(spitterRepository.findByUsername(username));
    return "profile";
}
Java Validation API
- Java Validation API, such as Hibernate Validator, is in the project’s classpath.
- you can put annotations on properties to place constraints on their values.
javax.validation.constraints package.
| Annotation | Description |
|---|---|
| @AssertFalse | must be a Boolean type and be false. |
| @AssertTrue | must be a Boolean type and be true. |
| @DecimalMax | must be a number whose value is less than or equal to a given BigDecimalString value. |
| @DecimalMin | must be a number whose value is greater than or equal to a given BigDecimalString value. |
| @Digits | must be a number whose value has a specified number of digits. |
| @Future | must be a date in the future. |
| @Max | must be a number whose value is less than or equal to a given value. |
| @Min | must be a number whose value is greater than or equal to a given value. |
| @NotNull | must not be null. |
| @Null | must be null. |
| @Past | must be a date in the past. |
| @Pattern | must match a given regular expression. |
| @Size | must be either a String or a collection, or an array whose length fits within the given range. |
public class Spitter {
 private Long id;
 @NotNull
 @Size(min=5, max=16)
 private String username;
 @NotNull
 @Size(min=5, max=25)
 private String password;
 @NotNull
 @Size(min=2, max=30)
 private String name;
 ...
}
@RequestMapping(value = "/register", method = POST)
public String processRegistration(@Valid Spitter spitter, Errors errors) {
    if (errors.hasErrors())
        return "registerForm";
    spitterRepository.save(spitter);
    return "redirect:/spitter/" + spitter.getUsername();
}
- If errors.hasErrors(), return registerForm to correct the input problems by user.
Custom Validation Annotation
@CourseCode
@Constraint(validatedBy=CourseCodeConstraintValidator.class)
@Target({ElementType.METHOD, ElementType.FIELD})
@Retention(RetentionPolicy.RUNTIME)
public @interface CourseCode{
  public String value() default "LUV";
  public String message() default "must start with LUV";
  public Class<?>[] groups default {};
  public Class<? extends Payload>[] payload default {};
}
public class CourseCodeConstraintValidator implements ConstraintValidator<CourseCode, String>{

  private String coursePrefix;

  @Override
  public void initialize(CourseCode courseCode){
    coursePrefix = courseCode.value();
  }

  @Override
  public boolean isValid(String code, ConstraintValidatorContext ctx){
    boolean result = code.startsWith(coursePrefix);
    return result;
  }
}
@Initbinder
- @Initbinder to customize the request being sent to the controller.
- defined in controller, helps in controlling and formatting each and every request that comes to it.
- used with the methods which initializes WebDataBinder
- works as a preprocessor for each request coming to the controller.
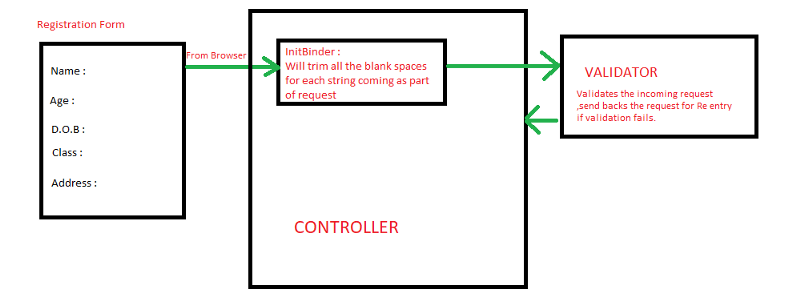
@InitBinder
public void initBinder(WebDataBinder dataBinder) {
    StringTrimmerEditor stringTrimmerEditor = new StringTrimmerEditor(true);
    dataBinder.registerCustomEditor(String.class, stringTrimmerEditor);
}
public class Student {
    private String Id;
    private String firstName;

    @NotNull(message = "is required")
    @Size(min = 1, message = "is required")
    private String lastName; // validation done to check if lastname is NULL

    @Max(value = 10, message = "Value should between 0 and 10")
    @Min(value = 0, message = "Value should between 0 and 10")
    private String standard;
    private String Age;
}
- WebDataBinder extends DataBinder.
- It can be used to register custom formatter, validators and PropertyEditors.
WebDataBinder.addCustomFormatter(..);
WebDataBinder.addValidators(..);
WebDataBinder.registerCustomEditor(..);
Rendering web views
- Spring MVC decouples controller logic and view-rendering of a view.
- controller and view should agree on the contents of the model at max.
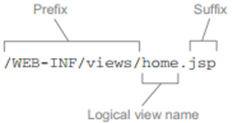
- InternalResourceViewResolver
- apply prefix
/WEB-INF/views/and suffix.jspto view name. - this gives physical location of the JSP that would render the model.
- apply prefix
public interface ViewResolver {
    View resolveViewName(String viewName, Locale locale) throws Exception;
}
public interface View {
    String getContentType();
    void render(Map<String, ?> model, HttpServletRequest request, HttpServletResponse response) throws Exception;
}
View resolver Types
| View resolver | Description |
|---|---|
| ContentNegotiatingViewResolver | Resolves views by considering the content type desired by the client and delegating to another view resolver that can produce that type. |
| InternalResourceViewResolver | Resolves views as resources internal to the web application (typically JSPs). |
| BeanNameViewResolver | Resolves views as beans in the Spring application context whose ID is the same as the view name. |
| FreeMarkerViewResolver | Resolves views as FreeMarker templates. |
| JasperReportsViewResolver | Resolves views as JasperReports definitions. |
| ResourceBundleViewResolver | Resolves views from a resource bundle (typically a proper ties file). |
| TilesViewResolver | Resolves views as Apache Tile definitions, where the tile ID is the same as the view name. Note that there are two different TilesViewResolver implementations, one each for Tiles 2.0 and Tiles 3.0. |
| UrlBasedViewResolver | Resolves views directly from the view name, where the view name matches the name of a physical view definition. |
| VelocityLayoutViewResolver | Resolves views as Velocity layouts to compose pages from different Velocity templates. |
| VelocityViewResolver | Resolves views as Velocity templates. |
| XmlViewResolver | Resolves views as bean definitions from a specified XML file. Similar to BeanNameViewResolver. |
| XsltViewResolver | Resolves views to be rendered as the result of an XSLT transformation. |
Multipart Requests
- Multipart form data
- breaks a form into individual parts, with one part per field.
- Each part can have its own type.
- Typical form fields have textual data in their parts
- but when something is being uploaded, the part can be binary.
- In this multipart request
- profilePicture part has its own Content-Type header indicating JPEG image.
- body of profilePicture part is binary data instead of simple text.
------WebKitFormBoundaryqgkaBn8IHJCuNmiW
Content-Disposition: form-data; name="firstName"
Charles
------WebKitFormBoundaryqgkaBn8IHJCuNmiW
Content-Disposition: form-data; name="lastName"
Xavier
------WebKitFormBoundaryqgkaBn8IHJCuNmiW
Content-Disposition: form-data; name="email"
charles@xmen.com
------WebKitFormBoundaryqgkaBn8IHJCuNmiW
Content-Disposition: form-data; name="username"
professorx
------WebKitFormBoundaryqgkaBn8IHJCuNmiW
Content-Disposition: form-data; name="password"
letmein01
------WebKitFormBoundaryqgkaBn8IHJCuNmiW
Content-Disposition: form-data; name="profilePicture"; filename="me.jpg"
Content-Type: image/jpeg
[[ Binary image data goes here ]]
------WebKitFormBoundaryqgkaBn8IHJCuNmiW--
Configuring a multipart resolver
- DispatcherServlet doesn’t implement any logic for parsing the multipart request.
- It delegates to an implementation of Spring’s MultipartResolver interface.
- StandardServletMultipartResolver - Relies on Servlet 3.0 support for multipart requests.
- CommonsMultipartResolver - Resolves multipart requests using Jakarta Commons FileUpload.
StandardServletMultipartResolver - Resolving Multipart Requests With Servlet 3.0
- It’s possible to configure constraints on StandardServletMultipartResolver.
- you must specify multipart configuration in the servlet configuration rather than Spring configuration.
- More specifically, you must configure multipart details as part of DispatcherServlet’s configuration in web.xml or in the servlet initializer class.
- StandardServletMultipartResolver has no constructor arguments or properties to be set.
- StandardServletMultipartResolver won’t work unless you configure this minimum detail.
- you must specify the temporary file path where the file will be written during the upload.
- override the customizeRegistration() method of class that extends AbstractAnnotationConfigDispatcherServletInitializer or AbstractDispatcherServletInitializer.
@Bean
public MultipartResolver multipartResolver() throws IOException {
  return new StandardServletMultipartResolver();
}
DispatcherServlet ds = new DispatcherServlet();
Dynamic registration = context.addServlet("appServlet", ds);
registration.addMapping("/");
registration.setMultipartConfig(new MultipartConfigElement("/tmp/spittr/uploads"));
@Override
protected void customizeRegistration(Dynamic registration) {
    registration.setMultipartConfig(new MultipartConfigElement("/tmp/spittr/uploads"));
}
@Override
protected void customizeRegistration(Dynamic registration) {
    registration.setMultipartConfig(new MultipartConfigElement("/tmp/spittr/uploads", 2097152, 4194304, 0));
    // 2097152 - limit files to no more than 2 MB
    // 4194304 - limit the entire request to no more than 4 MB
    // to write all files to disk
}
The other constructor accepts the following:
- The maximum size (in bytes) of any file uploaded. By default there is no limit.
- The maximum size (in bytes) of the entire multipart request, regardless of how many parts or how big any of the parts are. By default there is no limit.
- The maximum size (in bytes) of a file that can be uploaded without being written to the temporary location.
- The default is 0, meaning that all uploaded files will be written to disk.
<?xml version="1.0" encoding="UTF-8"?>
<servlet>
   <servlet-name>appServlet</servlet-name>
   <servlet-class>org.springframework.web.servlet.DispatcherServlet</servlet-class>
   <load-on-startup>1</load-on-startup>
   <multipart-config>
      <location>/tmp/spittr/uploads</location>
      <max-file-size>2097152</max-file-size>
      <max-request-size>4194304</max-request-size>
   </multipart-config>
</servlet>
CommonsMultipartResolver
Configuring a Jakarta Commons FileUpload Multipart Resolver
- Spring offers
CommonsMultipartResolveras an out-of-the-box alternative toStandardServletMultipartResolver. - no need to configure a temporary file location with CommonsMultipartResolver.
- By default, the location is the servlet container’s temporary directory.
- there’s no way to specify the maximum multipart request size.
@Bean
public MultipartResolver multipartResolver() {
  return new CommonsMultipartResolver();
}
@Bean
public MultipartResolver multipartResolver() throws IOException {
  CommonsMultipartResolver multipartResolver = new CommonsMultipartResolver();
  multipartResolver.setUploadTempDir(new FileSystemResource("/tmp/spittr/uploads"));
  multipartResolver.setMaxUploadSize(2097152);
  multipartResolver.setMaxInMemorySize(0);
  return multipartResolver;
}
Handle multipart request
Annotate a controller method parameter with @RequestPart.
You’ve added a new <input> field whose type is file. This lets the user select an image file to upload. The accept attribute is set to limit file types to JPEG, PNG, and GIF images. And according to its name attribute, the image data will be sent in the multipart request in the profile Picture part. Now you just need to change the processRegistration() method to accept the uploaded image. One way to do that is to add a byte array parameter that’s annotated with @RequestPart.
@RequestMapping(value="/register", method=POST)
public String processRegistration(
    @RequestPart("profilePicture") byte[] profilePicture,
    @Valid Spitter spitter,
    Errors errors
  ) {
      ...
}
When the registration form is submitted, the profilePicture attribute is given an array of byte containing the data from the request part (as specified by @RequestPart). If the user submits the form without selecting a file, then the array will be empty (but not null). With the image data in hand, all that’s left is for processRegistration() to save the file somewhere.
Receiving a MultipartFile
public interface MultipartFile {
    String getName();
    String getOriginalFilename();
    String getContentType();
    boolean isEmpty();
    long getSize();
    byte[] getBytes() throws IOException;
    InputStream getInputStream() throws IOException;
    void transferTo(File dest) throws IOException;
}
MultipartFile offers a convenient transferTo() method to help you write the uploaded file to the filesystem. For example, you could add the following lines to processRegistration() to write the uploaded image file to the filesystem:
profilePicture.transferTo(new File("/data/spittr/" + profilePicture.getOriginalFilename()));
Saving a file to the local filesystem like this is simple enough, but it leaves the management of the file up to you. You’re responsible for ensuring that there’s plenty of space. It’s up to you to make sure the file is backed up in case of a hardware failure. And it’s your job to deal with synchronizing the image files across multiple servers in a cluster.
Saving Files To Amazon S3
private void saveImage(MultipartFile image) throws ImageUploadException {
  try {
    AWSCredentials awsCredentials = new AWSCredentials(s3AccessKey, s2SecretKey);
    S3Service s3 = new RestS3Service(awsCredentials);
    S3Bucket bucket = s3.getBucket("spittrImages");
    S3Object imageObject = new S3Object(image.getOriginalFilename());
    imageObject.setDataInputStream(image.getInputStream());
    imageObject.setContentLength(image.getSize());
    imageObject.setContentType(image.getContentType());
    AccessControlList acl = new AccessControlList();
    acl.setOwner(bucket.getOwner());
    acl.grantPermission(GroupGrantee.ALL_USERS, Permission.PERMISSION_READ);
    imageObject.setAcl(acl);
    s3.putObject(bucket, imageObject);
  } catch (Exception e) {
    throw new ImageUploadException("Unable to save image", e);
  }
}
The first thing that saveImage() does is set up Amazon Web Service (AWS) credentials. For this, you’ll need an S3 access key and an S3 secret access key. These will be given to you by Amazon when you sign up for S3 service. They’re provided to SpitterController via value injection. With the AWS credentials in hand, saveImage() creates an instance of JetS3t’s RestS3Service, through which it operates on the S3 filesystem. It gets a reference to the spitterImages bucket, creates an S3Object to contain the image, and then fills that S3Object with image data.
Just before calling the putObject() method to write the image data to S3, saveImage() sets the permissions on the S3Object to allow all users to view it. This is important—without it, the images wouldn’t be visible to your application’s users. Finally, if anything goes wrong, an ImageUploadException will be thrown.
Receiving the Uploaded File as a Part
If you’re deploying your application to a Servlet 3.0 container, you have an alternative to MultipartFile. Spring MVC will also accept a javax.servlet.http.Part as a controller method parameter. Using Part instead of MultipartFile leaves the processRegistration() method signature looking like this:
@RequestMapping(value="/register", method=POST)
public String processRegistration(
@RequestPart("profilePicture") Part profilePicture, @Valid Spitter spitter, Errors errors) {
  ...
}
public interface Part {
  public InputStream getInputStream() throws IOException;
  public String getContentType();
  public String getName();
  public String getSubmittedFileName();
  public long getSize();
  public void write(String fileName) throws IOException;
  public void delete() throws IOException;
  public String getHeader(String name);
  public Collection<String> getHeaders(String name);
  public Collection<String> getHeaderNames();
}

profilePicture.write("/data/spittr/" + profilePicture.getOriginalFilename());
It’s worth noting that if you write your controller handler methods to accept file uploads via a Part parameter, then you don’t need to configure the StandardServletMultipartResolver bean. StandardServletMultipartResolver is required only when you’re working with MultipartFile.
Handling exceptions
- Spring offers a ways to translate exceptions to responses.
- Certain Spring exceptions are automatically mapped to specific HTTP status codes.
- An exception can be annotated with @ResponseStatus to map it to an HTTP status code.
- A method can be annotated with @ExceptionHandler to handle the exception.
@ResponseStatus
- By default, response status code is 500 (Internal Server Error).
@ResponseStatus(value=HttpStatus.NOT_FOUND, reason="Spittle Not Found")
public class SpittleNotFoundException extends RuntimeException { }
@RequestMapping(value = "/{spittleId}", method = RequestMethod.GET)
public String spittle(@PathVariable long spittleId, Model model) {
    Spittle spittle = spittleRepository.findOne(spittleId);
    if (spittle == null)
        throw new SpittleNotFoundException();
    model.addAttribute(spittle);
    return "spittle";
}
@ExceptionHandler methods
- @ExceptionHandler methods can handle exceptions thrown from any handler method in the same controller class.
@ExceptionHandler(DuplicateSpittleException.class)
public String handleDuplicateSpittle() {
  return "error/duplicate";
}
@RequestMapping(method=RequestMethod.POST)
public String saveSpittle(SpittleForm form, Model model) {
  spittleRepository.save(new Spittle(null, form.getMessage(), new Date(), form.getLongitude(), form.getLatitude()));
  return "redirect:/spittles";
}
Without @ExceptionHandler methods
@RequestMapping(method = RequestMethod.POST)
public String saveSpittle(SpittleForm form, Model model) {
    try {
        spittleRepository.save(new Spittle(null, form.getMessage(), new Date(), form.getLongitude(), form.getLatitude()));
        return "redirect:/spittles";
    } catch (DuplicateSpittleException e) {
        return "error/duplicate";
    }
}
Exception Handling References
Spring Exceptions - Mapping to HTTP status codes
Exceptions thrown by Spring when something going wrong in DispatcherServlet or while performing validation.
| Spring exception | HTTP status code |
|---|---|
| BindException | 400 - Bad Request |
| ConversionNotSupportedException | 500 - Internal Server Error |
| HttpMediaTypeNotAcceptableException | 406 - Not Acceptable |
| HttpMediaTypeNotSupportedException | 415 - Unsupported Media Type |
| HttpMessageNotReadableException | 400 - Bad Request |
| HttpMessageNotWritableException | 500 - Internal Server Error |
| HttpRequestMethodNotSupportedException | 405 - Method Not Allowed |
| MethodArgumentNotValidException | 400 - Bad Request |
| MissingServletRequestParameterException | 400 - Bad Request |
| MissingServletRequestPartException | 400 - Bad Request |
| NoSuchRequestHandlingMethodException | 404 - Not Found |
| TypeMismatchException | 400 - Bad Request |
Advising controllers
- Centralized Exception Handling
- handling exceptions across multiple controllers.
- applied globally across all @RequestMapping
@ControllerAdviceannotation is itself annotated with @Component.- will be picked up by component-scanning
- @ControllerAdvice class having following kinds of methods:
@ExceptionHandler@InitBinder@ModelAttribute
- Any controller method throw DuplicateSpittleException
- duplicateSpittleHandler() method will be called to handle the exception.
package spitter.web;
import org.springframework.web.bind.annotation.ControllerAdvice;
import org.springframework.web.bind.annotation.ExceptionHandler;

@ControllerAdvice
public class AppWideExceptionHandler {
    @ExceptionHandler(DuplicateSpittleException.class)
    public String duplicateSpittleHandler() {
        return "error/duplicate";
    }
}
Spring MVC - FAQ
Can we call servlet destory() from service()?
- destory() is part of servlet life cycle methods
- it is used to kill the servlet instance.
- Servlet Engine is used to call destory().
- If you call destroy method from service()
- it just execute the code written in the destory()
- but it wont kill the servlet instance.
- destroy() will be called before killing the servlet instance by servlet engine.
How to use CSS, JavaScript and Images in Spring MVC Web App
<mvc:resources mapping="/resources/**" location="/resources/"></mvc:resources>
<img src="${pageContext.request.contextPath}/resources/images/spring-logo.png">
<head>
   <link rel="stylesheet" type="text/css" href="${pageContext.request.contextPath}/resources/css/my-test.css">
   <script src="${pageContext.request.contextPath}/resources/js/simple-test.js"></script>
</head>
<body>
   <h2>Spring MVC Demo - Home Page</h2>
   <a href="showForm">Plain Hello World</a>
   <br><br>
   <img src="${pageContext.request.contextPath}/resources/images/spring-logo.png" />
   <br><br>
   <input type="button" onclick="doSomeWork()" value="Click Me"/>
</body>
</html>
@RequestMapping("/processForm")
public String processForm(
    @Valid @ModelAttribute("customer") Customer theCustomer,
    BindingResult theBindingResult) {
        ...
    }
}
The Errors or BindingResult parameters have to follow the model object that is being bound immediately.
@InitBinder
Make integer field mandatory and handle string in input field
@NotNull(message="is required")
@Min(value=0, message="must be greater than or equal to zero")
@Max(value=10, message="must be less than or equal to 10")
private Integer freePasses;

//messages.properties
typeMismatch.customer.freePasses=Invalid number

//servlet.xml
<bean id="messageSource" class="org.springframework.context.support.ResourceBundleMessageSource">
    <property name="basenames" value="resources/messages" />
</bean>
Creating JSP views
JSP has evolved over the years to include support for an expression language and custom tag libraries. Spring supports JSP views in two ways:
- InternalResourceViewResolver can be used to resolve view names into JSP files. Moreover, if you’re using JavaServer Pages Standard Tag Library (JSTL) tags in your JSP pages, InternalResourceViewResolver can resolve view names into JSP files fronted by JstlView to expose JSTL locale and resource bundle variables to JSTL’s formatting and message tags.
- Spring provides two JSP tag libraries, one for form-to-model binding and one providing general utility features.
Configuring a JSP-ready view resolver
Whereas some view resolvers, such as ResourceBundleViewResolver, directly map a logical view name to a specific implementation of the View interface, InternalResourceViewResolver takes a more indirect approach. It follows a convention whereby a prefix and a suffix are attached to the view name to determine the physical path to a view resource in the same web application.
It’s a common practice to place JSP files under the web application’s WEB-INF folder to prevent direct access. With this configuration of InternalResourceViewResolver in place, you can expect it to resolve logical view names into JSP files such as this:
- home resolves to /WEB-INF/views/home.jsp
- productList resolves to /WEB-INF/views/productList.jsp
- books/detail resolves to /WEB-INF/views/books/detail.jsp
@Bean
public ViewResolver viewResolver() {
    InternalResourceViewResolver resolver = new InternalResourceViewResolver();
    resolver.setPrefix("/WEB-INF/views/");
    resolver.setSuffix(".jsp");
    return resolver;
}
<bean id="viewResolver" class="org.springframework.web.servlet.view.InternalResourceViewResolver"
p:prefix="/WEB-INF/views/"
p:suffix=".jsp" />
When a logical view name has a slash in it, that slash is carried over into the resource path name. Therefore, it maps to a JSP file that’s in a subdirectory of whatever directory is referenced by the prefix property. This offers a handy way of organizing your view templates under a hierarchy of directories rather than keeping them all in a single directory.
Resolving JSTL Views
So far you’ve configured the basic, garden-variety InternalResourceViewResolver. It ultimately resolves logical view names into instances of InternalResourceView that reference JSP files. But if those JSP files are using JSTL tags for formatting or messages, then you may want to configure InternalResourceViewResolver to resolve a JstlView instead. JSTL’s formatting tags need a Locale to properly format locale-specific values such as dates and money. And its message tags can use a Spring message source and a Locale to properly choose messages to render in HTML. By resolving JstlView, the JSTL tags will be given the Locale and any message source configured in Spring
@Bean
public ViewResolver viewResolver() {
InternalResourceViewResolver resolver = new InternalResourceViewResolver();
  resolver.setPrefix("/WEB-INF/views/");
  resolver.setSuffix(".jsp");  resolver.setViewClass(org.springframework.web.servlet.view.JstlView.class);
  return resolver;
}
<bean id="viewResolver" class="org.springframework.web.servlet.view.InternalResourceViewResolver"
p:prefix="/WEB-INF/views/"
p:suffix=".jsp"
p:viewClass="org.springframework.web.servlet.view.JstlView" />
Using Spring’s JSP libraries
Tag libraries are a powerful way to bring functionality to a JSP template without resorting to writing Java code directly in scriptlet blocks. Spring offers two JSP tag libraries to help define the view of your Spring MVC web views. One tag library renders HTML form tags that are bound to a model attribute. The other has a hodgepodge of utility tags that come in handy from time to time. You’re likely to find the form-binding tag library to be the more useful of the two tag libraries. So that’s where you’ll start with Spring’s JSP tags.
BINDING FORMS TO THE MODEL
Spring’s form-binding JSP tag library includes 14 tags, most of which render HTML form tags. But what makes these different from the raw HTML tags is that they’re bound to an object in the model and can be populated with values from the model object’s properties. The tag library also includes a tag that can be used to communicate errors to the user by rendering them into the resulting HTML.
To use the form-binding tag library, you’ll need to declare it in the JSP pages that will use it:
<%@ taglib uri="http://www.springframework.org/tags/form" prefix="sf" %>

<sf:form method="POST" commandName="spitter">
First Name: <sf:input path="firstName" /><br/>
Last Name: <sf:input path="lastName" /><br/>
Email: <sf:input path="email" /><br/>
Username: <sf:input path="username" /><br/>
Password: <sf:password path="password" /><br/>
<input type="submit" value="Register" />
</sf:form>
The
@RequestMapping(value="/register", method=GET)
public String showRegistrationForm(Model model) {
model.addAttribute(new Spitter());
return "registerForm";
}
This tweak to showRegistrationForm() now has that method adding a new Spitter instance to the model. The model key will be inferred from the object type to be spitter—exactly what you need it to be.
Once you declare the form-binding tag library, you’re afforded 14 tags. These are listed in table.
| JSP tag | Description |
|---|---|
| <sf:checkbox> | Renders an HTML <input> tag with type set to checkbox. |
| <sf:checkboxes> | Renders multiple HTML <input> tags with type set to checkbox. |
| <sf:errors> | Renders field errors in an HTML <span> tag. |
| <sf:form> | Renders an HTML <form> tag and exposed binding path to inner tags for data-binding. |
| <sf:hidden> | Renders an HTML <input> tag with type set to hidden. |
| <sf:input> | Renders an HTML <input> tag with type set to text. |
| <sf:label> | Renders an HTML <label> tag. |
| <sf:option> | Renders an HTML <option> tag. The selected attribute is set according to the bound value. |
| <sf:options> | Renders a list of HTML <option> tags corresponding to the bound collection, array, or map. |
| <sf:password> | Renders an HTML <input> tag with type set to password. |
| <sf:radiobutton> | Renders an HTML <input> tag with type set to radio. |
| <sf:radiobuttons> | Renders multiple HTML <input> tags with type set to radio. |
| <sf:select> | Renders an HTML <select> tag. |
| <sf:textarea> | Renders an HTML <textarea> tag. |
Going back to the form, the first three fields have had their HTML <input> tag replaced with <sf:input>. This tag renders an HTML <input> tag with the type attribute set to text. Its value attribute will be set to the value of the model object’s property specified in the path attribute. For instance, if the Spitter object in the model has Jack as the value of its firstName property, then <sf:input path=”firstName”/> will render an <input> tag with value=”Jack”. The password field uses <sf:password> instead of <sf:input>.
<sf:password> is similar to <sf:input> but renders an HTML <input> whose type attribute is set to password so that the value will be masked as it’s typed.
<form id="spitter" action="/spitter/spitter/register" method="POST">
 First Name: <input id="firstName" name="firstName" type="text" value="J"/><br/>
 Last Name: <input id="lastName" name="lastName" type="text" value="B"/><br/>
 Email: <input id="email" name="email" type="text" value="jack"/><br/>
 Username: <input id="username" name="username" type="text" value="jack"/><br/>
 Password: <input id="password" name="password" type="password" value=""/><br/>
 <input type="submit" value="Register" />
</form>
Starting with Spring 3.1, the
Email: <sf:input path="email" type="email" /><br/> will rendered to HTML5 Email: <input id="email" name="email" type="email" value="jack"/><br/>
Using Spring’s form-binding tags gives you a slight improvement over using standard HTML tags—the form is prepopulated with the previously entered values after failed validation. But it still fails to tell the user what they did wrong. To guide the user in fixing their mistakes, you’ll need the <sf:errors> tag.
DISPLAYING ERRORS
When there are validation errors, the details of those errors are carried in the request along with model data. All you need to do is dig into the model and extract the errors to display to the user. Here its path attribute is set to firstName, the name of the Spitter model object property for which errors should be displayed. If there are no errors for the firstName property, then <sf:errors> won’t render anything. But if there is a validation error, it will render that error message in an HTML <span> tag.
<sf:form method="POST" commandName="spitter">
First Name: <sf:input path="firstName" />
<sf:errors path="firstName" /><br/>
...
</sf:form>
HTML Output on error -
First Name: <input id="firstName" name="firstName" type="text" value="J"/>
<span id="firstName.errors">size must be between 2 and 30</span>

<sf:form method="POST" commandName="spitter" >
First Name: <sf:input path="firstName" />
<sf:errors path="firstName" cssClass="error" /><br/>
...
</sf:form>
span.error { color: red; }
Displaying validation errors next to the fields that have errors is a nice way to draw the user’s attention to problems they need to fix. But it could be problematic with regard to layout. Another way to handle validation errors is to display them all together. To do this, you can remove the <sf:errors> element from each field and place it at the top of the form like this:
<sf:form method="POST" commandName="spitter" >
<sf:errors path="*" element="div" cssClass="errors" />
...
</sf:form>
What’s noticeably different about this <sf:errors> as compared to the ones you’ve used before is that its path is set to *. This is a wildcard selector that tells <sf:errors> to render all errors for all properties. Also notice that you set the element attribute to div. By default, errors are rendered in an HTML <span> tag, which is fine when there’s only one error to display. But when you’re rendering errors for all fields, there could easily be more than one error to display, and a <span> tag (an inline tag) is not ideal. A block tag such as <div> would be better. Therefore, you can set the element attribute to div so that errors render in a <div> tag.
div.errors {
background-color: #ffcccc;
border: 2px solid red;
}
Now you’ve shoved all the errors to the top of the form, which may make laying out the page easier. But you’ve lost the ability to highlight the fields that need to be corrected. That’s easily addressed by setting the cssErrorClass attribute on each field. You can also wrap each label with <sf:label> and set its cssErrorClass.
<sf:form method="POST" commandName="spitter" >
<sf:label path="firstName" cssErrorClass="error">First Name</sf:label>:
<sf:input path="firstName" cssErrorClass="error" /><br/>
...
</sf:form>
On its own, setting the path attribute on <sf:label> doesn’t accomplish much. But you’re also setting cssErrorClass. If the bound property has any errors, the rendered <label> element’s class attribute will be set to error like this:
<label for="firstName" class="error">First Name</label>
Similarly, the <sf:input> tag now has its cssErrorClass set to error. If there’s a validation error, the rendered <input> tag’s class attribute will be set to error. Now you can style the label and the fields so that the user’s attention is drawn to them if there are any errors.
label.error { color: red; }
input.error { background-color: #ffcccc; }
@NotNull
@Size(min=5, max=16, message="{username.size}")
private String username;
@NotNull
@Size(min=5, max=25, message="{password.size}")
private String password;
@NotNull
@Size(min=2, max=30, message="{firstName.size}")
private String firstName;
@NotNull
@Size(min=2, max=30, message="{lastName.size}")
private String lastName;
@NotNull
@Email(message="{email.valid}")
private String email;
For each of the fields, the @Size annotation has message set to a string whose value is wrapped in curly braces. If you left the curly braces out, the value given to message would be the error message displayed to the user. But by using curly braces, you designate a property in a properties file that contains the actual message.
firstName.size=First name must be between {min} and {max} characters long.
lastName.size=Last name must be between {min} and {max} characters long.
username.size=Username must be between {min} and {max} characters long.
password.size=Password must be between {min} and {max} characters long.
email.valid=The email address must be valid.
What’s nice about extracting the error messages to a properties file is that you can display language- and locale-specific messages by creating a locale-specific properties file. For example, to display the errors in Spanish, you can create a file named ValidationErrors_es.properties with the following content: 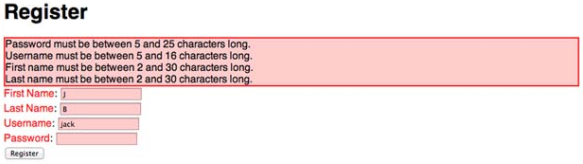
Spring General Tag Library
To use Spring’s general tag library, you must declare it in the pages that will use it:
<%@ taglib uri="http://www.springframework.org/tags" prefix="s" %>
As with any JSP tag library, the prefix can be anything you want. Commonly, spring is given as the prefix for this tag library. But I prefer to use s because it’s much more succinct and easier to type and read. With the tag library declared, you can now use the 10 JSP tags listed in table. Several of the tags in table 6.3 have been made obsolete by Spring’s form-binding tag library. The <s:bind> tag, for instance, was Spring’s original form-binding tag, and it was much more complex than the tags covered in the previous section.
Displaying Internationalized Messages
<h1><s:message code="spittr.welcome"/></h1>
As used here, <s:message> will render the text available from a message source where the key is spittr.welcome. Therefore, you’ll need to configure such a message source if you expect <s:message> to be able to do its job.
Spring has a handful of message-source classes, all implementing the MessageSource interface. One of the more common and useful implementations is ResourceBundleMessageSource. It loads messages from a properties file whose name is derived from a base name. The following @Bean method configures ResourceBundleMessageSource:
| JSP tag | Description |
|---|---|
| <s:bind> | Exports a bound property status to a page-scoped status property. Used along with <s:path> to obtain a bound property value. |
| <s:escapeBody> | HTML and/or JavaScript escapes the content in the body of the tag. |
| <s:hasBindErrors> | Conditionally renders content if a specified model object (in a request attribute) has bind errors. |
| <s:htmlEscape> | Sets the default HTML escape value for the current page. |
| <s:message> | Retrieves the message with the given code and either renders it (default) or assigns it to a page-, request-, session-, or application-scoped variable (when using the var and scope attributes). |
| <s:nestedPath> | Sets a nested path to be used by <s:bind>. |
| <s:theme> | Retrieves a theme message with the given code and either renders it(default) or assigns it to a page-, request-, session-, or application-scoped variable (when using the var and scope attributes). |
| <s:transform> | Transforms properties not contained in a command object using a com mand object’s property editors. |
| <s:url> | Creates context-relative URLs with support for URI template variables and HTML/XML/JavaScript escaping. Can either render the URL (default) or assign it to a page-, request-, session-, or application-scoped variable (when using the var and scope attributes). |
| <s:eval> | Evaluates Spring Expression Language (SpEL) expressions, rendering the result (default) or assigning it to a page-, request-, session-, or application scoped variable (when using the var and scope attributes). |
@Bean
public MessageSource messageSource() {
  ResourceBundleMessageSource ms = new  ResourceBundleMessageSource();
  ms.setBasename("messages");
  return ms;
}
The key thing in this bean declaration is the setting of the basename property. You can set it to any value you’d like, but here I’ve chosen to set it to messages. By setting it to messages, you can expect ResourceBundleMessageResolver to resolve messages from properties files at the root of the classpath whose names are derived from that base name.
Optionally, you may choose ReloadableResourceBundleMessageSource, which works much like ResourceBundleMessageSource, but it has the ability to reload message properties without recompiling or restarting the application. Here’s a sample configuration for ReloadableResourceBundleMessageSource:
@Bean
public MessageSource messageSource() {
    ReloadableResourceBundleMessageSource msgSource = new ReloadableResourceBundleMessageSource();
    messageSource.setBasename("file:///etc/spittr/messages");
    messageSource.setCacheSeconds(10);
    return msgSource;
}
The key difference here is that the basename property is configured to look outside of the application (not in the classpath, like ResourceBundleMessageSource). The basename property can be set to look for messages in the classpath (with a classpath: prefix), in the filesystem (with a file: prefix), or at the root of the web application (with no prefix). Here, it’s configured to look for messages in properties files in the /etc/spittr directory of the server’s filesystem and with a base filename of “messages”.
Creating URLs
The <s:url> tag is a modest little tag. Its main job is to create a URL and either assign it to a variable or render it in the response. It’s a drop-in replacement for JSTL’s <c:url> tag, but with a few new tricks up its sleeve. In its simplest form, <s:url> takes a servlet-context-relative URL and renders it with the servlet context path prepended.
<a href="<s:url href='/spitter/register'/>">Register</a>
If the application’s servlet context is named spittr, then the following HTML will be rendered in the response:
<a href="/spittr/spitter/register">Register</a>
This enables you to create URLs without worrying about what the servlet context path will be. The <s:url> tag takes care of it for you. Optionally, you can have <s:url> construct the URL and assign it to a variable to be used later in the template:
<s:url href="/spitter/register" var="registerUrl" />
<a href="${registerUrl}">Register</a>
By default, URL variables are created in page scope. But you can have
<s:url href="/spitter/register" var="registerUrl" scope="request" />
<!-- With Request params -->
<s:url href="/spittles" var="spittlesUrl">
  <s:param name="max" value="60" />
  <s:param name="count" value="20" />
</s:url>
<!-- With path variables -->
<s:url href="/spitter/{username}" var="spitterUrl">
  <s:param name="username" value="jbauer" />
</s:url>
When the href value is a placeholder that matches a parameter specified by <s:param>, the parameter is inserted into the placeholder’s spot. If the <s:param> parameter doesn’t match any placeholders in href, then the parameter is used as a query parameter.
The <s:url> tag can also address any escaping needs for the URL. For example, if you intend to render the URL to be displayed as part of the content on a web page (as opposed to being used as a hypertext link), you may want to ask <s:url> to do HTML escaping on the URL by setting the htmlEscape attribute to true. For example, the following <s:url> tag renders an HTML-escaped URL:
<s:url value="/spittles" htmlEscape="true">
<s:param name="max" value="60" />
<s:param name="count" value="20" />
</s:url>
This results in the URL being rendered like this: /spitter/spittles?max=60&count=20
On the other hand, if you intend to use the URL in JavaScript code, you may want to set the javaScriptEscape attribute to true:
<s:url value="/spittles" var="spittlesJSUrl" javaScriptEscape="true">
<s:param name="max" value="60" />
<s:param name="count" value="20" />
</s:url>

<script>
var spittlesUrl = "${spittlesJSUrl}"
</script>
This renders the following to the response:
<script>
var spittlesUrl = "\/spitter\/spittles?max=60&count=20"
</script>
Escaping Content
The <s:escapeBody> tag is a general-purpose escaping tag. It renders any content nested in its body, escaping as necessary. For example, suppose you want to display a snippet of HTML code on a page. In order for it to be displayed properly, the < and > characters need to be replaced with < and > or the browser will interpret the HTML as any other HTML in the page.
<s:escapeBody htmlEscape="true">
  <h1>Hello</h1>
</s:escapeBody>
This renders the following to the body of the response: <h1> Hello</h1> The <s:escapeBody> tag also supports JavaScript escaping with the javaScriptEscape attribute:
<s:escapeBody javaScriptEscape="true">
  <h1>Hello</h1>
</s:escapeBody>
<s:escapeBody> does one job and does it well. Unlike