- References
- Introduction
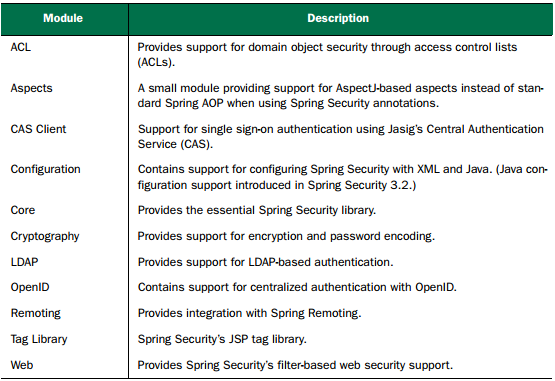
- Spring Security
- Selecting UserDetailsService
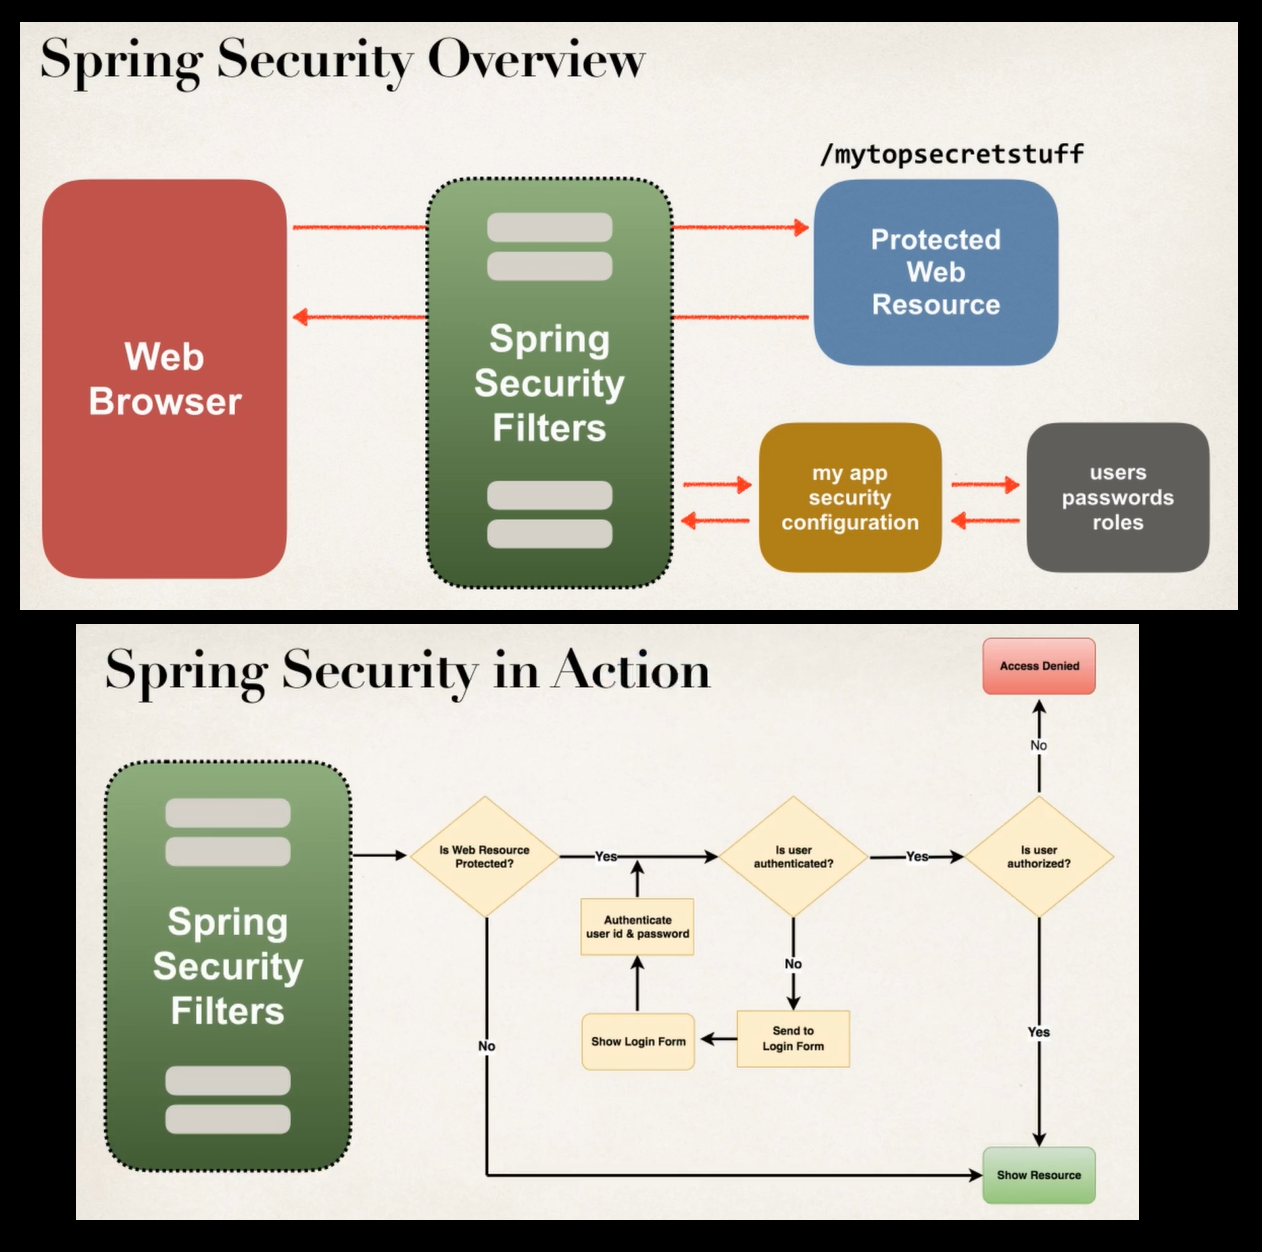
- Intercepting Requests
- Authenticating users
- Securing the view
- Securing Methods
- Others
References
- SpringBoot Security with JWT
- Authentication on the Web (Sessions, Cookies, JWT, localStorage, and more)
- Below are few links to secure endpoint at
controller method level - SpringBoot and Security Demo
- spring-security-authentication
- Spring-Certification-Spring-Security
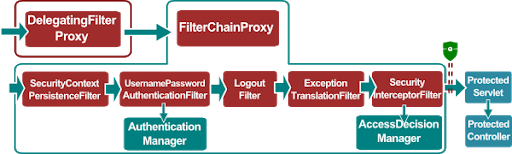
- Spring Security Filters
Introduction
- Authentication : verifying identity (401 Unauthorized)
- Authorization : verifying permissions (403 Forbidden)
- Authentication for Username/Password Schemes
- Stateful (ie. session using a cookie)
- Stateless (ie. token using JWT/OAuth/Other)
Spring Security
- Security is a concern (aspect) that transcends an application’s functionality.
- Should not write security functionality directly into your application’s code.
- Should keep security concerns separate from application concerns.
- Spring Security is a security framework that provides declarative security for your Spring-based applications.
- Spring Security provides a comprehensive security solution, handling authentication and authorization at both the web request level and at the method invocation level.
- Spring Security can also secure method invocations using Spring AOP, proxying objects and applying advice to ensure that the user has the proper authority to invoke secured methods.
- To secure web requests and restrict access at the URL level, Spring Security uses servlet filters.
- Servlet filters are used to pre-process / post-process web requests.
- Servlet filters can route web requests based on security logic.
- Spring provides a bulk of security functionality with servlet filters.

Filtering web requests
- Spring Security employs several servlet filters to provide various aspects of security.
- you only need to configure
DelegatingFilterProxy.
DelegatingFilterProxy

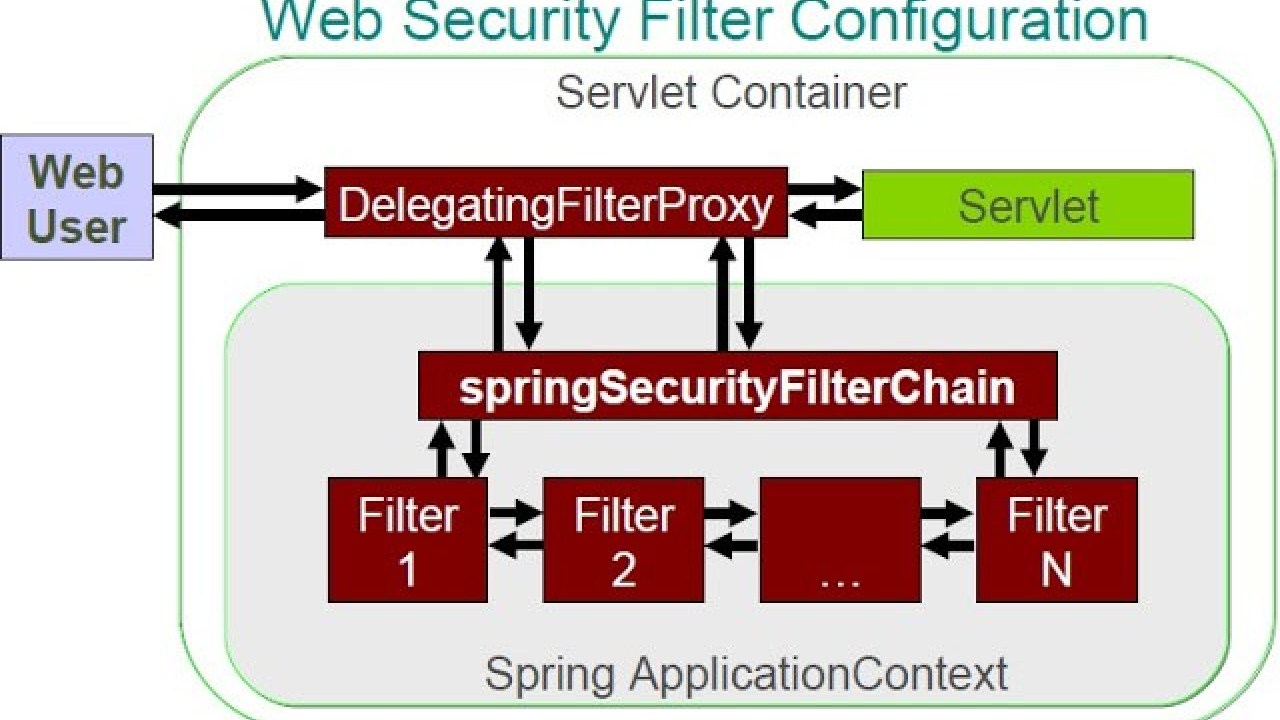
- It is a special servlet filter that, by itself, doesn’t do much.
- It delegates to an implementation of
javax.servlet.Filterthat’s registered as a bean in the Spring application context.
<filter>
    <filter-name>springSecurityFilterChain</filter-name>
    <filter-class>org.springframework.web.filter.DelegatingFilterProxy</filter-class>
</filter>
- <filter-name> should be set to
springSecurityFilterChain. - For configuring Spring Security for web security, there will be a filter bean named springSecurityFilterChain that DelegatingFilterProxy will need to delegate to.
- you can configure DelegatingFilterProxy in Java with a
WebApplicationInitializer, then all you need to do is create a new class that extendsAbstractSecurityWebApplicationInitializer.
import org.springframework.security.web.context.AbstractSecurityWebApplicationInitializer;
public class SecurityWebInitializer extends AbstractSecurityWebApplicationInitializer {}
- AbstractSecurityWebApplicationInitializer implements WebApplicationInitializer, so it will be discovered by Spring and be used to register DelegatingFilterProxy with the web container.
- you can override its appendFilters() or insertFilters() methods to register filters of your own choosing, you need not override anything to register DelegatingFilterProxy.
- DelegatingFilterProxy will intercept requests coming into the application and delegate them to a bean whose ID is SpringSecurityFilterChain.
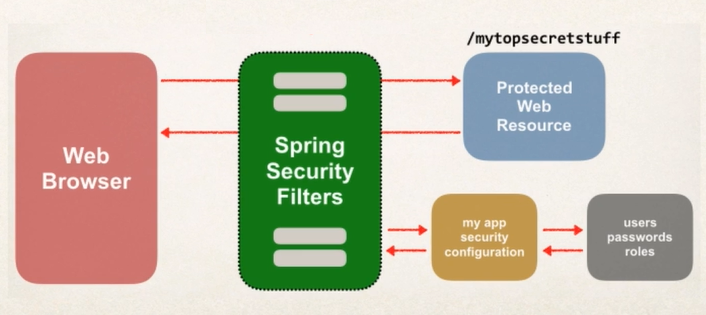
SpringSecurityFilterChain
- SpringSecurityFilterChain bean itself, it’s another special filter known as FilterChainProxy.
- It’s a single filter that chains together one or more additional filters.
- Spring Security relies on several servlet filters to provide different security features. Those filters will be created when you enable web security.
Writing a simple security configuration
import org.springframework.context.annotation.Configuration;
import org.springframework.security.config.annotation.web.configuration.EnableWebSecurity;
import org.springframework.security.config.annotation.web.configuration.WebSecurityConfigurerAdapter;

@Configuration
@EnableWebSecurity
public class SecurityConfig extends WebSecurityConfigurerAdapter {
}
@EnableWebSecurity
@EnableWebSecurityannotation enables web security.- It is useless on its own, however with WebSecurityConfigurer it works.
- Spring Security must be configured in a bean that implements
WebSecurityConfigureror (for convenience) extendsWebSecurityConfigurerAdapter. - Any bean in the Spring application context that implements WebSecurityConfigurer can contribute to Spring Security configuration, but it’s often most convenient for the configuration class to extend WebSecurityConfigurerAdapter.
- @EnableWebSecurity is generally useful for enabling security in any web application. But if you happen to be developing a Spring MVC application, you should consider using
@EnableWebMvcSecurityinstead.
@EnableWebMvcSecurity
- Among other things, the @EnableWebMvcSecurity annotation configures a Spring MVC argument resolver so that handler methods can receive the authenticated user’s principal (or username) via @AuthenticationPrincipal-annotated parameters.
- It also configures a bean that automatically adds a hidden cross-site request forgery (CSRF) token field on forms using Spring’s form-binding tag library.
- You can configure web security by overriding WebSecurityConfigurerAdapter’s three configure() methods and setting behavior on the parameter passed in.
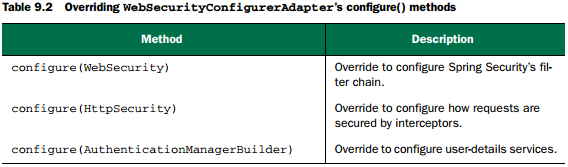
- override configure method - AuthenticationManagerBuilder for in-memory
- override configure method - HttpSecurity for antMatchers
protected void configure(HttpSecurity http) throws Exception {
 http.authorizeRequests()
    .anyRequest().authenticated()
    .and().formLogin()
    .and().httpBasic();
}
- This simple default configuration specifies how HTTP requests should be secured and what options a client has for authenticating the user.
- authorizeRequests() and anyRequest().authenticated() demands that all HTTP requests coming into the application be authenticated.
- also configures Spring Security to support authentication via a form-based login (using a predefined login page) as well as HTTP Basic.
Meanwhile, because you haven’t overridden the configure(AuthenticationManagerBuilder) method, there’s no user store backing the authentication process.
With no user store, there are effectively no users. Therefore, all requests require authentication, but there’s nobody who can log in.
- Configure a user store
- Specify which requests should and should not require authentication, as well as what authorities they require
- Provide a custom login screen to replace the plain default login screen
Selecting UserDetailsService
- you need is a user store—some place where usernames, passwords, and other data can be kept and retrieved from when making authentication decisions.
- common user store situations—such as in-memory, relational database, and LDAP—are provided out of the box.
- you can also create and plug in custom user store implementations.
In-Memory User Store
- When using
WebSecurityConfigurerAdapter, easiest way to configure a user store is to override the configure() method that takes an AuthenticationManagerBuilder as a parameter. AuthenticationManagerBuilderhas several methods that can be used to configure Spring Security’s authentication support.- Simply calling
inMemoryAuthentication()method, you can enable and configure and optionally populate an in-memory user store.
@Configuration
@EnableWebMvcSecurity
public class SecurityConfig extends WebSecurityConfigurerAdapter {
    @Override
    protected void configure(AuthenticationManagerBuilder auth) throws Exception {
        auth.inMemoryAuthentication()
        .withUser("user").password("password").roles("USER")
        .and().withUser("admin").password("password").roles("USER", "ADMIN");
    }
}

// .roles("USER") --> .authorities("ROLE_USER")
// .roles("USER", "ADMIN") --> .authorities("ROLE_USER", "ROLE_ADMIN")
- withUser() returns a
UserDetailsManagerConfigurer.UserDetailsBuilder. - roles() method is a shortcut for the authorities() methods. Any values given to roles() are prefixed with ROLE_ and assigned as authorities to the user.

Authenticating against database tables
- jdbcAuthentication() method
@Autowired
DataSource dataSource;

@Override
protected void configure(AuthenticationManagerBuilder auth) throws Exception {
    auth.jdbcAuthentication().dataSource(dataSource);
}
Overriding The Default User Queries
- Above minimal configuration makes some assumptions about your database schema.
- It expects that certain tables exist where user data will be kept.
- snippet of code from Spring Security’s internals shows the SQL queries that will be performed when looking up user details:
// retrieves a user’s username, password, and whether or not they’re enabled. Used to authenticate the user.
public static final String DEF_USERS_BY_USERNAME_QUERY = "select username,password,enabled " + "from users " + "where username = ?";

// looks up the user’s granted authorities for authorization purposes
public static final String DEF_AUTHORITIES_BY_USERNAME_QUERY = "select username,authority " + "from authorities " + "where username = ?";

// looks up authorities granted to a user as a member of a group.
public static final String DEF_GROUP_AUTHORITIES_BY_USERNAME_QUERY = "select g.id, g.group_name, ga.authority " + "from groups g, group_members gm, group_authorities ga " + "where gm.username = ? " + "and g.id = ga.group_id " + "and g.id = gm.group_id";
- you can configure your own queries like this
@Override
protected void configure(AuthenticationManagerBuilder auth) throws Exception {
    auth.jdbcAuthentication().dataSource(dataSource)
    .usersByUsernameQuery("select username, password, true from Spitter where username=?")
    .authoritiesByUsernameQuery("select username, 'ROLE_USER' from Spitter where username=?")
    .groupAuthoritiesByUsername("custom_query");
}
When replacing the default SQL queries with those of your own design, it’s important to adhere to the basic contract of the queries. All of them take the username as their only parameter. The authentication query selects the username, password, and enabled status. The authorities query selects zero or more rows containing the username and a granted authority. And the group authorities query selects zero or more rows each with a group ID, group name, and an authority.
Working With Encoded Passwords
@Override
protected void configure(AuthenticationManagerBuilder auth) throws Exception {
    auth.jdbcAuthentication().dataSource(dataSource)
    .usersByUsernameQuery("select username, password, true " + "from Spitter where username=?")
    .authoritiesByUsernameQuery("select username, 'ROLE_USER' from Spitter where username=?")
    .passwordEncoder(new StandardPasswordEncoder("53cr3t"));
}
- passwordEncoder method accepts any implementation of Spring Security’s PasswordEncoder interface.
- Spring Security’s cryptography module includes three such implementations:
BCryptPasswordEncoder,NoOpPasswordEncoder, andStandardPasswordEncoder.
public interface PasswordEncoder {
    String encode(CharSequence rawPassword);
    boolean matches(CharSequence rawPassword, String encodedPassword);
}
- password in the database is never decoded. Instead, the password that the user enters at login is encoded using the same algorithm and is then compared with the encoded password in the database.
LDAP-backed Authentication
- Light Weight Directory Access Protocol
@Override
protected void configure(AuthenticationManagerBuilder auth) throws Exception {
    auth.ldapAuthentication().userSearchFilter("(uid={0})").groupSearchFilter("member={0}");
}
- userSearchFilter() and groupSearchFilter() methods are used to provide a filter for the base LDAP queries, which are used to search for users and groups.
- By default, the base queries for both users and groups are empty, indicating that the search will be done from the root of the LDAP hierarchy.
@Override
protected void configure(AuthenticationManagerBuilder auth) throws Exception {
    auth.ldapAuthentication().userSearchBase("ou=people").userSearchFilter("(uid={0})")
    .groupSearchBase("ou=groups").groupSearchFilter("member={0}");
}
- userSearchBase() - provides a base query for finding users.
- groupSearchBase() - specifies the base query for finding groups.
- Rather than search from the root, this example specifies that users be searched for where the organization unit is people. And groups should be searched for where the organizational unit is groups.
Configuring Password Comparison
- The default strategy for authenticating against LDAP is to perform a bind operation, authenticating the user directly to the LDAP server.
- Another option is to perform a comparison operation. This involves sending the entered password to the LDAP directory and asking the server to compare the password against a user’s password attribute. Because the comparison is done within the LDAP server, the actual password remains secret.
@Override
protected void configure(AuthenticationManagerBuilder auth) throws Exception {
    auth.ldapAuthentication().userSearchBase("ou=people").userSearchFilter("(uid={0})")
    .groupSearchBase("ou=groups").groupSearchFilter("member={0}")
    .passwordCompare();
}
- By default, the password given in the login form will be compared with the value of the userPassword attribute in the user’s LDAP entry. If the password is kept in a different attribute, you can specify the password attribute’s name with passwordAttribute().
@Override
protected void configure(AuthenticationManagerBuilder auth) throws Exception {
    auth.ldapAuthentication().userSearchBase("ou=people").userSearchFilter("(uid={0})")
    .groupSearchBase("ou=groups").groupSearchFilter("member={0}")
    .passwordCompare()
    .passwordEncoder(new Md5PasswordEncoder()).passwordAttribute("passcode");
}
- It’s nice that the actual password is kept secret on the server when doing server-side password comparison. But the attempted password is still passed across the wire to the LDAP server and could be intercepted by a hacker. To prevent that, you can specify an encryption strategy by calling the passwordEncoder() method.
Referring To A Remote Ldap Server
By default, Spring Security’s LDAP authentication assumes that the LDAP server is listening on port 33389 on localhost. But if your LDAP server is on another machine, you can use the contextSource() method to configure the location:
@Override
protected void configure(AuthenticationManagerBuilder auth) throws Exception {
  auth.ldapAuthentication().userSearchBase("ou=people").userSearchFilter("(uid={0})")
  .groupSearchBase("ou=groups").groupSearchFilter("member={0}")
  .contextSource().url("ldap://habuma.com:389/dc=habuma,dc=com");
}
The contextSource() method returns a ContextSourceBuilder, which, among other things, offers the url() method that lets you specify the location of the LDAP server.
Configuring An Embedded Ldap Server
Spring Security can provide an embedded LDAP server for you.
@Override
protected void configure(AuthenticationManagerBuilder auth) throws Exception {
    auth.ldapAuthentication().userSearchBase("ou=people").userSearchFilter("(uid={0})")
    .groupSearchBase("ou=groups").groupSearchFilter("member={0}")
    .contextSource().root("dc=habuma,dc=com");
}
- When the LDAP server starts, it will attempt to load data from any LDIF files that it can find in the classpath.
- LDIF (LDAP Data Interchange Format) is a standard way of representing LDAP data in a plain text file.
- Each record is composed of one or more lines, each containing a name:value pair.
- Records are separated from each other by blank lines.
- If you’d rather that Spring not rummage through your classpath looking for just any LDIF files it can find, you can be more explicit about which LDIF file gets loaded by calling the ldif() method.
@Override
protected void configure(AuthenticationManagerBuilder auth)
throws Exception {
    auth.ldapAuthentication()
    .userSearchBase("ou=people").userSearchFilter("(uid={0})")
    .groupSearchBase("ou=groups").groupSearchFilter("member={0}")
    .contextSource().root("dc=habuma,dc=com")
    .ldif("classpath:users.ldif");
}
# organizationalUnit = groups
dn: ou=groups,dc=habuma,dc=com
objectclass: top
objectclass: organizationalUnit
ou: groups
# organizationalUnit = people
dn: ou=people,dc=habuma,dc=com
objectclass: top
objectclass: organizationalUnit
ou: people
# employee = habuma
dn: uid=habuma,ou=people,dc=habuma,dc=com
objectclass: top
objectclass: person
objectclass: organizationalPerson
objectclass: inetOrgPerson
cn: Craig Walls
sn: Walls
uid: habuma
userPassword: password
# employee = jsmith
dn: uid=jsmith,ou=people,dc=habuma,dc=com
objectclass: top
objectclass: person
objectclass: organizationalPerson
objectclass: inetOrgPerson
cn: John Smith
sn: Smith
uid: jsmith
userPassword: password
# Adding employee habuba to group spittr
dn: cn=spittr,ou=groups,dc=habuma,dc=com
objectclass: top
objectclass: groupOfNames
cn: spittr
member: uid=habuma,ou=people,dc=habuma,dc=com
- we reference a few key-value pairs in order to construct the DN for our new entry. When setting attribute values, you must use the colon and space. When referencing attributes/values, an equal sign should be used instead.
dn: ou=groups,dc=habuma,dc=com
- necessary objectClass declarations and attributes must be set to construct a valid entry. For example, to create an organizational unit to contain the entries for the employees of our organization.
objectclass: organizationalUnit–> ou attributeobjectclass: inetOrgPerson–> uid attribute- inetOrgPerson
# LDIF Keywords
dn      distinguished name
ou      organizationalUnitName
dc      domainComponent
cn      commonName
uid     userid
L       localityName
ST      stateOrProvinceName
O       organizationName
C       countryName
STREET  streetAddress
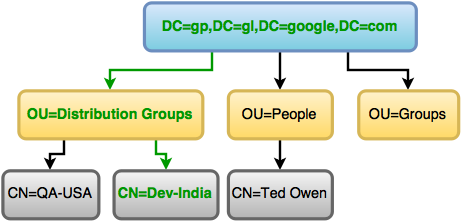
("CN=Dev-India,OU=Distribution Groups,DC=gp,DC=gl,DC=google,DC=com");
- You read it from right to left, the right-most component is the root of the tree, and the left most component is the node (or leaf) you want to reach.
- From the com Domain Component, find the google Domain Component, and then inside it the gl Domain Component and then inside it the gp Domain Component.
- In the gp Domain Component, find the Organizational Unit called Distribution Groups and then find the the object that has a common name of Dev-India.
Configuring a custom user service
Suppose that you need to authenticate against users in a non-relational database such as Mongo or Neo4j. In that case, you’ll need to implement a custom implementation of the UserDetailsService interface.
All you need to do is implement the loadUserByUsername() method to find a user given the user’s username. loadUserByUsername() then returns a UserDetails object representing the given user.
User is a concrete implementation of UserDetails.
public interface UserDetailsService {
    UserDetails loadUserByUsername(String username) throws UsernameNotFoundException;
}
@Autowired
SpitterRepository spitterRepository;

@Override
protected void configure(AuthenticationManagerBuilder auth) throws Exception {
  auth.userDetailsService(new SpitterUserService(spitterRepository));
}
public class SpitterUserService implements UserDetailsService {

    private final SpitterRepository spitterRepository;

    @Autowired
    public SpitterUserService(SpitterRepository spitterRepository) {
        this.spitterRepository = spitterRepository;
    }

    @Override
    public UserDetails loadUserByUsername(String username) throws UsernameNotFoundException {
        Spitter spitter = spitterRepository.findByUsername(username);
        if (spitter != null) {
            List < GrantedAuthority > authorities = new ArrayList < GrantedAuthority > ();
            authorities.add(new SimpleGrantedAuthority("ROLE_SPITTER"));
            return new User(spitter.getUsername(), spitter.getPassword(), authorities);
        }
        throw new UsernameNotFoundException("User '" + username + "' not found.");
    }
}
Intercepting Requests
- If you were to handle a request for /spitters/me to display the current user’s profile, then authentication is required to know whose profile to show.
- The key to fine-tuning security for each request is to override the configure (HttpSecurity) method.
@Override
protected void configure(HttpSecurity http) throws Exception {
  http.authorizeRequests()
  .antMatchers("/spitters/me").authenticated()
  .antMatchers(HttpMethod.POST, "/spittles").authenticated()
  .anyRequest().permitAll();

  // can also include .hasAuthority("ROLE_SPITTER") or .hasRole("SPITTER")
}
- Here you’re calling authorizeRequests() and then calling methods on the object it returns to indicate that you want to configure request-level security details.
- The first call to antMatchers() specifies that requests whose path is /spitters/me should be authenticated.
- The second call to antMatchers() is even more specific, saying that any HTTP POST request to /spittles must be authenticated.
- Finally, a call to anyRequests() says that all other requests should be permitted, not requiring authentication or any authorities.
You should know, however, that they’ll be applied in the order given. For that reason, it’s important to configure the most specific request path patterns first and the least specific ones (such as anyRequest()) last. If not, then the least specific paths will trump the more specific ones.
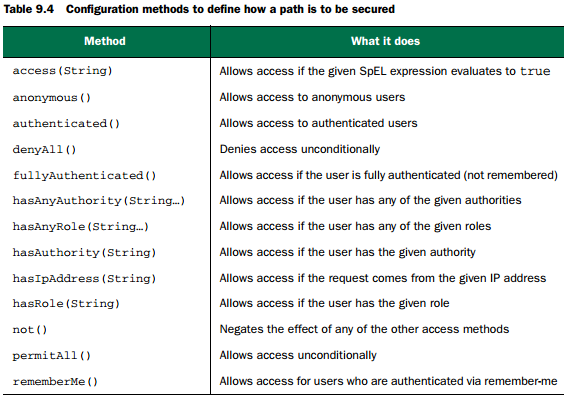
Securing with Spring Expressions
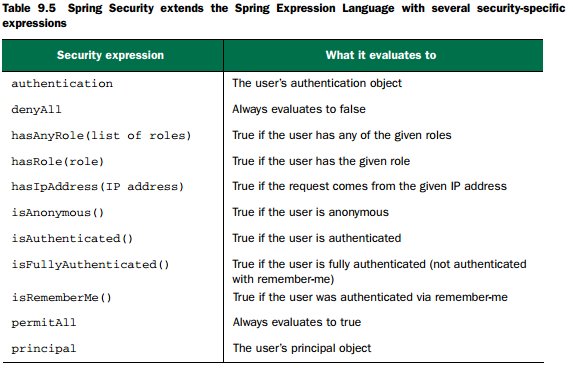
.antMatchers("/spitter/me").access("hasRole('ROLE_SPITTER') and hasIpAddress('192.168.1.2')")
Enforcing channel security
- Data is sent over HTTP unencrypted, leaving an open opportunity for a hacker to intercept the request and see information you don’t want them to see. That’s why sensitive information should be sent encrypted over HTTPS.
- In addition to the authorizeRequests() method, the HttpSecurity object passed into configure() has a requiresChannel() method that lets you declare channel requirements for various URL patterns.
- You can declare that the home page always be sent over HTTP by using requiresInsecure() instead of requiresSecure as it doesn’t carry any sensitive information.
@Override
protected void configure(HttpSecurity http) throws Exception {
  http.authorizeRequests()
    .antMatchers("/spitter/me").hasRole("SPITTER")
    .antMatchers(HttpMethod.POST, "/spittles").hasRole("SPITTER")
    .anyRequest().permitAll()
  .and().requiresChannel()
    .antMatchers("/").requiresInsecure()
    .antMatchers("/spitter/form").requiresSecure();
}
Preventing cross-site request forgery
what if that POST request comes from another website? And what if that POST request is the result of submitting the following form on that other site?
<form method="POST" action="http://www.spittr.com/spittles">
  <input type="hidden" name="message" value="I'm stupid!" />
  <input type="submit" value="Click here to win a new car!" />
</form>
- This is a simple example of a cross-site request forgery (CSRF). Basically, a CSRF attack happens when one site tricks a user into submitting a request to another server, possibly having a negative outcome. Starting with Spring Security 3.2, CSRF protection is enabled by default.
- Spring Security implements CSRF protection with a synchronizer token.
- Statechanging requests (for example, any request that is not GET, HEAD, OPTIONS, or TRACE) will be intercepted and checked for a CSRF token. If the request doesn’t carry a CSRF token, or if the token doesn’t match the token on the server, the request will fail with a CsrfException.
- This means that any forms in your application must submit a token in a _csrf field. And that token must be the same as the one calculated and stored by the server so that it matches up when the form is submitted.
- Spring’s form-binding tag library, the
- each request includes a session cookie and randomly generated token.
@Override
protected void configure(HttpSecurity http) throws Exception {http... .csrf().disable();}
Authenticating users
@Override
protected void configure(HttpSecurity http) throws Exception {
  http.formLogin().and().authorizeRequests().antMatchers("/spitter/me").hasRole("SPITTER")
  .antMatchers(HttpMethod.POST, "/spittles").hasRole("SPITTER").anyRequest().permitAll();
  .and().requiresChannel().antMatchers("/spitter/form").requiresSecure();
}
Enabling HTTP Basic authentication
RESTful API, When the user of the application is another application, prompting for login with a form just won’t do. HTTP Basic authentication is one way to authenticate a user to an application directly in the HTTP request itself. You may have seen HTTP Basic authentication before. When encountered by a web browser, it prompts the user with a plain modal dialog box. But that’s just how it’s manifested in a web browser. In reality, it’s an HTTP 401 response, indicating that a username and password must be presented with the request. This makes it suitable as a means for REST clients to authenticate against the services they’re consuming. Enabling HTTP Basic authentication is as simple as calling httpBasic() on the HttpSecurity object passed into configure(). Optionally, you can specify a realm by calling realmName().
@Override
protected void configure(HttpSecurity http) throws Exception {
  http.formLogin().loginPage("/login").and().httpBasic().realmName("Spittr").and()...
}
Enabling remember-me functionality
Spring Security makes it easy to add remember-me functionality to an application. To turn on remember-me support, all you need to do is call rememberMe() on the HttpSecurity passed into configure().
@Override
protected void configure(HttpSecurity http) throws Exception {
  http.formLogin().loginPage("/login").and().rememberMe()
  .tokenValiditySeconds(2419200).key("spittrKey")...
}
- By default, a remember-me token is stored in a cookie that’s valid for up to two weeks. But this example specifies that the token should stay valid for up to four weeks (2,419,200 seconds).
- The token that’s stored in the cookie is made up of the username, password, an expiration date, and a private key—all encoded in an MD5 hash before being written to the cookie.
- By default, the private key is SpringSecured, but this example sets it to spitterKey to make it specific to the Spittr application.
<input id="remember_me" name="remember-me" type="checkbox"/>
<label for="remember_me" class="inline">Remember me</label>
Logging out
- logout capability is already enabled by your configuration without you having to do anything else. All you need to do is add a link that uses it.
- Logout is implemented as a servlet filter that (by default) intercepts requests to /logout.
<a th:href="@{/logout}">Logout</a>
- /logout will be handled by Spring Security’s LogoutFilter.
- The user will be logged out and any remember-me tokens cleared.
- After the logout is complete, the user’s browser will be redirected to /login?logout to give the user an opportunity to log in again.
- If you’d like to have the user redirected to some other page, such as the application’s home page, you can configure that in configure().
@Override
protected void configure(HttpSecurity http) throws Exception {
  http.formLogin().loginPage("/login").and().logout().logoutSuccessUrl("/") ...
}
- override the default path that LogoutFilter intercepts.
.logout().logoutSuccessUrl("/").logoutUrl("/signout")
Securing the view
<!-- security tag JSTL -->
<%@ taglib prefix="security" uri="http://www.springframework.org/security/tags" %>

<security:authentication> will render the property’s value in the view. But if you’d rather assign it to a variable, then simply specify the name of the variable in the var attribute. The variable is created in page scope by default.
<security:authentication property="principal.username" var="loginId"/>
<security:authentication property="principal.username" var="loginId" scope="request" />
Spring Security’s
<security:authorize access="hasRole('ROLE_SPITTER')">
  <s:url value="/spittles" var="spittle_url" />
  <sf:form modelAttribute="spittle" action="${spittle_url}">
    <sf:label path="text">
      <s:message code="label.spittle" text="Enter spittle:"/>
    </sf:label>
    <sf:textarea path="text" rows="2" cols="40" />
    <sf:errors path="text" />
    <br/>
    <div class="spitItSubmitIt">
      <input type="submit" value="Spit it!" class="status-btn round-btn disabled" />
    </div>
  </sf:form>
</security:authorize>
<security:authorize access="isAuthenticated() and principal.username=='habuma'">
  <a href="/admin">Administration</a>
</security:authorize>
is equivalent to
.antMatchers("/admin").access("isAuthenticated() and principal.username=='habuma'");
- Now the admin functionality is locked down. The URL is secured and the link to the URL won’t appear unless the user is authorized to use it. But to do that, you had to declare the SpEL expression in two places—in the security configuration and in the
<security:authorize>tag’s access attribute. - Is there any way to eliminate that duplication and still prevent the link to the administrative functions from being rendered unless the rule is met? That’s what the
- Unlike the access attribute where the security constraint is explicitly declared, the url attribute indirectly refers to the security constraints for a given URL pattern.
<security:authorize url="/admin">
  <spring:url value="/admin" var="admin_url" />
  <br/>
  <a href="${admin_url}">Admin</a>
</security:authorize>
Securing Methods
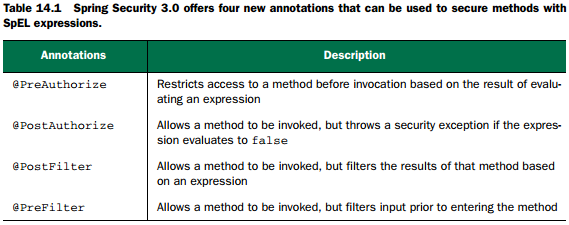
Spring Security provides three different kinds of security annotations:
- Spring Security’s own
@Secured - JSR-250’s
@RolesAllowed - Expression-driven annotations, with
@PreAuthorize,@PostAuthorize,@PreFilter, and@PostFilter
The @Secured and @RolesAllowed annotations are the simplest options, restricting access based on what authorities have been granted to the user.
- When you need more flexibility in defining security rules on methods, Spring Security offers @PreAuthorize and @PostAuthorize. And @PreFilter/@PostFilter filter elements out of collections returned from or passed into a method.
@Secured
- annotated with @EnableGlobalMethodSecurity along with extending GlobalMethodSecurityConfiguration.
- GlobalMethodSecurityConfiguration offers you the opportunity to configure the finer points of method-level security.
- If you haven’t already configured authentication in the web-layer security configuration, you may want to do that here by overriding the GlobalMethodSecurityConfiguration’s configure() method.
@Configuration
@EnableGlobalMethodSecurity(securedEnabled=true)
public class MethodSecurityConfig extends GlobalMethodSecurityConfiguration {
  @Override
  protected void configure(AuthenticationManagerBuilder auth) throws Exception {
    auth.inMemoryAuthentication()
    .withUser("user").password("password").roles("USER");
  }
}
- @EnableGlobalMethodSecurity with securedEnabled attribute is set to true creates a pointcut such that the Spring Security aspects will wrap bean methods that are annotated with @Secured.
@Secured({"ROLE_SPITTER", "ROLE_ADMIN"})
public void addSpittle(Spittle spittle) { // ... }
- @Secured annotation takes an array of String as an argument. Each String value is an authorization, one of which is required to invoke the method.
- If more than one value is passed into @Secured, then the authenticated user must be granted at least one of those authorities to gain access to the method.
- For unauthorized user, the aspect wrapping the method will throw one of Spring Security’s exceptions (probably a subclass of AuthenticationException or AccessDeniedException). These are unchecked exceptions, but ultimately someone will need to catch it and handle it.
- If the secured method is invoked in the course of a web request, the exception will be automatically handled by Spring Security’s filters. Otherwise, you’ll need to write the code to handle the exception.
- One drawback of the @Secured annotation is that it’s a Spring-specific annotation.
- If you’re more comfortable using annotations defined in Java standards, then perhaps you should consider using @RolesAllowed instead.
@RolesAllowed
@Configuration
@EnableGlobalMethodSecurity(jsr250Enabled=true)
public class MethodSecurityConfig extends GlobalMethodSecurityConfiguration { }

@RolesAllowed("ROLE_SPITTER")
public void addSpittle(Spittle spittle) {// ...}
Shortcoming : They can restrict the invocation of a method based only on whether or not that user has been granted a specific privilege. No other factors can play a part in the decision to allow the method to execute or not.
SpEL Enabled Annotations
- annotations that use SpEL to enable even more interesting security constraints on methods.
- to enable them by setting @EnableGlobalMethodSecurity’s prePostEnabled attribute to true.
@Configuration
public class MethodSecurityConfig extends GlobalMethodSecurityConfiguration { }
Expressing method access rules
- @PreAuthorize is evaluated before the method executes and prevents method execution unless the expression evaluates to true.
- @PostAuthorize waits until the method has returned before deciding whether or not to raise a security exception.
@PreAuthorize
@PreAuthorize("hasRole('ROLE_SPITTER')")
public void addSpittle(Spittle spittle) {// ...}
- With SpEL expressions guiding access decisions, far more advanced security constraints can be written. For example, suppose that the average Spittr user can only write spittles of 140 characters or less, but premium users are allowed unlimited spittle lengths.
@PreAuthorize("(hasRole('ROLE_SPITTER') and #spittle.text.length() <= 140 or hasRole('ROLE_PREMIUM')")
public void addSpittle(Spittle spittle) {// ...}
@PostAuthorize
- Suppose that you wanted to secure the getSpittleById() method so that it only authorizes access if the Spittle object returned belongs to the authenticated user. There’s no way of knowing if a Spittle belongs to the current user until you’ve already fetched it. Therefore, getSpittleById() must execute first. If, after fetching the Spittle, it turns out to not belong to the current user, then a security exception should be thrown.
@PostAuthorize("returnObject.spitter.username == principal.username")
public Spittle getSpittleById(long id) {// ...}
- principal is another one of Spring Security’s special built-in names that represents the principal (typically the username) of the currently authenticated user.
- If SpEL is true then the Spittle will be returned to the caller. Otherwise, an AccessDeniedException will be thrown, and the caller won’t get to see the Spittle.
Filtering method inputs and outputs
- Sometimes it’s not the method that’s being secured, but rather the data being passed into or returned from that method.
- For instance, suppose that you have a method called getOffensiveSpittles() that returns a list of Spittles that have been flagged as offensive.
- This is a method that’s primarily intended to be used by an administrator to help moderate the content on the Spittr application. But it could also be used by an individual user to see if any of their Spittles have been flagged as offensive.
- As it is, the getOffensiveSpittles() method isn’t concerned with any specific user. It merely returns a list of offensive Spittles, no matter who they belong to. That’s perfect for the administrative use of the method, but it falls short of limiting the list to those Spittles that belong to the current user. What’s needed is a way to filter the collection of Spittles returned from getOffensiveSpittles(), narrowing it down to the list that the current user is allowed to see.
@PostFilter
- @PostFilter evaluates that expression against each member of a collection being returned from the method, removing those members for whom the expression evaluates to false.
@PreAuthorize("hasAnyRole({'ROLE_SPITTER', 'ROLE_ADMIN'})")
@PostFilter( "hasRole('ROLE_ADMIN') || " + "filterObject.spitter.username == principal.name")
public List<Spittle> getOffensiveSpittles() {...}
The filterObject referenced in the expression refers to an individual element (which you know to be a Spittle) in the List returned from the method.
@PreFilter
- For instance, suppose you have a list of Spittles that you want to delete as a batch.
- you need to apply some security rules to it, such that the Spittles can only be deleted by the user who owns them or by an administrator.
@PreAuthorize("hasAnyRole({'ROLE_SPITTER', 'ROLE_ADMIN'})")
@PreFilter( "hasRole('ROLE_ADMIN') || " + "targetObject.spitter.username == principal.name")
public void deleteSpittles(List<Spittle> spittles) { ... }
targetObject variable is another Spring Security–provided value that represents the current list item to evaluate against.
Defining A Permission Evaluator
@PreAuthorize("hasAnyRole({'ROLE_SPITTER', 'ROLE_ADMIN'})")
@PreFilter("hasPermission(targetObject, 'delete')")
public void deleteSpittles(List<Spittle> spittles) { ... }
- Now, expression is much tighter.
- If user have permission to delete the target object, Spittle will remain in the list passed to deleteSpittles().
- If not, then it will be tossed out.
- The hasPermission() function is a Spring Security–provided extension to SpEL, and it represents an opportunity for you, the developer, to plug in whatever logic you want to perform when it’s evaluated. All you need to do is write and register a custom permission evaluator.
public class SpittlePermissionEvaluator implements PermissionEvaluator {

  private static final GrantedAuthority ADMIN_AUTHORITY =new GrantedAuthorityImpl("ROLE_ADMIN");

  public boolean hasPermission(Authentication authentication,Object target,   Object permission) {
    if (target instanceof Spittle) {
      Spittle spittle = (Spittle) target;
      String username = spittle.getSpitter().getUsername();
      if ("delete".equals(permission)) {
        return isAdmin(authentication) || username.equals(authentication.getName());
      }
    }
    throw new UnsupportedOperationException("hasPermission not supported for object <" + target + "> and permission <" + permission +">");
  }

  public boolean hasPermission(Authentication authentication, Serializable targetId, String targetType, Object permission) {
    throw new UnsupportedOperationException();
  }

  private boolean isAdmin(Authentication authentication) {
    return authentication.getAuthorities().contains(ADMIN_AUTHORITY);
  }
}
- SpittlePermissionEvaluator implements Spring Security’s PermissionEvaluator interface, which demands that two different hasPermission() methods be implemented.
- One of the hasPermission() methods takes an Object as the object to evaluate against in the second parameter.
- The other hasPermission() is useful when only the ID of the target object is available, and it takes that ID as a Serializable in its second parameter.
- For our purposes, we’ll assume that you’ll always have the Spittle object to evaluate permissions against, so the other method simply throws UnsupportedOperationException.
- Once the permission evaluator is ready, you need to register it with Spring Security for it to back the hasPermission() operation in the expression given to @PostFilter. To do that, you’ll need to replace the expression handler with one that’s configured to use your custom permission evaluator.
- By default, Spring Security is configured with a DefaultMethodSecurityExpressionHandler that’s given an instance of DenyAllPermissionEvaluator. As its name suggests, DenyAllPermissionEvaluator always returns false from its hasPermission() methods, denying all method access. But you can provide Spring Security with a
DefaultMethodSecurityExpressionHandlerconfigured with your custom SpittlePermissionEvaluator by overriding the createExpressionHandler method from GlobalMethodSecurityConfiguration:
@Override
protected MethodSecurityExpressionHandler createExpressionHandler() {
  DefaultMethodSecurityExpressionHandler expressionHandler =
       new DefaultMethodSecurityExpressionHandler();
  expressionHandler.setPermissionEvaluator(new SpittlePermissionEvaluator());
  return expressionHandler;
}
Now anytime you secure a method with an expression that uses hasPermission(), the SpittlePermissionEvaluator will be invoked and get to decide whether or not the user has permission to call the method.

{noop}password - tells spring security not apply any password encoder.
Others
- AbstractAnnotationConfigDispatcherServletInitializer
- servlet config class
- servlet mappings
- BCrypt is a one-way algorithm, password saved in DB are never decrypted instead provided password is encrypted and checked for a match for login.
- password field should be 68 chars -
{bcrypt}(8 chars) + password(60 chars)
- password field should be 68 chars -