Behavioral Design Patterns
Table of contents
Template Method Pattern
Template Method is a behavioral design pattern and it’s used to create a method stub and deferring some of the steps of implementation to the subclasses. Template method defines the steps to execute an algorithm and it can provide default implementation that might be common for all or some of the subclasses.
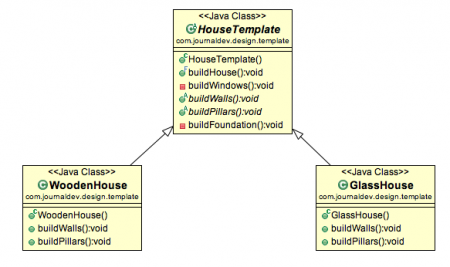
Example-Template Method Pattern
Suppose we want to provide an algorithm to build a house. The steps need to be performed to build a house are – building foundation, building pillars, building walls and windows. The important point is that the we can’t change the order of execution because we can’t build windows before building the foundation. So in this case we can create a template method that will use different methods to build the house.
Now building the foundation for a house is same for all type of houses, whether its a wooden house or a glass house. So we can provide base implementation for this, if subclasses want to override this method, they can but mostly it’s common for all the types of houses. To make sure that subclasses don’t override the template method, we should make it final.
buildHouse() is the template method and defines the order of execution for performing several steps.
public abstract class HouseTemplate {
	//template method, final so subclasses can't override
	public final void buildHouse(){
		buildFoundation();
		buildPillars();
		buildWalls();
		buildWindows();
		System.out.println("House is built.");
	}

	//default implementation
	private void buildWindows() {
		System.out.println("Building Glass Windows");
	}

	//methods to be implemented by subclasses
	public abstract void buildWalls();
	public abstract void buildPillars();
	private void buildFoundation() {
		System.out.println("Building foundation with cement,iron rods and sand");
	}
}
public class WoodenHouse extends HouseTemplate {
 @Override
 public void buildWalls() {
  System.out.println("Building Wooden Walls");
 }
 @Override
 public void buildPillars() {
  System.out.println("Building Pillars with Wood coating");
 }
}
public class GlassHouse extends HouseTemplate {
 @Override
 public void buildWalls() {
  System.out.println("Building Glass Walls");
 }
 @Override
 public void buildPillars() {
  System.out.println("Building Pillars with glass coating");
 }
}
public class HousingClient {
 public static void main(String[] args) {
  HouseTemplate houseType = new WoodenHouse();
  //using template method
  houseType.buildHouse();
  System.out.println("************");
  houseType = new GlassHouse();
  houseType.buildHouse();
 }
}
Notice that client is invoking the template method of base class and depending of implementation of different steps, it’s using some of the methods from base class and some of them from subclass.
JDK Example-Template Method Design Pattern
- All non-abstract methods of
java.io.InputStream,java.io.OutputStream,java.io.Readerandjava.io.Writer. - All non-abstract methods of
java.util.AbstractList,java.util.AbstractSetandjava.util.AbstractMap.
Template Method Design Pattern Important Points
- Template method should consists of certain steps whose order is fixed and for some of the methods, implementation differs from base class to subclass. Template method should be final.
- Most of the times, subclasses calls methods from super class but in template pattern, superclass template method calls methods from subclasses, this is known as Hollywood Principle – “don’t call us, we’ll call you.”.
- Methods in base class with default implementation are referred as Hooks and they are intended to be overridden by subclasses, if you want some of the methods to be not overridden, you can make them final, for example in our case we can make buildFoundation() method final because if we don’t want subclasses to override it.
Mediator Pattern
- Mediator design pattern is used to provide a centralized communication medium between different objects in a system. Mediator design pattern is very helpful in an enterprise application where multiple objects are interacting with each other. If the objects interact with each other directly, the system components are tightly-coupled with each other that makes maintainability cost higher and not flexible to extend easily. Mediator pattern focuses on provide a mediator between objects for communication and help in implementing lose-coupling between objects.
- Air traffic controller is a great example of mediator pattern where the airport control room works as a mediator for communication between different flights.
- Mediator works as a router between objects and it can have it’s own logic to provide way of communication.
- The system objects that communicate each other are called Colleagues. Usually we have an interface or abstract class that provides the contract for communication and then we have concrete implementation of mediators.
Example - Mediator Pattern
We will try to implement a chat application where users can do group chat. Every user will be identified by it’s name and they can send and receive messages. The message sent by any user should be received by all the other users in the group.

public interface ChatMediator {
 public void sendMessage(String msg, User user);
 void addUser(User user);
}
- Users can send and receive messages, so we can have User interface or abstract class.
- Notice that User has a reference to the mediator object, it’s required for the communication between different users.
public abstract class User {
 protected ChatMediator mediator;
 protected String name;
 public User(ChatMediator med, String name){
  this.mediator=med;
  this.name=name;
 }
 public abstract void send(String msg);
 public abstract void receive(String msg);
}
Now we will create concrete mediator class, it will have a list of users in the group and provide logic for the communication between the users.
public class ChatMediatorImpl implements ChatMediator {
 private List<User> users;
 public ChatMediatorImpl(){
  this.users=new ArrayList<>();
 }
 @Override
 public void addUser(User user){
  this.users.add(user);
 }
 @Override
  public void sendMessage(String msg, User user) {
  for(User u : this.users){
  //message should not be received by the user sending it
   if(u != user){u.receive(msg);}
  }
 }
}
Now we can create concrete User classes to be used by client system.
public class UserImpl extends User {
 public UserImpl(ChatMediator med, String name) {
  super(med, name);
 }
 @Override
 public void send(String msg){
  System.out.println(this.name+": Sending Message="+msg);
  mediator.sendMessage(msg, this);
 }
 @Override
 public void receive(String msg) {
  System.out.println(this.name+": Received Message:"+msg);
 }
}
Notice that send() method is using mediator to send the message to the users and it has no idea how it will be handled by the mediator.
public class ChatClient {
	public static void main(String[] args) {
		ChatMediator mediator = new ChatMediatorImpl();
		User user1 = new UserImpl(mediator, "Pankaj");
		User user2 = new UserImpl(mediator, "Lisa");
		User user3 = new UserImpl(mediator, "Saurabh");
		User user4 = new UserImpl(mediator, "David");
		mediator.addUser(user1);
		mediator.addUser(user2);
		mediator.addUser(user3);
		mediator.addUser(user4);
		user1.send("Hi All");
	}
}
JDK Example-Mediator Pattern
- java.util.Timer class scheduleXXX() methods
- Java Concurrency Executor execute() method.
- java.lang.reflect.Method invoke() method.
Mediator Design Pattern Important Points
- Mediator pattern is useful when the communication logic between objects is complex, we can have a central point of communication that takes care of communication logic.
- Allows loose coupling by encapsulating the way disparate sets of objects interact and communicate with each other. Allows for the actions of each object set to vary independently of one another.
- Java Message Service (JMS) uses Mediator pattern along with Observer pattern to allow applications to subscribe and publish data to other applications.
- We should not use mediator pattern just to achieve lose-coupling because if the number of mediators will grow, then it will become hard to maintain them.
Chain of Responsibility Pattern
- Chain of responsibility pattern is used to achieve loose coupling in software design where a request from client is passed to a chain of objects to process them. Then the object in the chain will decide themselves who will be processing the request and whether the request is required to be sent to the next object in the chain or not.
- We know that we can have multiple catch blocks in a try-catch block code. Here every catch block is kind of a processor to process that particular exception. So when any exception occurs in the try block, its send to the first catch block to process. If the catch block is not able to process it, it forwards the request to next object in chain i.e next catch block. If even the last catch block is not able to process it, the exception is thrown outside of the chain to the calling program.
Example-ATM Dispense machine
Dispense bills of 50$, 20$, 10$ denomination.
If the user enters an amount that is not multiples of 10, it throws error. We will use Chain of Responsibility pattern to implement this solution.
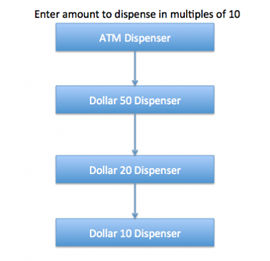

Note that we can implement this solution easily in a single program itself but then the complexity will increase and the solution will be tightly coupled. So we will create a chain of dispense systems to dispense bills of 50$, 20$ and 10$.
create a class Currency that will store the amount to dispense and used by the chain implementations.
public class Currency {
	private int amount;
	public Currency(int amt){this.amount=amt;}
	public int getAmount(){return this.amount;}
}
The base interface should have a method to define the next processor in the chain and the method that will process the request.
public interface DispenseChain {
 void setNextChain(DispenseChain nextChain);
 void dispense(Currency cur);
}
We need to create different processor classes that will implement the DispenseChain interface and provide implementation of dispense methods. Since we are developing our system to work with three types of currency bills – 50$, 20$ and 10$, we will create three concrete implementations.
public class Dollar50Dispenser implements DispenseChain {
	private DispenseChain chain;
	@Override
	public void setNextChain(DispenseChain nextChain) {	this.chain=nextChain;	}
	@Override
	public void dispense(Currency cur) {
		if(cur.getAmount() >= 50){
			int num = cur.getAmount()/50;
			int remainder = cur.getAmount() % 50;
			System.out.println("Dispensing "+num+" 50$ note");
			if(remainder !=0) this.chain.dispense(new Currency(remainder));
		}else{	this.chain.dispense(cur);}
	}
}
public class Dollar20Dispenser implements DispenseChain{
	private DispenseChain chain;
	@Override
	public void setNextChain(DispenseChain nextChain) {	this.chain=nextChain;	}
	@Override
	public void dispense(Currency cur) {
		if(cur.getAmount() >= 20){
			int num = cur.getAmount()/20;
			int remainder = cur.getAmount() % 20;
			System.out.println("Dispensing "+num+" 20$ note");
			if(remainder !=0) this.chain.dispense(new Currency(remainder));
		}else{	this.chain.dispense(cur);}
	}
}
public class Dollar10Dispenser implements DispenseChain {
	private DispenseChain chain;
	@Override
	public void setNextChain(DispenseChain nextChain) {	this.chain=nextChain;	}
	@Override
	public void dispense(Currency cur) {
		if(cur.getAmount() >= 10){
			int num = cur.getAmount()/10;
			int remainder = cur.getAmount() % 10;
			System.out.println("Dispensing "+num+" 10$ note");
			if(remainder !=0) this.chain.dispense(new Currency(remainder));
		}else{	this.chain.dispense(cur);}
	}
}
Note the implementation of dispense method. You will notice that every implementation is trying to process the request and based on the amount, it might process some or full part of it. If one of the chain not able to process it fully, it sends the request to the next processor in chain to process the remaining request.
If the processor is not able to process anything, it just forwards the same request to the next chain.
Creating the Chain
- This is a very important step and we should create the chain carefully, otherwise a processor might not be getting any request at all. For example, in our implementation if we keep the first processor chain as Dollar10Dispenser and then Dollar20Dispenser, then the request will never be forwarded to the second processor and the chain will become useless. Here is our ATM Dispenser implementation to process the user requested amount.
JDK Example-Chain of Responsibility Pattern
- java.util.logging.Logger##log()
- javax.servlet.Filter##doFilter()
- We know that we can have multiple catch blocks in a try-catch block code. Here every catch block is kind of a processor to process that particular exception. So when any exception occurs in the try block, its send to the first catch block to process. If the catch block is not able to process it, it forwards the request to next object in chain i.e next catch block. If even the last catch block is not able to process it, the exception is thrown outside of the chain to the calling program.
Chain of Responsibility Design Pattern Important Points
- Client doesn’t know which part of the chain will be processing the request and it will send the request to the first object in the chain. For example, in our program ATMDispenseChain is unaware of who is processing the request to dispense the entered amount.
- Each object in the chain will have it’s own implementation to process the request, either full or partial or to send it to the next object in the chain.
- Every object in the chain should have reference to the next object in chain to forward the request to, its achieved by java composition.
- Creating the chain carefully is very important otherwise there might be a case that the request will never be forwarded to a particular processor or there are no objects in the chain who are able to handle the request. In my implementation, I have added the check for the user entered amount to make sure it gets processed fully by all the processors but we might not check it and throw exception if the request reaches the last object and there are no further objects in the chain to forward the request to. This is a design decision.
- Chain of Responsibility design pattern is good to achieve lose coupling but it comes with the trade-off of having a lot of implementation classes and maintenance problems if most of the code is common in all the implementations.
Observer Pattern
- Observer design pattern is useful when you are interested in the state of an object and want to get notified whenever there is any change. In observer pattern, the object that watch on the state of another object are called Observer and the object that is being watched is called Subject.
- Subject contains a list of observers to notify of any change in it’s state, so it should provide methods using which observers can register and unregister themselves. Subject also contain a method to notify all the observers of any change and either it can send the update while notifying the observer or it can provide another method to get the update. Observer should have a method to set the object to watch and another method that will be used by Subject to notify them of any updates.
- Define a one-to-many dependency between objects so that when one object changes state, all its dependents are notified and updated automatically.
- Java provides inbuilt platform for implementing Observer pattern through java.util.Observable class and java.util.Observer interface. However it’s not widely used because the implementation is really simple and most of the times we don’t want to end up extending a class just for implementing Observer pattern as java doesn’t provide multiple inheritance in classes.
- Java Message Service (JMS) uses Observer pattern along with Mediator pattern to allow applications to subscribe and publish data to other applications.
- Model-View-Controller (MVC) frameworks also use Observer pattern where Model is the Subject and Views are observers that can register to get notified of any change to the model.
Example - Observer Pattern
we would implement a simple topic and observers can register to this topic. Whenever any new message will be posted to the topic, all the registers observers will be notified and they can consume the message.
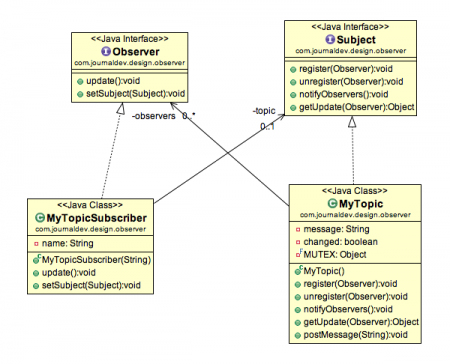
public interface Subject {
//methods to register and unregister observers
	public void register(Observer obj);
	public void unregister(Observer obj);
//method to notify observers of change
	public void notifyObservers();
//method to get updates from subject
	public Object getUpdate(Observer obj);
}
Next we will create contract for Observer, there will be a method to attach the Subject to the observer and another method to be used by Subject to notify of any change.
public interface Observer {
	//method to update the observer, used by subject
	public void update();
	//attach with subject to observe
	public void setSubject(Subject sub);
}
public class MyTopic implements Subject {
	private List<Observer> observers;
	private String message;
	private boolean changed;
	private final Object MUTEX= new Object();
	public MyTopic(){this.observers=new ArrayList<>();}
	@Override
	public void register(Observer obj) {
		if(obj == null) throw new NullPointerException("Null Observer");
		synchronized (MUTEX) {	if(!observers.contains(obj)) observers.add(obj);}
	}
	@Override
	public void unregister(Observer obj) {
		synchronized (MUTEX) {	observers.remove(obj);	}
	}
	@Override
	public void notifyObservers() {
		List<Observer> observersLocal = null;
		//synchronization is used to make sure any observer registered after
		//message is received is not notified
		synchronized (MUTEX) {
			if (!changed) {return;}
			observersLocal = new ArrayList<>(this.observers);
			this.changed=false;
		}
		for (Observer obj : observersLocal) {	obj.update();}
	}
	@Override
	public Object getUpdate(Observer obj) {return this.message;	}
	//method to post message to the topic
	public void postMessage(String msg){
		System.out.println("Message Posted to Topic:"+msg);
		this.message=msg;
		this.changed=true;
		notifyObservers();
	}
}
The method implementation to register and unregister an observer is very simple, the extra method is postMessage() that will be used by client application to post String message to the topic. Notice the boolean variable to keep track of the change in the state of topic and used in notifying observers. This variable is required so that if there is no update and somebody calls notifyObservers() method, it doesn’t send false notifications to the observers.
Also notice the use of synchronization in notifyObservers() method to make sure the notification is sent only to the observers registered before the message is published to the topic. Here is the implementation of Observers that will watch over the subject.
public class MyTopicSubscriber implements Observer {
	private String name;
	private Subject topic;
	public MyTopicSubscriber(String nm){	this.name=nm;	}

	@Override
	public void update() {
		String msg = (String) topic.getUpdate(this);
		if(msg == null){
			System.out.println(name+":: No new message");
		}else{	System.out.println(name+":: Consuming message::"+msg); }
	}

	@Override
	public void setSubject(Subject sub) {	this.topic=sub;}
}
Notice the implementation of update() method where it’s calling Subject getUpdate() method to get the message to consume. We could have avoided this call by passing message as argument to update() method.
public class TestObserverPattern {
	public static void main(String[] args) {
		//create subject
		MyTopic topic = new MyTopic();
		//create observers
		Observer obj1 = new MyTopicSubscriber("Obj1");
		Observer obj2 = new MyTopicSubscriber("Obj2");
		Observer obj3 = new MyTopicSubscriber("Obj3");
		//register observers to the subject
		topic.register(obj1);
		topic.register(obj2);
		topic.register(obj3);
		//attach observer to subject
		obj1.setSubject(topic);
		obj2.setSubject(topic);
		obj3.setSubject(topic);
		//check if any update is available
		obj1.update();
		//now send message to subject
		topic.postMessage("New Message");
	}
}
JDK Examples - Observer Pattern
Observer design pattern is also called as publish-subscribe pattern. Some of it’s implementations are;
- java.util.EventListener in Swing
- javax.servlet.http.HttpSessionBindingListener
- javax.servlet.http.HttpSessionAttributeListener
Strategy Pattern
- Strategy pattern is used when we have multiple algorithm for a specific task and client decides the actual implementation to be used at runtime.
- Strategy pattern is also known as Policy Pattern. We defines multiple algorithms and let client application pass the algorithm to be used as a parameter.
- One of the best example of this pattern is Collections.sort() method that takes Comparator parameter. Based on the different implementations of Comparator interfaces, the Objects are getting sorted in different ways.
Example-Strategy Pattern
we will try to implement a simple Shopping Cart where we have two payment strategies – using Credit Card or using PayPal. First of all we will create the interface for our strategy pattern example, in our case to pay the amount passed as argument.
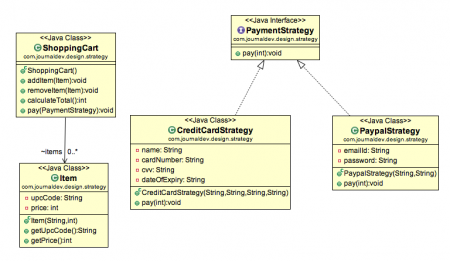
public interface PaymentStrategy { public void pay(int amount);}
Now we will have to create concrete implementation of algorithms for payment using credit/debit card or through paypal.
public class CreditCardStrategy implements PaymentStrategy {

 private String name;
 private String cardNumber;
 private String cvv;
 private String dateOfExpiry;
 public CreditCardStrategy(String nm, String ccNum, String cvv, String expiryDate){
  this.name=nm;
  this.cardNumber=ccNum;
  this.cvv=cvv;
  this.dateOfExpiry=expiryDate;
 }
 @Override
 public void pay(int amount) {System.out.println(amount +" paid with credit/debit card");	}
}
public class PaypalStrategy implements PaymentStrategy {
	private String emailId;
	private String password;
	public PaypalStrategy(String email, String pwd){
		this.emailId=email;
		this.password=pwd;
	}
	@Override
	public void pay(int amount) {
		System.out.println(amount + " paid using Paypal.");
	}
}
Now our strategy pattern example algorithms are ready. We can implement Shopping Cart and payment method will require input as Payment strategy.
public class Item {
	private String upcCode;
	private int price;
	public Item(String upc, int cost){
		this.upcCode=upc;
		this.price=cost;
	}
	public String getUpcCode() {return upcCode;}
	public int getPrice() {return price;}
}
public class ShoppingCart {
	//List of items
	List<Item> items;
	public ShoppingCart(){	this.items=new ArrayList<Item>();	}
	public void addItem(Item item){	this.items.add(item);	}
	public void removeItem(Item item){	this.items.remove(item);	}
	public int calculateTotal(){
		int sum = 0;
		for(Item item : items){sum += item.getPrice();	}
		return sum;
	}
	public void pay(PaymentStrategy paymentMethod){
		int amount = calculateTotal();
		paymentMethod.pay(amount);
	}
}
Notice that payment method of shopping cart requires payment algorithm as argument and doesn’t store it anywhere as instance variable. Let’s test our strategy pattern example setup with a simple program.
public class TestShoppingCart {
  public static void main(String[] args) {
  ShoppingCart cart = new ShoppingCart();
  Item item1 = new Item("1234",10);
  Item item2 = new Item("5678",40);
  cart.addItem(item1);
  cart.addItem(item2);
  //pay by paypal
  cart.pay(new PaypalStrategy("myemail@example.com", "mypwd"));
  //pay by credit card
  cart.pay(new CreditCardStrategy("Pankaj Kumar", "1234567890123456", "786", "12/15"));
 }
}
Strategy Design Pattern Important Points
- We could have used composition to create instance variable for strategies but we should avoid that as we want the specific strategy to be applied for a particular task. Same is followed in Collections.sort() and Arrays.sort() method that take comparator as argument.
- Strategy Pattern is very similar to State Pattern. One of the difference is that Context contains state as instance variable and there can be multiple tasks whose implementation can be dependent on the state whereas in strategy pattern strategy is passed as argument to the method and context object doesn’t have any variable to store it.
- Strategy pattern is useful when we have multiple algorithms for specific task and we want our application to be flexible to chose any of the algorithm at runtime for specific task.
Command Pattern
- Command Pattern is used to implement lose coupling in a request-response model.
- In command pattern, the request is send to the invoker and invoker pass it to the encapsulated command object. Command object passes the request to the appropriate method of Receiver to perform the specific action.
- The client program create the receiver object and then attach it to the Command. Then it creates the invoker object and attach the command object to perform an action. Now when client program executes the action, it’s processed based on the command and receiver object.
Example-Command Pattern
Let’s say we want to provide a File System utility with methods to open, write and close file and it should support multiple operating systems such as Windows and Unix. To implement our File System utility, first of all we need to create the receiver classes that will actually do all the work. Since we code in terms of java interfaces, we can have FileSystemReceiver interface and it’s implementation classes for different operating system flavors such as Windows, Unix, Solaris etc.
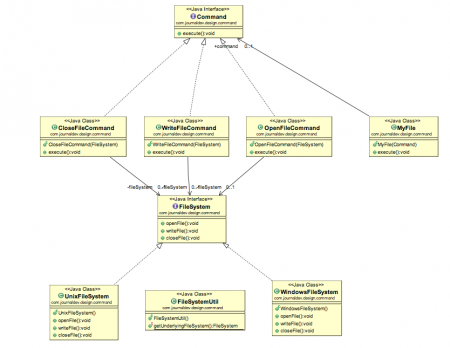
public interface FileSystemReceiver {
	void openFile();
	void writeFile();
	void closeFile();
}
public class UnixFileSystemReceiver implements FileSystemReceiver {
	@Override
	public void openFile() {System.out.println("Opening file in unix OS");}
	@Override
	public void writeFile() {System.out.println("Writing file in unix OS");}
	@Override
	public void closeFile() {System.out.println("Closing file in unix OS");}
}
public class WindowsFileSystemReceiver implements FileSystemReceiver {
	@Override
	public void openFile() {System.out.println("Opening file in Windows OS");}
	@Override
	public void writeFile() {System.out.println("Writing file in Windows OS");}
	@Override
	public void closeFile() {System.out.println("Closing file in Windows OS");}
}
public interface Command { void execute(); }
Now we need to create implementations for all the different types of action performed by the receiver. Since we have three actions we will create three Command implementations. Each Command implementation will forward the request to the appropriate method of receiver.
public class OpenFileCommand implements Command {
	private FileSystemReceiver fileSystem;
	public OpenFileCommand(FileSystemReceiver fs){	this.fileSystem=fs;	}
	@Override
	public void execute() {
		//open command is forwarding request to openFile method
		this.fileSystem.openFile();
	}
}
public class CloseFileCommand implements Command {
	private FileSystemReceiver fileSystem;
	public CloseFileCommand(FileSystemReceiver fs){	this.fileSystem=fs;	}
	@Override
	public void execute() {	this.fileSystem.closeFile();	}
}
Invoker is a simple class that encapsulates the Command and passes the request to the command object to process it.
public class FileSystemReceiverUtil {
	public static FileSystemReceiver getUnderlyingFileSystem(){
		 String osName = System.getProperty("os.name");
		 System.out.println("Underlying OS is:"+osName);
		 if(osName.contains("Windows")){
			 return new WindowsFileSystemReceiver();
		 }else{	 return new UnixFileSystemReceiver();	 }
	}
}
public class FileSystemClient {
	public static void main(String[] args) {
		//Creating the receiver object
		FileSystemReceiver fs = FileSystemReceiverUtil.getUnderlyingFileSystem();
		//creating command and associating with receiver
		OpenFileCommand openFileCommand = new OpenFileCommand(fs);
		//Creating invoker and associating with Command
		FileInvoker file = new FileInvoker(openFileCommand);
		//perform action on invoker object
		file.execute();
		WriteFileCommand writeFileCommand = new WriteFileCommand(fs);
		file = new FileInvoker(writeFileCommand);
		file.execute();
		CloseFileCommand closeFileCommand = new CloseFileCommand(fs);
		file = new FileInvoker(closeFileCommand);
		file.execute();
	}
}
- Notice that client is responsible to create the appropriate type of command object.
- For example if you want to write a file you are not supposed to create CloseFileCommand object. Client program is also responsible to attach receiver to the command and then command to the invoker class.
Command Pattern Important Points
- Command is the core of command design pattern that defines the contract for implementation.
- Receiver implementation is separate from command implementation.
- Command implementation classes chose the method to invoke on receiver object, for every method in receiver there will be a command implementation. It works as a bridge between receiver and action methods.
- Invoker class just forward the request from client to the command object.
- Client is responsible to instantiate appropriate command and receiver implementation and then associate them together.
- Client is also responsible for instantiating invoker object and associating command object with it and execute the action method.
- Command design pattern is easily extendible, we can add new action methods in receivers and create new Command implementations without changing the client code.
Drawback-Command Design Pattern
The code gets huge and confusing with high number of action methods and because of so many associations.
JDK Example-Command Design Pattern
- Runnable interface (java.lang.Runnable)
- Swing Action (javax.swing.Action) uses command pattern.
State Pattern
- State design pattern is used when an Object change it’s behavior based on it’s internal state.
- If we have to change the behavior of an object based on it’s state, we can have a state variable in the Object and use if-else condition block to perform different actions based on the state. State pattern is used to provide a systematic and lose-coupled way to achieve this through
ContextandStateimplementations. - State Pattern Context is the class that has a State reference to one of the concrete implementations of the State. Context forwards the request to the state object for processing.
Example-State Pattern
Suppose we want to implement a TV Remote with a simple button to perform action. If the State is ON, it will turn on the TV and if state is OFF, it will turn off the TV.
public class TVRemoteBasic {
	private String state="";
	public void setState(String state){this.state=state;	}
	public void doAction(){
		if(state.equalsIgnoreCase("ON")){
			System.out.println("TV is turned ON");
		}else if(state.equalsIgnoreCase("OFF")){
			System.out.println("TV is turned OFF");
		}
	}

	public static void main(String args[]){
		TVRemoteBasic remote = new TVRemoteBasic();
		remote.setState("ON");
		remote.doAction();
		remote.setState("OFF");
		remote.doAction();
	}
}
Notice that client code should know the specific values to use for setting the state of remote. Further more if number of states increase then the tight coupling between implementation and the client code will be very hard to maintain and extend. Now we will use State pattern to implement above TV Remote example.
public interface State {public void doAction();}
In our example, we can have two states – one for turning TV on and another to turn it off. So we will create two concrete state implementations for these behaviors.
public class TVStartState implements State{
 @Override
 public void doAction() {
  System.out.println("TV is turned ON");
 }
}
public class TVStopState implements State{
 @Override
 public void doAction() {
  System.out.println("TV is turned OFF");
 }
}
public class TVContext implements State {
	private State tvState;
	public void setState(State state) {
		this.tvState=state;
	}
	public State getState() {
		return this.tvState;
	}
	@Override
	public void doAction() {
		this.tvState.doAction();
	}
}
Notice that Context also implements State and keep a reference of its current state and forwards the request to the state implementation.
public class TVRemote {
 public static void main(String[] args) {
  TVContext context = new TVContext();
  State tvStartState = new TVStartState();
  State tvStopState = new TVStopState();
  context.setState(tvStartState);
  context.doAction();
  context.setState(tvStopState);
  context.doAction();
 }
}
Benefits-State Design Pattern
The benefits of using State pattern to implement polymorphic behavior is clearly visible. The chances of error are less and it’s very easy to add more states for additional behavior. Thus making our code more robust, easily maintainable and flexible. Also State pattern helped in avoiding if-else or switch-case conditional logic in this scenario. State Pattern is very similar to Strategy Pattern, check out Strategy Pattern in Java.
Visitor Pattern
- Visitor pattern is used when we have to perform an operation on a group of similar kind of Objects. With the help of visitor pattern, we can move the operational logic from the objects to another class.
Example-Visitor Pattern
Consider a Shopping cart where we can add different type of items (Elements), when we click on checkout button, it calculates the total amount to be paid. Now we can have the calculation logic in item classes or we can move out this logic to another class using visitor pattern.
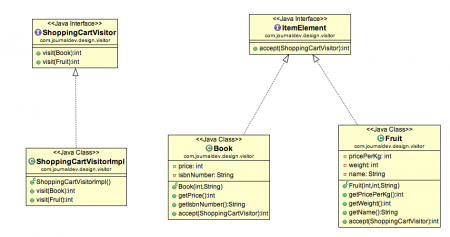
public interface ItemElement {public int accept(ShoppingCartVisitor visitor);}
public class Book implements ItemElement {
 private int price;
 private String isbnNumber;
 public Book(int cost, String isbn){
  this.price=cost;
  this.isbnNumber=isbn;
 }
 public int getPrice() {
  return price;
 }
 public String getIsbnNumber() {
  return isbnNumber;
 }
 @Override
 public int accept(ShoppingCartVisitor visitor) {
  return visitor.visit(this);
 }
}
public class Fruit implements ItemElement {
 private int pricePerKg;
 private int weight;
 private String name;
 public Fruit(int priceKg, int wt, String nm){
  this.pricePerKg=priceKg;
  this.weight=wt;
  this.name = nm;
 }
 public int getPricePerKg() {
  return pricePerKg;
 }
 public int getWeight() {
  return weight;
 }
 public String getName(){
  return this.name;
 }
 @Override
 public int accept(ShoppingCartVisitor visitor){
  return visitor.visit(this);
 }
}
Notice the implementation of accept() method in concrete classes, its calling visit() method of Visitor and passing itself as argument. We have visit() method for different type of items in Visitor interface that will be implemented by concrete visitor class.
public interface ShoppingCartVisitor {
	int visit(Book book);
	int visit(Fruit fruit);
}
public class ShoppingCartVisitorImpl implements ShoppingCartVisitor {
	@Override
	public int visit(Book book) {
		int cost=0;
		//apply 5$ discount if book price is greater than 50
		if(book.getPrice() > 50){cost = book.getPrice()-5;}else cost = book.getPrice();
		System.out.println("Book ISBN::"+book.getIsbnNumber() + " cost ="+cost);
		return cost;
	}
	@Override
	public int visit(Fruit fruit) {
		int cost = fruit.getPricePerKg()*fruit.getWeight();
		System.out.println(fruit.getName() + " cost = "+cost);
		return cost;
	}
}
Benefits-Visitor Pattern
The benefit of this pattern is that if the logic of operation changes, then we need to make change only in the visitor implementation rather than doing it in all the item classes. Another benefit is that adding a new item to the system is easy, it will require change only in visitor interface and implementation and existing item classes will not be affected.
Limitations-Visitor Pattern
The drawback of visitor pattern is that we should know the return type of visit() methods at the time of designing otherwise we will have to change the interface and all of its implementations. Another drawback is that if there are too many implementations of visitor interface, it makes it hard to extend.
Interpreter Pattern
- This is used to define a grammatical representation for a language and provides an interpreter to deal with this grammar.
- The best example of this pattern is java compiler that interprets the java source code into byte code that is understandable by JVM. Google Translator is also an example of interpreter pattern where the input can be in any language and we can get the output interpreted in another language.
To implement interpreter pattern
- we need to create Interpreter context engine that will do the interpretation work
- then we need to create different Expression implementations that will consume the functionalities provided by the interpreter context.
- Finally we need to create the client that will take the input from user and decide which Expression to use and then generate output for the user.
Example-Interpreter Pattern
- user input will be of two forms – “<Number> in Binary” or “<Number> in Hexadecimal” and
- our interpreter client should return it in format “<Number> in Binary= <Number_Binary_String>” and “<Number> in Hexadecimal= <Number_Hex_String>” respectively.
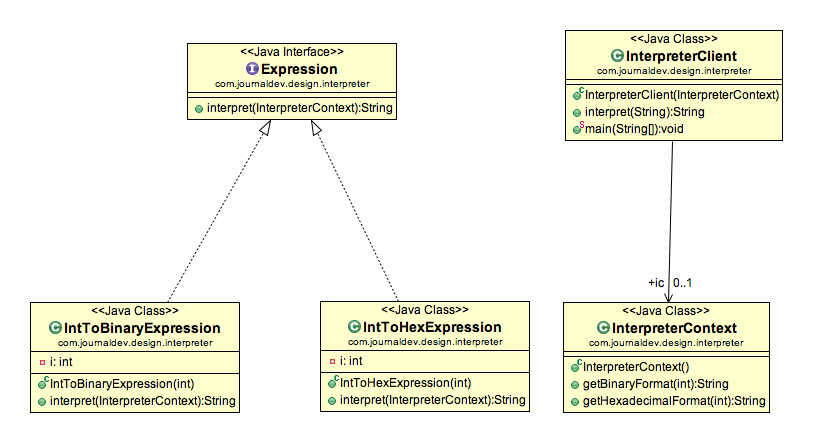
public class InterpreterContext {
    public String getBinaryFormat(int i){return Integer.toBinaryString(i);}
    public String getHexadecimalFormat(int i){return Integer.toHexString(i);}
}
public interface Expression { String interpret(InterpreterContext ic);}
public class IntToBinaryExpression implements Expression {
    private int i;
    public IntToBinaryExpression(int c){this.i=c;}
    @Override
    public String interpret(InterpreterContext ic){return ic.getBinaryFormat(this.i);}
}
public class IntToHexExpression implements Expression {
    private int i;
    public IntToHexExpression(int c){ this.i=c; }
    @Override
    public String interpret(InterpreterContext ic) { return ic.getHexadecimalFormat(i); }
}
public class InterpreterClient {
    public InterpreterContext ic;
    public InterpreterClient(InterpreterContext i){ this.ic=i; }
    public String interpret(String str){
        Expression exp=null;
        //create rules for expressions
        if(str.contains("Hexadecimal")){
         exp=new IntToHexExpression(Integer.parseInt(str.substring(0,str.indexOf(" "))));
        }else if(str.contains("Binary")){
         exp=new IntToBinaryExpression(Integer.parseInt(str.substring(0,str.indexOf(" "))));
        }else return str;
        return exp.interpret(ic);
    }

    public static void main(String args[]){
        String str1 = "28 in Binary";
        String str2 = "28 in Hexadecimal";
        InterpreterClient ec = new InterpreterClient(new InterpreterContext());
        System.out.println(str1+"= "+ec.interpret(str1));
        System.out.println(str2+"= "+ec.interpret(str2));
    }
}
Important Points Interpreter Pattern
- Interpreter pattern can be used when we can create a syntax tree for the grammar we have.
- Interpreter pattern requires a lot of error checking and a lot of expressions and code to evaluate them, it gets complicated when the grammar becomes more complicated and hence hard to maintain and provide efficiency.
JDK Example-Interpreter Pattern
java.util.Pattern and subclasses of java.text.Format are some of the examples of interpreter pattern used in JDK.
Iterator Pattern
- It’s used to provide a standard way to traverse through a group of Objects. Iterator pattern is widely used in Java Collection Framework where Iterator interface provides methods for traversing through a collection.
- Iterator pattern is not only about traversing through a collection, we can provide different kind of iterators based on our requirements. Iterator pattern hides the actual implementation of traversal through the collection and client programs just use iterator methods.
Provides a way to access the elements of an aggregate object without exposing its underlying represenation. Iterator pattern is not only about traversing through a collection, we can provide different kind of iterators based on our requirements.
Iterator design pattern hides the actual implementation of traversal through the collection and client programs just use iterator methods.
public enum ChannelTypeEnum {ENGLISH, HINDI, FRENCH, ALL;}
public class Channel {
	private double frequency;
	private ChannelTypeEnum TYPE;
	public Channel(double freq, ChannelTypeEnum type){
		this.frequency=freq;
		this.TYPE=type;
	}
	public double getFrequency() {return frequency;}
	public ChannelTypeEnum getTYPE() {return TYPE;}
	@Override
	public String toString(){return "Frequency="+this.frequency+", Type="+this.TYPE;}
}
The first part of implementation is to define the contract for our collection and iterator interfaces.
public interface ChannelCollection {
	public void addChannel(Channel c);
	public void removeChannel(Channel c);
	public ChannelIterator iterator(ChannelTypeEnum type);
}
- ChannelCollection interface defines the contract for our collection class implementation. Notice that there are methods to add and remove a channel but there is no method that returns the list of channels.
- ChannelCollection has a method that returns the iterator for traversal.
public interface ChannelIterator {
	public boolean hasNext();
	public Channel next();
}
public class ChannelCollectionImpl implements ChannelCollection {
	private List<Channel> channelsList;
	public ChannelCollectionImpl() {channelsList = new ArrayList<>();}
	public void addChannel(Channel c) {this.channelsList.add(c);}
	public void removeChannel(Channel c) {this.channelsList.remove(c);}

	@Override
	public ChannelIterator iterator(ChannelTypeEnum type) {
		return new ChannelIteratorImpl(type, this.channelsList);
	}

	private class ChannelIteratorImpl implements ChannelIterator {
		private ChannelTypeEnum type;
		private List<Channel> channels;
		private int position;
		public ChannelIteratorImpl(ChannelTypeEnum ty, List<Channel> channelsList) {
			this.type = ty;
			this.channels = channelsList;
		}
		@Override
		public boolean hasNext() {
			while (position < channels.size()) {
				Channel c = channels.get(position);
				if (c.getTYPE().equals(type) || type.equals(ChannelTypeEnum.ALL)) {
					return true;
				} else
					position++;
			}
			return false;
		}
		@Override
		public Channel next() {
			Channel c = channels.get(position);
			position++;
			return c;
		}
	}
}
- Notice the inner class implementation of iterator interface so that the implementation can’t be used by any other collection. Same approach is followed by collection classes also and all of them have inner class implementation of Iterator interface.
public class TestIteratorPattern {

	public static void main(String[] args) {
		ChannelCollection channels = populateChannels();
		ChannelIterator baseIterator = channels.iterator(ChannelTypeEnum.ALL);
		while (baseIterator.hasNext()) {
			Channel c = baseIterator.next();
			System.out.println(c.toString());
		}
		System.out.println("******");
		// Channel Type Iterator
		ChannelIterator englishIterator = channels.iterator(ChannelTypeEnum.ENGLISH);
		while (englishIterator.hasNext()) {
			Channel c = englishIterator.next();
			System.out.println(c.toString());
		}
	}

	private static ChannelCollection populateChannels() {
		ChannelCollection channels = new ChannelCollectionImpl();
		channels.addChannel(new Channel(98.5, ChannelTypeEnum.ENGLISH));
		channels.addChannel(new Channel(99.5, ChannelTypeEnum.HINDI));
		channels.addChannel(new Channel(100.5, ChannelTypeEnum.FRENCH));
		channels.addChannel(new Channel(101.5, ChannelTypeEnum.ENGLISH));
		channels.addChannel(new Channel(102.5, ChannelTypeEnum.HINDI));
		channels.addChannel(new Channel(103.5, ChannelTypeEnum.FRENCH));
		channels.addChannel(new Channel(104.5, ChannelTypeEnum.ENGLISH));
		channels.addChannel(new Channel(105.5, ChannelTypeEnum.HINDI));
		channels.addChannel(new Channel(106.5, ChannelTypeEnum.FRENCH));
		return channels;
	}
}
Iterator Design Pattern Important Points
- Iterator pattern is useful when you want to provide a standard way to iterate over a collection and hide the implementation logic from client program.
- The logic for iteration is embedded in the collection itself and it helps client program to iterate over them easily.
JDK Example-Iterator Pattern
We all know that Collection framework Iterator is the best example of iterator pattern implementation but do you know that java.util.Scanner class also Implements Iterator interface. Read this post to learn about Java Scanner Class.
Memento Pattern
- Memento design pattern is used when we want to save the state of an object so that we can restore later on. Memento pattern is used to implement this in such a way that the saved state data of the object is not accessible outside of the object, this protects the integrity of saved state data.
- Memento pattern is implemented with two objects – Originator and Caretaker.
- Originator is the object whose state needs to be saved and restored and it uses an inner class to save the state of Object. The inner class is called Memento and is private, so that it can’t be accessed from other objects.
- Caretaker is the helper class that is responsible for storing and restoring the Originator’s state through Memento object. Since Memento is private to Originator, Caretaker can’t access it and it’s stored as an Object within the caretaker.
Real Life Example
Text Editors where we can save it’s data anytime and use undo to restore it to previous saved state. We will implement the same feature and provide a utility where we can write and save contents to a File anytime and we can restore it to last saved state. For simplicity, I will not use any IO operations to write data into file.
Memento Pattern Originator Class
public class FileWriterUtil {
	private String fileName;
	private StringBuilder content;
	public FileWriterUtil(String file){
		this.fileName=file;
		this.content=new StringBuilder();
	}
	@Override
	public String toString(){return this.content.toString();}
	public void write(String str){content.append(str);}
	public Memento save(){	return new Memento(this.fileName,this.content);}
	public void undoToLastSave(Object obj){
		Memento memento = (Memento) obj;
		this.fileName= memento.fileName;
		this.content=memento.content;
	}
	private class Memento{
		private String fileName;
		private StringBuilder content;
		public Memento(String file, StringBuilder content){
			this.fileName=file;
			//notice the deep copy so that Memento and FileWriterUtil
      //content variables don't refer to same object
			this.content=new StringBuilder(content);
		}
	}
}
- Notice the Memento inner class and implementation of save and undo methods. Now we can continue to implement Caretaker class.
Memento Pattern Caretaker Class
public class FileWriterCaretaker {
	private Object obj;
	public void save(FileWriterUtil fileWriter){this.obj=fileWriter.save();}
	public void undo(FileWriterUtil fileWriter){fileWriter.undoToLastSave(obj);}
}
- Notice that caretaker object contains the saved state in the form of Object, so it can’t alter its data and also it has no knowledge of it’s structure.
public class FileWriterClient {
	public static void main(String[] args) {
		FileWriterCaretaker caretaker = new FileWriterCaretaker();
		FileWriterUtil fileWriter = new FileWriterUtil("data.txt");
		fileWriter.write("First Set of Data\n");
		System.out.println(fileWriter+"\n\n");
		// lets save the file
		caretaker.save(fileWriter);
		//now write something else
		fileWriter.write("Second Set of Data\n");
		//checking file contents
		System.out.println(fileWriter+"\n\n");
		//lets undo to last save
		caretaker.undo(fileWriter);
		//checking file content again
		System.out.println(fileWriter+"\n\n");
	}
}
- Memento pattern is simple and easy to implement, one of the thing needs to take care is that Memento class should be accessible only to the Originator object.
- Also in client application, we should use caretaker object for saving and restoring the originator state.
- Also if Originator object has properties that are not immutable, we should use deep copy or cloning to avoid data integrity issue like I have used in above example.
- We can use Serialization to achieve memento pattern implementation that is more generic rather than Memento pattern where every object needs to have it’s own Memento class implementation.
Drawback of Memento Pattern
If Originator object is very huge then Memento object size will also be huge and use a lot of memory.