Structural Design Patterns
Table of contents
Adapter Pattern
- used so that two unrelated interfaces can work together.
- The object that joins these unrelated interface is called an Adapter.
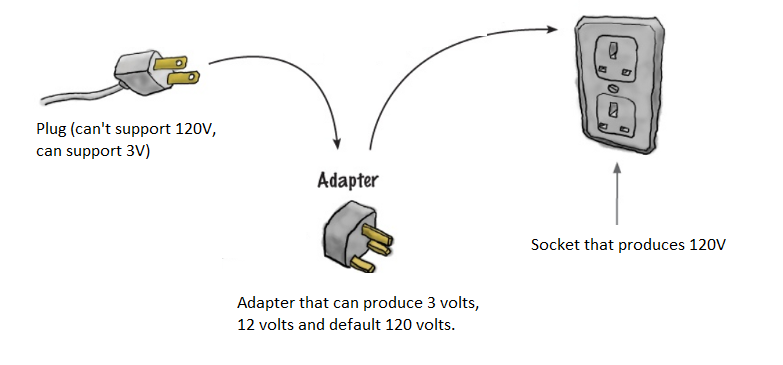
Real Life Example
Mobile charger - Mobile battery needs 3 volts to charge but the normal socket produces either 120V (US) or 240V (India). So the mobile charger works as an adapter between mobile charging socket and the wall socket.
public class Volt {
    private int volts;

    public Volt(int v) {this.volts = v;}
    public int getVolts() {return volts;}
    public void setVolts(int volts) {this.volts = volts;}
}
public class Socket {
    public Volt getVolt() {return new Volt(120);}
}
public interface SocketAdapter {
    public Volt get120Volt();
    public Volt get12Volt();
    public Volt get3Volt();
}
JDK Example - Adapter Design Pattern
java.util.Arrays.asList()- java.io.InputStreamReader(InputStream) (returns a Reader)
- java.io.OutputStreamWriter(OutputStream) (returns a Writer)
Two Way Adapter Pattern
- Class Adapter - This form uses java inheritance and extends the source interface, in our case Socket class.
- Object Adapter - This form uses Java Composition and adapter contains the source object.

//Using inheritance for adapter pattern
public class SocketClassAdapterImpl extends Socket implements SocketAdapter {
    @Override
    public Volt get120Volt() {
        return getVolt();
    }
    @Override
    public Volt get12Volt() {
        Volt v = getVolt();
        return convertVolt(v, 10);
    }
    @Override
    public Volt get3Volt() {
        Volt v = getVolt();
        return convertVolt(v, 40);
    }
    private Volt convertVolt(Volt v, int i) {
        return new Volt(v.getVolts() / i);
    }
}
public class SocketObjectAdapterImpl implements SocketAdapter {
    //Using Composition for adapter pattern
    private Socket sock = new Socket();
    @Override
    public Volt get120Volt() {
        return sock.getVolt();
    }
    @Override
    public Volt get12Volt() {
        Volt v = sock.getVolt();
        return convertVolt(v, 10);
    }
    @Override
    public Volt get3Volt() {
        Volt v = sock.getVolt();
        return convertVolt(v, 40);
    }
    private Volt convertVolt(Volt v, int i) {
        return new Volt(v.getVolts() / i);
    }
}
public class AdapterPatternTest {
    public static void main(String[] args) {
        testClassAdapter();
        testObjectAdapter();
    }
    private static void testObjectAdapter() {
        SocketAdapter sockAdapter = new SocketObjectAdapterImpl();
        Volt v3 = getVolt(sockAdapter, 3);
        Volt v12 = getVolt(sockAdapter, 12);
        Volt v120 = getVolt(sockAdapter, 120);
        System.out.println("v3 volts using Object Adapter=" + v3.getVolts());
        System.out.println("v12 volts using Object Adapter=" + v12.getVolts());
        System.out.println("v120 volts using Object Adapter=" + v120.getVolts());
    }
    private static void testClassAdapter() {
        SocketAdapter sockAdapter = new SocketClassAdapterImpl();
        Volt v3 = getVolt(sockAdapter, 3);
        Volt v12 = getVolt(sockAdapter, 12);
        Volt v120 = getVolt(sockAdapter, 120);
        System.out.println("v3 volts using Class Adapter=" + v3.getVolts());
        System.out.println("v12 volts using Class Adapter=" + v12.getVolts());
        System.out.println("v120 volts using Class Adapter=" + v120.getVolts());
    }
    private static Volt getVolt(SocketAdapter sockAdapter, int i) {
        switch (i) {
            case 3: return sockAdapter.get3Volt();
            case 12: return sockAdapter.get12Volt();
            case 120: return sockAdapter.get120Volt();
            default: return sockAdapter.get120Volt();
        }
    }
}
Composite Pattern
- Used when we have to represent a part-whole hierarchy.
- When we need to create a structure in a way that the objects in structure are treated the same way.
Real Life Example
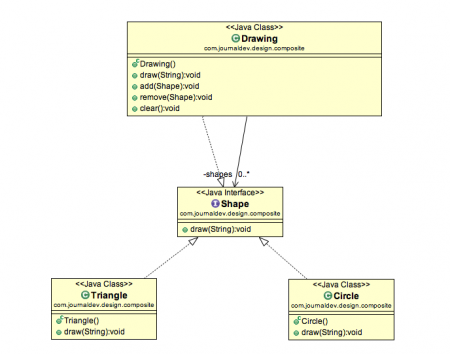
A diagram is a structure that consists of Objects such as Circle, Lines, Triangle etc and when we fill the drawing with color (say Red), the same color also gets applied to the Objects in the drawing. Here drawing is made up of different parts and they all have same operations.
Composite Pattern consists of following objects.
- Base Component – Base component is the interface for all objects in the composition, client program uses base component to work with the objects in the composition. It can be an interface or an abstract class with some methods common to all the objects.
- Leaf – Defines the behaviour for the elements in the composition. It is the building block for the composition and implements base component. It doesn’t have references to other Components.
- Composite – It consists of leaf elements and implements the operations in base component.
Base component
defines the common methods for leaf and composites. We can create a class Shape with a method draw(String fillColor) to draw the shape with given color.
public interface Shape {
    public void draw(String fillColor);
}
Leaf Objects
- Leaf implements base component and these are the building block for the composite.
- We can create multiple leaf objects such as Triangle, Circle etc.
public class Triangle implements Shape {
    @Override
    public void draw(String fillColor) {
        System.out.println("Drawing Triangle with color " + fillColor);
    }
}
public class Circle implements Shape {
    @Override
    public void draw(String fillColor) {
        System.out.println("Drawing Circle with color " + fillColor);
    }
}
Composite object
- A composite object contains group of leaf objects and we should provide some helper methods to add or delete leafs from the group.
- We can also provide a method to remove all the elements from the group.
- Notice that composite also implements Base component and behaves similar to leaf except that it can contain group of leaf elements.
public class Drawing implements Shape {
    // collection of Shapes
    private List<Shape> shapes = new ArrayList<Shape> ();

    @Override
    public void draw(String fillColor) {
        for (Shape sh: shapes)
            sh.draw(fillColor);
    }

    // adding shape to drawing
    public void add(Shape s) {
        this.shapes.add(s);
    }

    // removing shape from drawing
    public void remove(Shape s) {
        shapes.remove(s);
    }

    // removing all the shapes
    public void clear() {
        System.out.println("Clearing all the shapes from drawing");
        this.shapes.clear();
    }
}
public class TestCompositePattern {
    public static void main(String[] args) {
        Shape tri = new Triangle();
        Shape tri1 = new Triangle();
        Shape cir = new Circle();
        Drawing drawing = new Drawing();
        drawing.add(tri1);
        drawing.add(tri1);
        drawing.add(cir);
        drawing.draw("Red");
        drawing.clear();
        drawing.add(tri);
        drawing.add(cir);
        drawing.draw("Green");
    }
}

// Output of the above composite pattern client program is:
Drawing Triangle with color Red
Drawing Triangle with color Red
Drawing Circle with color Red
Clearing all the shapes from drawing
Drawing Triangle with color Green
Drawing Circle with color Green
Composite Pattern Important Points
- Composite pattern should be applied only when the group of objects should behave as the single object.
- Composite design pattern can be used to create a tree like structure.
JDK Example - Composite
java.awt.Container.add(Component), used a lot in Swing.
Proxy Pattern
- Provide a placeholder for another object to control access to it.
- Used when we want to provide controlled access of a functionality.
Example - Proxy Pattern
- Let’s say we have a class that can run some command on the system. Now if we are using it, its fine but if we want to give this program to a client application, it can have severe issues because client program can issue command to delete some system files or change some settings that you don’t want.
- Here a proxy class can be created to provide controlled access of the program.
public interface CommandExecutor {
    public void runCommand(String cmd) throws Exception;
}
public class CommandExecutorImpl implements CommandExecutor {
    @Override
    public void runCommand(String cmd) throws IOException {
        //some heavy implementation
        Runtime.getRuntime().exec(cmd);
        System.out.println("'" + cmd + "' command executed.");
    }
}
Now we want to provide only admin users to have full access of above class, if the user is not admin then only limited commands will be allowed. Here is our very simple proxy class implementation.
public class CommandExecutorProxy implements CommandExecutor {
    private boolean isAdmin;
    private CommandExecutor executor;

    public CommandExecutorProxy(String user, String pwd) {
        if ("Pankaj".equals(user) && "J@urnalD$v".equals(pwd))
            isAdmin = true;
        executor = new CommandExecutorImpl();
    }

    @Override
    public void runCommand(String cmd) throws Exception {
        if (isAdmin) {
            executor.runCommand(cmd);
        } else {
            if (cmd.trim().startsWith("rm")) {
                throw new Exception("rm command is not allowed for non-admin users.");
            } else {
                executor.runCommand(cmd);
            }
        }
    }
}
public class TestProxyPattern {
    public static void main(String[] args) {
        CommandExecutor executor = new CommandExecutorProxy("Pankaj", "wrong_pwd");
        try {
            executor.runCommand("ls -ltr");
            executor.runCommand("rm -rf abc.pdf");
        } catch (Exception e) {
            System.out.println("Exception Message::" + e.getMessage());
        }
    }
}

// Output
ls -ltr command executed.
Exception Message::rm command is not allowed for non-admin users.
Common Use-Proxy Pattern
Proxy design pattern common uses are
- to control access.
- to provide a wrapper implementation for better performance.
JDK Example-Proxy Pattern
- Java RMI package uses proxy pattern.
Flyweight Pattern (Pooling)
- Use sharing to support large numbers of fine-grained objects efficiently
- Flyweight design pattern is used when we need to create a lot of Objects of a class.
- For low memory devices, such as mobile devices or embedded systems, flyweight design pattern can be applied to reduce the load on memory by sharing objects.
- Less number of objects reduces the memory usage, and it manages to keep us away from errors related to memory like
java.lang.OutOfMemoryError.
JDK Examples-Flyweight Pattern
- All the wrapper classes valueOf() method uses cached objects.
- String Pool implementation in java.
Factors for Consideration
- number of Objects to be created by application should be huge.
- object creation is heavy on memory and it can be time consuming too.
- object properties can be divided into intrinsic and extrinsic properties.
- extrinsic properties of an Object should be defined by the client program.
Flyweight Pattern Application
- we need to divide Object property into intrinsic and extrinsic properties.
- Intrinsic properties make the Object unique whereas extrinsic properties are set by client code and used to perform different operations.
- example, an Object Circle can have extrinsic properties such as color and width.
- For applying flyweight pattern, we need to create a FlyweightFactory that returns the shared objects.
Example-Flyweight Pattern
- Lets say we need to create a drawing with lines and Ovals.
- So we will have an interface Shape and its concrete implementations as Line and Oval.
- Oval class will have intrinsic property to determine whether to fill the Oval with given color or not whereas Line will not have any intrinsic property.
public interface Shape {
    public void draw(Graphics g, int x, int y, int width, int height, Color color);
}
public class Line implements Shape {
    public Line() {
        System.out.println("Creating Line object");
        //adding time delay
        try {
            Thread.sleep(2000);
        } catch (InterruptedException e) {
            e.printStackTrace();
        }
    }
    @Override
    public void draw(Graphics line, int x1, int y1, int x2, int y2, Color color) {
        line.setColor(color);
        line.drawLine(x1, y1, x2, y2);
    }
}
- Notice the intentionally introduced delay in creating the Object of concrete classes to make the point that flyweight pattern can be used for Objects that takes a lot of time while instantiated.
public class Oval implements Shape {
    // intrinsic property
    private boolean fill;

    public Oval(boolean f) {
        this.fill = f;
        System.out.println("Creating Oval object with fill=" + f);
        // adding time delay
        try {
            Thread.sleep(2000);
        } catch (InterruptedException e) {
            e.printStackTrace();
        }
    }

    @Override
    public void draw(Graphics circle, int x, int y, int width, int height, Color color) {
        circle.setColor(color);
        circle.drawOval(x, y, width, height);
        if (fill) {
            circle.fillOval(x, y, width, height);
        }
    }
}
- The flyweight factory will be used by client programs to instantiate the Object, so we need to keep a map of Objects in the factory that should not be accessible by client application.
- Whenever client program makes a call to get an instance of Object, it should be returned from the HashMap, if not found then create a new Object and put in the Map and then return it.
- We need to make sure that all the intrinsic properties are considered while creating the Object.
- Notice the use of Java Enum for type safety, Java Composition (shapes map) and Factory n in getShape method.
public class ShapeFactory {
    private static final HashMap < ShapeType, Shape > shapes = new HashMap < ShapeType, Shape > ();
    public static Shape getShape(ShapeType type) {
        Shape shapeImpl = shapes.get(type);
        if (shapeImpl == null) {
            if (type.equals(ShapeType.OVAL_FILL)) {
                shapeImpl = new Oval(true);
            } else if (type.equals(ShapeType.OVAL_NOFILL)) {
                shapeImpl = new Oval(false);
            } else if (type.equals(ShapeType.LINE)) {
                shapeImpl = new Line();
            }
            shapes.put(type, shapeImpl);
        }
        return shapeImpl;
    }
    public static enum ShapeType {
        OVAL_FILL,
        OVAL_NOFILL,
        LINE;
    }
}
public class DrawingClient extends JFrame {
    private static final long serialVersionUID = -1350200437285282550 L;
    private final int WIDTH;
    private final int HEIGHT;
    private static final ShapeType shapes[] = {
        ShapeType.LINE,
        ShapeType.OVAL_FILL,
        ShapeType.OVAL_NOFILL
    };
    private static final Color colors[] = {
        Color.RED,
        Color.GREEN,
        Color.YELLOW
    };

    public DrawingClient(int width, int height) {
        this.WIDTH = width;
        this.HEIGHT = height;
        Container contentPane = getContentPane();
        JButton startButton = new JButton("Draw");
        final JPanel panel = new JPanel();
        contentPane.add(panel, BorderLayout.CENTER);
        contentPane.add(startButton, BorderLayout.SOUTH);
        setSize(WIDTH, HEIGHT);
        setDefaultCloseOperation(JFrame.EXIT_ON_CLOSE);
        setVisible(true);
        startButton.addActionListener(new ActionListener() {
            public void actionPerformed(ActionEvent event) {
                Graphics g = panel.getGraphics();
                for (int i = 0; i < 20; ++i) {
                    Shape shape = ShapeFactory.getShape(getRandomShape());
                    shape.draw(g, getRandomX(), getRandomY(), getRandomWidth(), getRandomHeight(), getRandomColor());
                }
            }
        });
    }

    private ShapeType getRandomShape() {
        return shapes[(int)(Math.random() * shapes.length)];
    }

    private int getRandomX() {
        return (int)(Math.random() * WIDTH);
    }

    private int getRandomY() {
        return (int)(Math.random() * HEIGHT);
    }

    private int getRandomWidth() {
        return (int)(Math.random() * (WIDTH / 10));
    }

    private int getRandomHeight() {
        return (int)(Math.random() * (HEIGHT / 10));
    }

    private Color getRandomColor() {
        return colors[(int)(Math.random() * colors.length)];
    }

    public static void main(String[] args) {
        DrawingClient drawing = new DrawingClient(500, 600);
    }
}
- used random number generation to generate different type of Shapes in our frame. If you run above client program, you will notice the delay in creating first Line Object and Oval objects with fill as true and false. After that the program executes quickly since its using the shared objects. After clicking “Draw” button multiple times, the frame looks like below image.

Flyweight Design Pattern Important Points
- In our example, the client code is not forced to create object using Flyweight factory but we can force that to make sure client code uses flyweight pattern implementation but its a complete design decision for particular application.
- Flyweight pattern introduces complexity and if number of shared objects are huge then there is a trade of between memory and time, so we need to use it judiciously based on our requirements.
- Flyweight pattern implementation is not useful when the number of intrinsic properties of Object is huge, making implementation of Factory class complex.
Facade Pattern
- Facade Pattern is used to help client applications to easily interact with the system.
- Provide a unified interface to a set of interfaces in a subsystem. Facade Pattern defines a higher-level interface that makes the subsystem easier to use.
Example-Facade Pattern
Suppose we have an application with set of interfaces to use MySql/Oracle database and to generate different types of reports, such as HTML report, PDF report etc. So we will have different set of interfaces to work with different types of database. Now a client application can use these interfaces to get the required database connection and generate reports. But when the complexity increases or the interface behavior names are confusing, client application will find it difficult to manage it. So we can apply Facade pattern here and provide a wrapper interface on top of the existing interface to help client application.
- We can have two helper interfaces, namely MySqlHelper and OracleHelper.
public class MySqlHelper {
  public static Connection getMySqlDBConnection(){
      //get MySql DB connection using connection parameters
      return null;
  }
  public void generateMySqlPDFReport(String tableName, Connection con){
      //get data from table and generate pdf report
  }
  public void generateMySqlHTMLReport(String tableName, Connection con){
      //get data from table and generate pdf report
  }
}
public class OracleHelper { public static Connection getOracleDBConnection(){ //get Oracle DB connection using connection parameters return null; } public void generateOraclePDFReport(String tableName, Connection con){ //get data from table and generate pdf report } public void generateOracleHTMLReport(String tableName, Connection con){ //get data from table and generate pdf report } }public class HelperFacade { public static void generateReport(DBTypes dbType, ReportTypes reportType, String tableName){ Connection con = null; switch (dbType){ case MYSQL: con = MySqlHelper.getMySqlDBConnection(); MySqlHelper mySqlHelper = new MySqlHelper(); switch(reportType){ case HTML: mySqlHelper.generateMySqlHTMLReport(tableName, con); break; case PDF: mySqlHelper.generateMySqlPDFReport(tableName, con); break; } break; case ORACLE: con = OracleHelper.getOracleDBConnection(); OracleHelper oracleHelper = new OracleHelper(); switch(reportType){ case HTML: oracleHelper.generateOracleHTMLReport(tableName, con); break; case PDF: oracleHelper.generateOraclePDFReport(tableName, con); break; } break; } } public static enum DBTypes{ MYSQL,ORACLE; } public static enum ReportTypes{ HTML,PDF; } }public class TestFacadePattern { public static void main(String[] args) { String tableName = "Employee"; // generating MySql HTML report and Oracle PDF report without using Facade Connection con = MySqlHelper.getMySqlDBConnection(); MySqlHelper mySqlHelper = new MySqlHelper(); mySqlHelper.generateMySqlHTMLReport(tableName, con); Connection con1 = OracleHelper.getOracleDBConnection(); OracleHelper oracleHelper = new OracleHelper(); oracleHelper.generateOraclePDFReport(tableName, con1); // generating MySql HTML report and Oracle PDF report using Facade HelperFacade.generateReport(HelperFacade.DBTypes.MYSQL, HelperFacade.ReportTypes.HTML, tableName); HelperFacade.generateReport(HelperFacade.DBTypes.ORACLE, HelperFacade.ReportTypes.PDF, tableName); } }As you can see that using Facade pattern interface is a lot easier and cleaner way to avoid having a lot of logic at client side. JDBC Driver Manager class to get the database connection is a wonderful example of facade design pattern.
Facade Design Pattern Important Points
- Facade design pattern is more like a helper for client applications, it doesn’t hide subsystem interfaces from the client. Whether to use Facade or not is completely dependent on client code.
- Facade design pattern can be applied at any point of development, usually when the number of interfaces grow and system gets complex.
- Subsystem interfaces are not aware of Facade and they shouldn’t have any reference of the Facade interface.
- Facade design pattern should be applied for similar kind of interfaces, its purpose is to provide a single interface rather than multiple interfaces that does the similar kind of jobs.
- We can use Factory pattern with Facade to provide better interface to client systems.
Bridge Pattern
- When we have interface hierarchies in both interfaces as well as implementations, then bridge design pattern is used to decouple the interfaces from implementation and hiding the implementation details from the client programs.
- Decouple an abstraction from its implementation so that the two can vary independently. The implementation of bridge design pattern follows the notion to prefer Composition over inheritance.
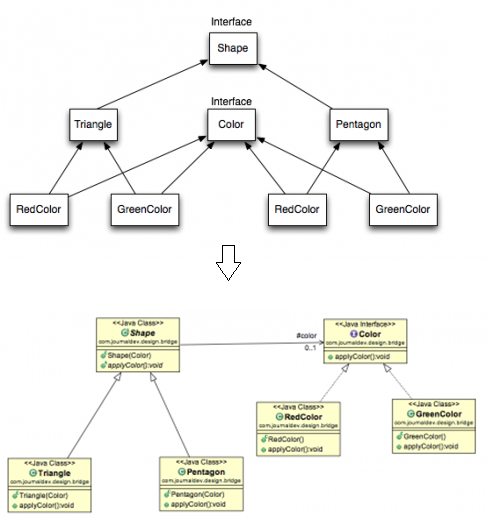
- Now we will use bridge design pattern to decouple the interfaces from implementation. UML diagram for the classes and interfaces after applying bridge pattern will look like below image.
Note - Bridge design pattern can be used when both abstraction and implementation can have different hierarchies independently and we want to hide the implementation from the client application.
public interface Color {
	public void applyColor();
}
public abstract class Shape {
 //Composition - implementor
 protected Color color;
 //constructor with implementor as input argument
 public Shape(Color c){
  this.color=c;
 }
 abstract public void applyColor();
}
public class RedColor implements Color{
	public void applyColor(){
		System.out.println("red.");
	}
}
public class GreenColor implements Color{
	public void applyColor(){
		System.out.println("green.");
	}
}
public class Pentagon extends Shape {
	public Pentagon(Color c) {
		super(c);
	}

	@Override
	public void applyColor() {
		System.out.print("Pentagon filled with color ");
		color.applyColor();
	}
}
public class Triangle extends Shape{
 public Triangle(Color c) {
  super(c);
 }
 @Override
 public void applyColor() {
  System.out.print("Triangle filled with color ");
  color.applyColor();
 }
}
public class TestBridgePattern {
 public static void main(String[] args) {
  Shape tri = new Triangle(new RedColor());
  tri.applyColor();
  Shape pent = new Pentagon(new GreenColor());
  pent.applyColor();
 }
}
Decorator Pattern
- Decorator design pattern is used to modify the functionality of an object at runtime.
- At the same time other instances of the same class will not be affected by this, so individual object gets the modified behavior.
- Decorator design pattern uses abstract classes or interface with composition to implement.
- We use inheritance or composition to extend the behavior of an object but this is done at compile time and its applicable to all the instances of the class. We can’t add any new functionality of remove any existing behavior at runtime – this is when Decorator pattern comes into picture.
- Ex. In angular we have template that is changing at runtime with change in data.
Example - Decorator Pattern
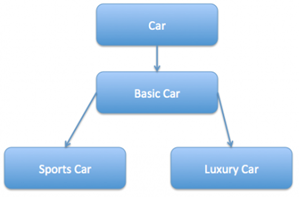
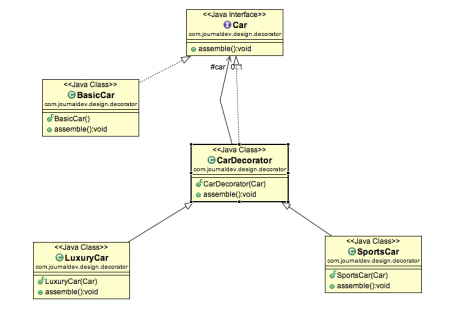
Suppose we want to implement different kinds of cars – we can create interface Car to define the assemble method and then we can have a Basic car, further more we can extend it to Sports car and Luxury Car. The implementation hierarchy will look like below image.
But if we want to get a car at runtime that has both the features of sports car and luxury car, then the implementation gets complex and if further more we want to specify which features should be added first, it gets even more complex. Now imagine if we have ten different kind of cars, the implementation logic using inheritance and composition will be impossible to manage. To solve this kind of programming situation, we apply decorator pattern in java.
Components needed for implementation
- Component Interface
- Component Implementation
- Decorator
- Concrete Decorators
1. Component Interface
interface or abstract class defining the methods that will be implemented.
public interface Car { public void assemble(); }
2. Component Implementation
The basic implementation of the component interface.
public class BasicCar implements Car {
	@Override
	public void assemble() { System.out.print("Basic Car.");}
}
3. Decorator
Decorator class implements the component interface and it has a HAS-A relationship with the component interface.
The component variable should be accessible to the child decorator classes, so we will make this variable protected.
public class CarDecorator implements Car {
	protected Car car;
	public CarDecorator(Car c){	this.car=c;	}
	@Override
	public void assemble() {this.car.assemble();	}
}
4. Concrete Decorators
Extending the base decorator functionality and modifying the component behavior accordingly. We can have concrete decorator classes as LuxuryCar and SportsCar.
public class SportsCar extends CarDecorator {
	public SportsCar(Car c) {	super(c);	}
	@Override
	public void assemble(){
		super.assemble();
		System.out.print(" Adding features of Sports Car.");
	}
}

public class LuxuryCar extends CarDecorator {
	public LuxuryCar(Car c) {	super(c);	}
	@Override
	public void assemble(){
		super.assemble();
		System.out.print(" Adding features of Luxury Car.");
	}
}
- Client program can create different kinds of Object at runtime and they can specify the order of execution too.
public class TestDecoratorPattern {
  public static void main(String[] args) {
      Car sportsCar = new SportsCar(new BasicCar());
      sportsCar.assemble();
      System.out.println("\n*****");
      Car sportsLuxuryCar = new SportsCar(new LuxuryCar(new BasicCar()));
      sportsLuxuryCar.assemble();
  }
}
Decorator Design Pattern Important Points
- Decorator design pattern is helpful in providing runtime modification abilities and hence more flexible. Its easy to maintain and extend when the number of choices are more.
- The disadvantage of decorator design pattern is that it uses a lot of similar kind of objects (decorators).
- Decorator pattern is used a lot in Java IO classes, such as FileReader, BufferedReader etc.